> ## Documentation Index
> Fetch the complete documentation index at: https://docs.coderabbit.ai/llms.txt
> Use this file to discover all available pages before exploring further.
# Schedule reports
> Set up automated recurring reports for GitHub, GitLab, Bitbucket, and Azure DevOps with customizable schedules, filters, and delivery channels including email, Slack, Discord, and Teams.
export const ProPlanBadge = ({tip = "This feature is available as part of the Pro, Pro+ and Enterprise plans. Please refer to our pricing page for more information about our plans and features.", title = "Pro Plan", cta = "Read more", href = "https://coderabbit.ai/pricing", disabled = false}) => {
return
{title}
;
};
CodeRabbit Pro offers automated recurring reports that provide insights into your organization's activities. These reports can be customized and delivered through various channels to help teams stay informed about development progress.
For a conceptual overview of reports in CodeRabbit, see [Generate
reports](/management/reports).
## Setting up a recurring report
Go to **Recurring Reports** in the [CodeRabbit
dashboard](https://app.coderabbit.ai/reports/recurring)
Click **Create Report**
Configure the following settings based on your team's needs
### Schedule configuration
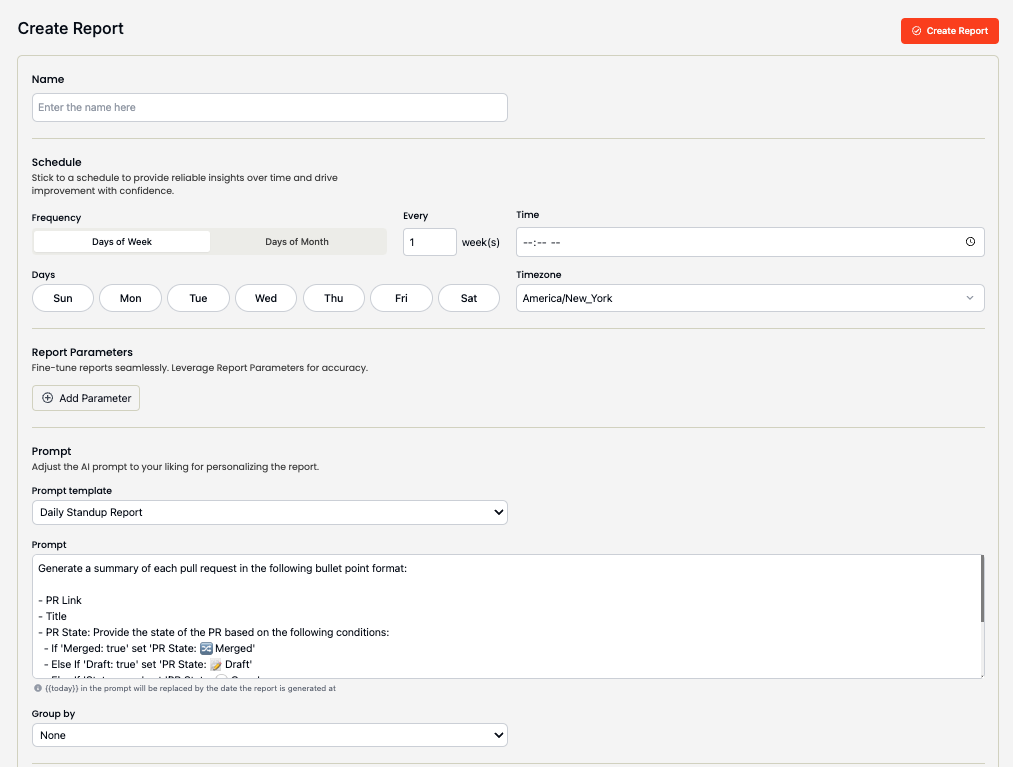 The schedule configuration allows you to set precise timing for your reports:
#### Frequency options
* Select any combination of days (Sun-Sat)
* Set frequency (every 1-3 weeks)
* Ideal for weekly team syncs or sprint reviews
* Select specific dates (1-31)
* Special date handling:
* **31st**: Runs on the last day of every month
* **30th**: Skips February
* **29th**: Only runs in February during leap years
#### Time settings
* Set specific time for report generation
* Choose from comprehensive timezone list (e.g., America/New\_York)
* Reports run at the specified time in the selected timezone
Choose a time that works for all team members, especially for distributed
teams across different time zones.
### Report parameters
Reports can be filtered using multiple parameters, match pull requests using the **IN** option and exclude pull requests using the **NOT\_IN** option:
Select specific repositories to monitor
Filter by labels with operators:
* **IN**: Match any selected label
* **NOT\_IN**: Exclude any pr with select label
* **ALL**: Match all selected labels
Filter by specific users
Filter by organization teams
Team filtering is not available for GitLab repositories
Each parameter can be:
* Added or removed as needed
* Combined with other parameters for precise filtering
* Modified using different operators
### Report content
Reports include comprehensive PR information:
* Title and description
* Creation and last activity dates
* Status (merged, mergeable, draft)
* State (open, closed, merged)
* Labels and reviewers
* Comments and discussions
* Team associations
* Repository context
* Author information
PRs are marked as stale after 168 hours (7 days) of inactivity. This helps
identify potential workflow bottlenecks.
### Report templates
CodeRabbit offers several built-in templates:
A concise summary of pull requests and activities
A structured overview of sprint goals, completed tasks, in-progress work,
and blockers
A high-level changelog with summary and significant changes
Create your own format using prompts. Allows for endless customization such
as native language reporting (Japanese, Spanish, French, etc.), custom
formatting, custom titles, and more. [Learn more about custom reports
→](/guides/custom-reports)
Example custom prompt:
```text lines Custom Prompt wrap icon="text" theme={null}
Please provide a summary of:
- All pull request activities
- Related issues and comments
- Code review discussions
- Quality gate status
Do not include:
- Bot conversations
- Sequence diagrams
```
### Communication channels
Configure where your reports will be delivered:
The schedule configuration allows you to set precise timing for your reports:
#### Frequency options
* Select any combination of days (Sun-Sat)
* Set frequency (every 1-3 weeks)
* Ideal for weekly team syncs or sprint reviews
* Select specific dates (1-31)
* Special date handling:
* **31st**: Runs on the last day of every month
* **30th**: Skips February
* **29th**: Only runs in February during leap years
#### Time settings
* Set specific time for report generation
* Choose from comprehensive timezone list (e.g., America/New\_York)
* Reports run at the specified time in the selected timezone
Choose a time that works for all team members, especially for distributed
teams across different time zones.
### Report parameters
Reports can be filtered using multiple parameters, match pull requests using the **IN** option and exclude pull requests using the **NOT\_IN** option:
Select specific repositories to monitor
Filter by labels with operators:
* **IN**: Match any selected label
* **NOT\_IN**: Exclude any pr with select label
* **ALL**: Match all selected labels
Filter by specific users
Filter by organization teams
Team filtering is not available for GitLab repositories
Each parameter can be:
* Added or removed as needed
* Combined with other parameters for precise filtering
* Modified using different operators
### Report content
Reports include comprehensive PR information:
* Title and description
* Creation and last activity dates
* Status (merged, mergeable, draft)
* State (open, closed, merged)
* Labels and reviewers
* Comments and discussions
* Team associations
* Repository context
* Author information
PRs are marked as stale after 168 hours (7 days) of inactivity. This helps
identify potential workflow bottlenecks.
### Report templates
CodeRabbit offers several built-in templates:
A concise summary of pull requests and activities
A structured overview of sprint goals, completed tasks, in-progress work,
and blockers
A high-level changelog with summary and significant changes
Create your own format using prompts. Allows for endless customization such
as native language reporting (Japanese, Spanish, French, etc.), custom
formatting, custom titles, and more. [Learn more about custom reports
→](/guides/custom-reports)
Example custom prompt:
```text lines Custom Prompt wrap icon="text" theme={null}
Please provide a summary of:
- All pull request activities
- Related issues and comments
- Code review discussions
- Quality gate status
Do not include:
- Bot conversations
- Sequence diagrams
```
### Communication channels
Configure where your reports will be delivered:
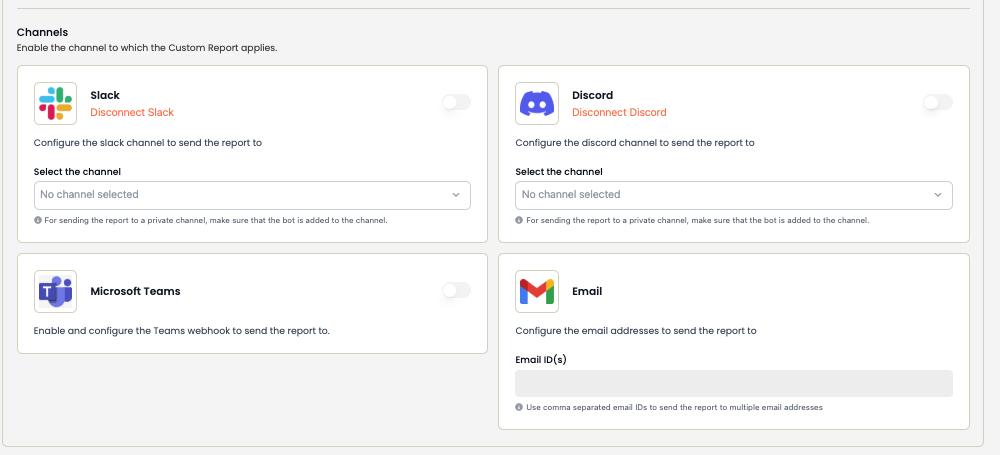 * Enter individual email addresses
* Use distribution lists for team-wide delivery
Connect your workspace through OAuth
Select target channels
CodeRabbit bot will be installed automatically
If installation fails check the [slack service](https://slack-status.com/) or [discord status](https://discordstatus.com/) page for any outages.
Create a webhook in your Teams channel
Add the webhook URL to CodeRabbit
Select target channels
Create separate reports if you need to send to multiple channels with
different formats. Learn more about [custom report
formats](/guides/custom-reports).
## Managing reports
### Preview reports
Test your configuration using the **Preview Report** button to generate a
sample report instantly.
### Grouping options
Reports can be organized hierarchically using groups and subgroups:
Select from these options to organize your main report structure:
* **None**: No grouping, flat list of items
* **Repository**: Group by source repository
* **Label**: Group by PR labels
* **Team**: Group by team ownership
* **User**: Group by PR author
After selecting a primary group, you can add a secondary level of organization:
* Choose any remaining grouping option for further categorization
* Subgroups create a nested hierarchy within primary groups
* Select "None" to use only primary grouping
Choose grouping options that match your team's workflow. For example:
* Use Repository → Team for large multi-team organizations
* Use User → Label to track individual contributions by type
* Use Team → Repository to monitor team activity across repos
### Report lifecycle management
Control your reports through their entire lifecycle:
#### Editing reports
Make your desired changes to any configuration settings
Click the **Save** button to apply your changes
Changes take effect from the next scheduled run
Remember to click **Save** when you're done making changes. Your modifications
will be discarded if you navigate away without saving.
#### Disabling reports
Toggle the **Active** switch to temporarily pause a report.
Disabled reports:
* Maintain their configuration
* Skip scheduled runs
* Can be re-enabled at any time
* Show "Disabled" status in the dashboard
#### Deleting reports
Click the **Delete** button (trash icon) next to the report
Confirm deletion in the modal
This action is permanent and cannot be undone. All report history and
configuration will be removed.
Deleting a report will immediately stop all scheduled runs and remove access
to historical reports. Consider disabling instead of deleting if you might
need the report again.
## Best practices
* Align report timing with your team's workflow
* Consider timezone differences for distributed teams
* Keep prompts focused on actionable information
* Use grouping to improve readability
* Exclude unnecessary details that may create noise
* Use channels your team actively monitors
* Consider creating separate reports for different audiences (e.g., management vs. development team)
## Related resources
Create personalized report formats
## What's next
Learn how to create custom report formats and prompts
* Enter individual email addresses
* Use distribution lists for team-wide delivery
Connect your workspace through OAuth
Select target channels
CodeRabbit bot will be installed automatically
If installation fails check the [slack service](https://slack-status.com/) or [discord status](https://discordstatus.com/) page for any outages.
Create a webhook in your Teams channel
Add the webhook URL to CodeRabbit
Select target channels
Create separate reports if you need to send to multiple channels with
different formats. Learn more about [custom report
formats](/guides/custom-reports).
## Managing reports
### Preview reports
Test your configuration using the **Preview Report** button to generate a
sample report instantly.
### Grouping options
Reports can be organized hierarchically using groups and subgroups:
Select from these options to organize your main report structure:
* **None**: No grouping, flat list of items
* **Repository**: Group by source repository
* **Label**: Group by PR labels
* **Team**: Group by team ownership
* **User**: Group by PR author
After selecting a primary group, you can add a secondary level of organization:
* Choose any remaining grouping option for further categorization
* Subgroups create a nested hierarchy within primary groups
* Select "None" to use only primary grouping
Choose grouping options that match your team's workflow. For example:
* Use Repository → Team for large multi-team organizations
* Use User → Label to track individual contributions by type
* Use Team → Repository to monitor team activity across repos
### Report lifecycle management
Control your reports through their entire lifecycle:
#### Editing reports
Make your desired changes to any configuration settings
Click the **Save** button to apply your changes
Changes take effect from the next scheduled run
Remember to click **Save** when you're done making changes. Your modifications
will be discarded if you navigate away without saving.
#### Disabling reports
Toggle the **Active** switch to temporarily pause a report.
Disabled reports:
* Maintain their configuration
* Skip scheduled runs
* Can be re-enabled at any time
* Show "Disabled" status in the dashboard
#### Deleting reports
Click the **Delete** button (trash icon) next to the report
Confirm deletion in the modal
This action is permanent and cannot be undone. All report history and
configuration will be removed.
Deleting a report will immediately stop all scheduled runs and remove access
to historical reports. Consider disabling instead of deleting if you might
need the report again.
## Best practices
* Align report timing with your team's workflow
* Consider timezone differences for distributed teams
* Keep prompts focused on actionable information
* Use grouping to improve readability
* Exclude unnecessary details that may create noise
* Use channels your team actively monitors
* Consider creating separate reports for different audiences (e.g., management vs. development team)
## Related resources
Create personalized report formats
## What's next
Learn how to create custom report formats and prompts