> ## Documentation Index
> Fetch the complete documentation index at: https://docs.coderabbit.ai/llms.txt
> Use this file to discover all available pages before exploring further.
# Jira Integration
> Connect CodeRabbit to Jira to enrich pull request reviews with issue context, validate changes against acceptance criteria, create issues from review comments, and design Coding Plans.
export const Hint = ({type, children, headline, tip, href, cta}) => {
const TIPS = {
learnings: {
headline: "Learnings",
tip: "Review preferences CodeRabbit learns from your chat conversations and applies automatically to future reviews.",
cta: "Learn about Learnings",
href: "/knowledge-base/learnings",
content: "Learnings"
},
walkthrough: {
headline: "PR Walkthrough",
tip: "A structured comment posted by CodeRabbit at the top of every pull request, summarizing changes, sequence diagrams, review effort, and more.",
cta: "Learn about PR Walkthroughs",
href: "/pr-reviews/walkthroughs",
content: "Walkthrough"
},
"finishing-touches": {
headline: "Finishing Touches",
tip: "Post-review agentic actions (Autofix, writing docstrings or unit tests, and more) you trigger from a PR comment or a checkbox in the Walkthrough.",
cta: "See all Finishing Touches",
href: "/finishing-touches",
content: "Finishing Touches"
},
"coding-plan": {
headline: "Coding Plan",
tip: "A detailed, codebase-aware implementation plan CodeRabbit generates from an issue or description, ready to hand off to any coding agent.",
cta: "Learn about Coding Plans",
href: "/plan",
content: "Coding Plan"
},
"knowledge-base": {
headline: "Knowledge Base",
tip: "The collected context sources CodeRabbit draws on during reviews: Learnings, Code Guidelines, issue trackers, connected MCP servers, and cross-repo analysis.",
cta: "Explore the Knowledge Base",
href: "/knowledge-base",
content: "Knowledge Base"
},
"path-instructions": {
headline: "Path Instructions",
tip: "Custom review rules that only apply to files matching a glob pattern, e.g. 'src/controllers/**'.",
cta: "Configure path instructions",
href: "/configuration/path-instructions",
content: "Path Instructions"
},
"coderabbit-review": {
headline: "CodeRabbit Review",
tip: "An improved code inspection interface that reorganizes a pull request from a flat file list into a structured, layer-by-layer walkthrough with range-specific summaries and diagrams.",
cta: "Learn about CodeRabbit Review",
href: "/pr-reviews/coderabbit-review",
content: "CodeRabbit Review"
},
scope: {
headline: "Scope",
tip: "A named set of repositories, connections, and spend limits that controls what CodeRabbit Agent can access in a given Slack conversation.",
cta: "Learn about Scopes",
href: "/slack-agent/scopes",
content: "Scope"
},
"coderabbit-agent": {
headline: "CodeRabbit Agent for Slack",
tip: "An AI agent built into Slack that investigates issues, generates implementation plans, and opens pull requests right from the Slack threads.",
cta: "Explore CodeRabbit Agent",
href: "/slack-agent",
content: "CodeRabbit Agent"
},
"configuration-inheritance": {
headline: "Configuration Inheritance",
tip: "A setting that merges configuration values across multiple levels — repository YAML, central YAML, and UI settings — instead of using only the highest-priority source.",
cta: "Learn about Configuration Inheritance",
href: "/configuration/configuration-inheritance",
content: "Configuration Inheritance"
}
};
const defaults = TIPS[type] || ({});
return
{children ?? defaults.content}
;
};
export const ProPlanBadge = ({tip = "This feature is available as part of the Pro, Pro+ and Enterprise plans. Please refer to our pricing page for more information about our plans and features.", title = "Pro Plan", cta = "Read more", href = "https://coderabbit.ai/pricing", disabled = false}) => {
return
{title}
;
};
export const AllPlatformsBadge = ({tip = "This feature is available on all supported platforms: GitHub, GitLab, Azure DevOps, and Bitbucket.", title = "All Platforms", cta, href, disabled = false}) => {
return
{title}
;
};
|
## Overview
The Jira integration connects CodeRabbit to your Jira workspace, bringing issue context into every stage of development. Here's what the integration enables:
Pulls in Jira issue details so CodeRabbit understands *why* a change is
being made
Assesses whether code changes address the linked issue's acceptance criteria
Generates step-by-step Coding Plans from Jira issues for coding agents and
IDE copilots
Creates new Jira issues directly from PR review comments
## Prerequisites
Before setting up the Jira integration, ensure you have:
* A **Jira Cloud** account (for Jira Data Center or self-hosted, see [Jira Data Center](#jira-data-center-self-hosted) below)
* Admin access to install apps on your Jira site
* A CodeRabbit Pro plan
## Install the Jira Cloud integration
The Jira Cloud integration uses a Forge app from the Atlassian Marketplace. Follow these steps to connect your Jira site to CodeRabbit:
Navigate to
[Integrations](https://app.coderabbit.ai/integrations?tab=integrations) in
the CodeRabbit app and toggle **Jira** to enable the integration.
A modal appears with setup instructions and an **Installation Secret**
(valid for 15 minutes). Copy the secret, then click **Open Atlassian
Installation**.
On the Atlassian Marketplace page for the CodeRabbit app, click **Get app**.
Choose which Jira site to install the CodeRabbit app on and click
**Install**.
In your Jira site, click the **Settings** gear icon and select **Marketplace
apps**.
Under **Apps**, select **CodeRabbit**. On the CodeRabbit Setup page, paste
the Installation Secret you copied earlier and click **Complete Setup**.
Return to CodeRabbit and click **Refresh Status** to confirm the integration
is connected.
The Installation Secret expires after 15 minutes. If it expires before you
complete the setup, start the process again from step 1.
## Jira Data Center (Self-Hosted)
For self-hosted Jira Data Center installations, a different setup process applies.
## Configure CodeRabbit for Jira
After connecting Jira, configure which Jira projects CodeRabbit should access by adding your project keys. The project key is the prefix that appears before issue numbers—for example, if your issue URL is `https://company.atlassian.net/browse/PROJ-123`, the project key is `PROJ`.
Add the `project_keys` setting under `knowledge_base.jira` in your `.coderabbit.yaml` file:
```yaml .coderabbit.yaml theme={null}
# yaml-language-server: $schema=https://coderabbit.ai/integrations/schema.v2.json
knowledge_base:
jira:
usage: "enabled"
project_keys:
- "PROJ"
- "DEV"
- "BACKEND"
chat:
integrations:
jira:
usage: "enabled"
```
The `usage` setting controls when the integration is active:
* `auto` (default): Disabled for public repositories, enabled for private repositories
* `enabled`: Always enabled
* `disabled`: Always disabled
1. Navigate to your repository or organization settings in the [CodeRabbit app](https://app.coderabbit.ai)
2. Go to **Configuration** → **Knowledge Base**
3. Under **Jira**, add your project keys
4. Save the configuration
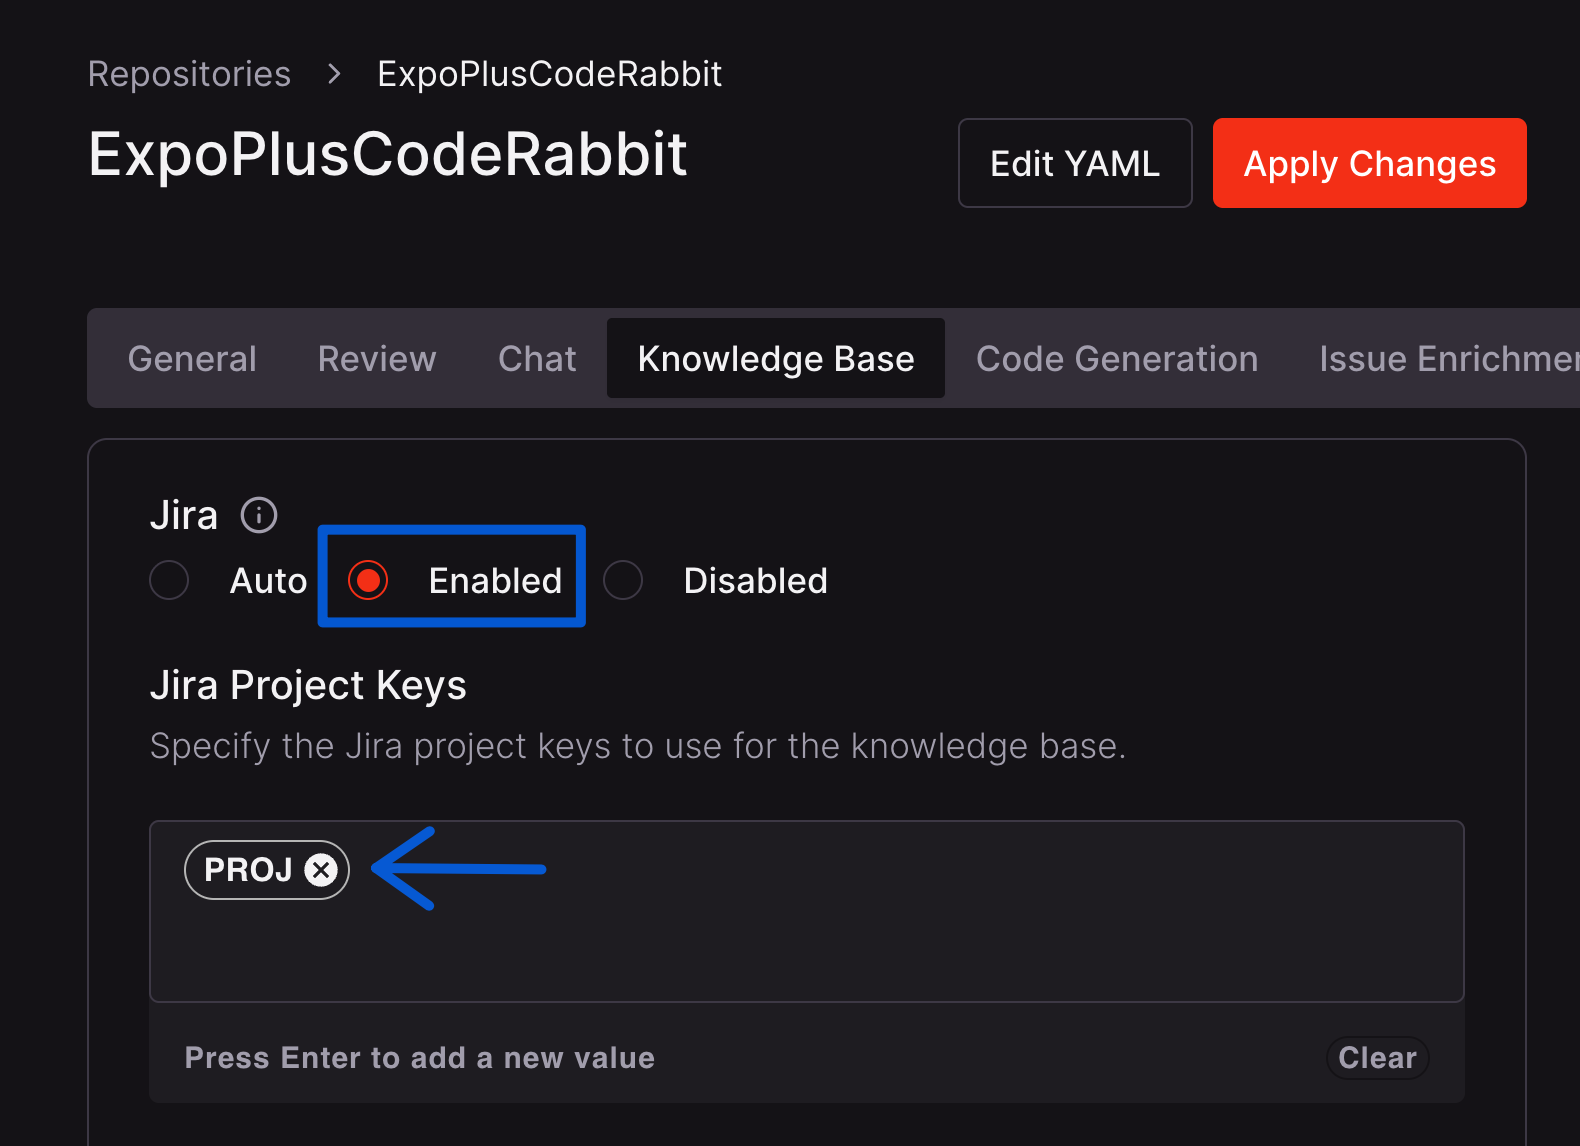 By default, Jira integration is enabled for private repositories and disabled
for public repositories. You can override this behavior by setting
`knowledge_base.jira.usage: enabled` and `chat.integrations.jira.usage:
enabled` in your `.coderabbit.yaml` file or using the web interface. See the
[Configuration reference](/reference/configuration) for details.
## Example usage
### Linking Jira issues to pull requests
To have CodeRabbit validate requirements from a Jira issue, include the issue URL in your pull request description:
```md theme={null}
This PR implements the user authentication flow.
Closes https://company.atlassian.net/browse/PROJ-123
```
CodeRabbit will fetch the issue details and assess whether your code changes address the requirements specified in the issue. See the [Linked issues guide](/issues/pr-validation) for best practices on linking issues.
### Creating Jira issues from reviews
During a code review, you can ask CodeRabbit to create a Jira issue by mentioning `@coderabbitai` in a comment:
```md theme={null}
@coderabbitai create a Jira issue for this technical debt in the PROJ project
```
CodeRabbit will create a well-structured issue with relevant context from the code review discussion. See the [Issue creation guide](/issues/creation) for more details.
## Related resources
Best practices for linking issues to pull requests
Generate Coding Plans from issues for coding agents
Create issues directly from CodeRabbit reviews
By default, Jira integration is enabled for private repositories and disabled
for public repositories. You can override this behavior by setting
`knowledge_base.jira.usage: enabled` and `chat.integrations.jira.usage:
enabled` in your `.coderabbit.yaml` file or using the web interface. See the
[Configuration reference](/reference/configuration) for details.
## Example usage
### Linking Jira issues to pull requests
To have CodeRabbit validate requirements from a Jira issue, include the issue URL in your pull request description:
```md theme={null}
This PR implements the user authentication flow.
Closes https://company.atlassian.net/browse/PROJ-123
```
CodeRabbit will fetch the issue details and assess whether your code changes address the requirements specified in the issue. See the [Linked issues guide](/issues/pr-validation) for best practices on linking issues.
### Creating Jira issues from reviews
During a code review, you can ask CodeRabbit to create a Jira issue by mentioning `@coderabbitai` in a comment:
```md theme={null}
@coderabbitai create a Jira issue for this technical debt in the PROJ project
```
CodeRabbit will create a well-structured issue with relevant context from the code review discussion. See the [Issue creation guide](/issues/creation) for more details.
## Related resources
Best practices for linking issues to pull requests
Generate Coding Plans from issues for coding agents
Create issues directly from CodeRabbit reviews