> ## Documentation Index
> Fetch the complete documentation index at: https://docs.coderabbit.ai/llms.txt
> Use this file to discover all available pages before exploring further.
# Azure DevOps
> Learn how to integrate CodeRabbit with Azure DevOps repositories using personal access tokens for automated AI-powered code reviews and pull request analysis.
For an overview of how CodeRabbit integrates with Git platforms, see [Platform Integration Overview](/platforms/overview).
For a hands-on tutorial with CodeRabbit performing code reviews on a live repository, see [Quickstart](/getting-started/quickstart).
CodeRabbit enhances your Azure DevOps development workflow by providing:
* **Automated code reviews** for newly created pull requests
* **AI-powered suggestions** displayed directly on pull requests
* **Interactive assistance** through the CodeRabbit bot for real-time feedback
* **Seamless integration** with your existing Azure DevOps workflow
To interact with CodeRabbit in pull request comments, use `@coderabbitai` — or the username of the service account you configure below, if it differs.
## Prerequisites
**Required Setup**
* Entra ID must be enabled for the organization
* An active Azure DevOps account
* Organizational email addresses are required; personal email addresses are not supported for this integration
* Admin approval permissions for Microsoft Apps consent requests
* The user installing CodeRabbit must have `Project Collection Administrator` permissions
## Integration Instructions
Navigate to the [CodeRabbit application](https://app.coderabbit.ai) and log
in with your account.
You'll be redirected to a page displaying Microsoft Apps consent requests.
If you are an administrator, you may approve the applications directly. If
not, please contact your administrator to request approval for the
applications.
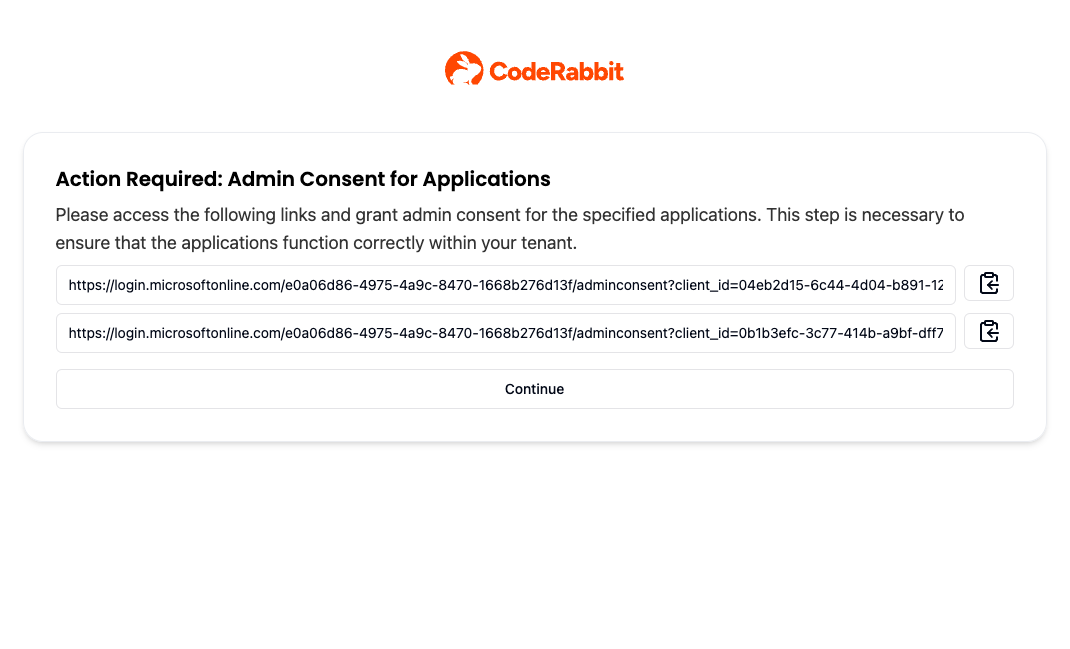 Once your administrator has approved the applications, click **Continue**.
You'll be redirected to the "Onboarding" page where you can select the
organization you wish to integrate with.
On the "Azure DevOps User" page, enter your Personal Access Token for Azure
DevOps.
Once your administrator has approved the applications, click **Continue**.
You'll be redirected to the "Onboarding" page where you can select the
organization you wish to integrate with.
On the "Azure DevOps User" page, enter your Personal Access Token for Azure
DevOps. 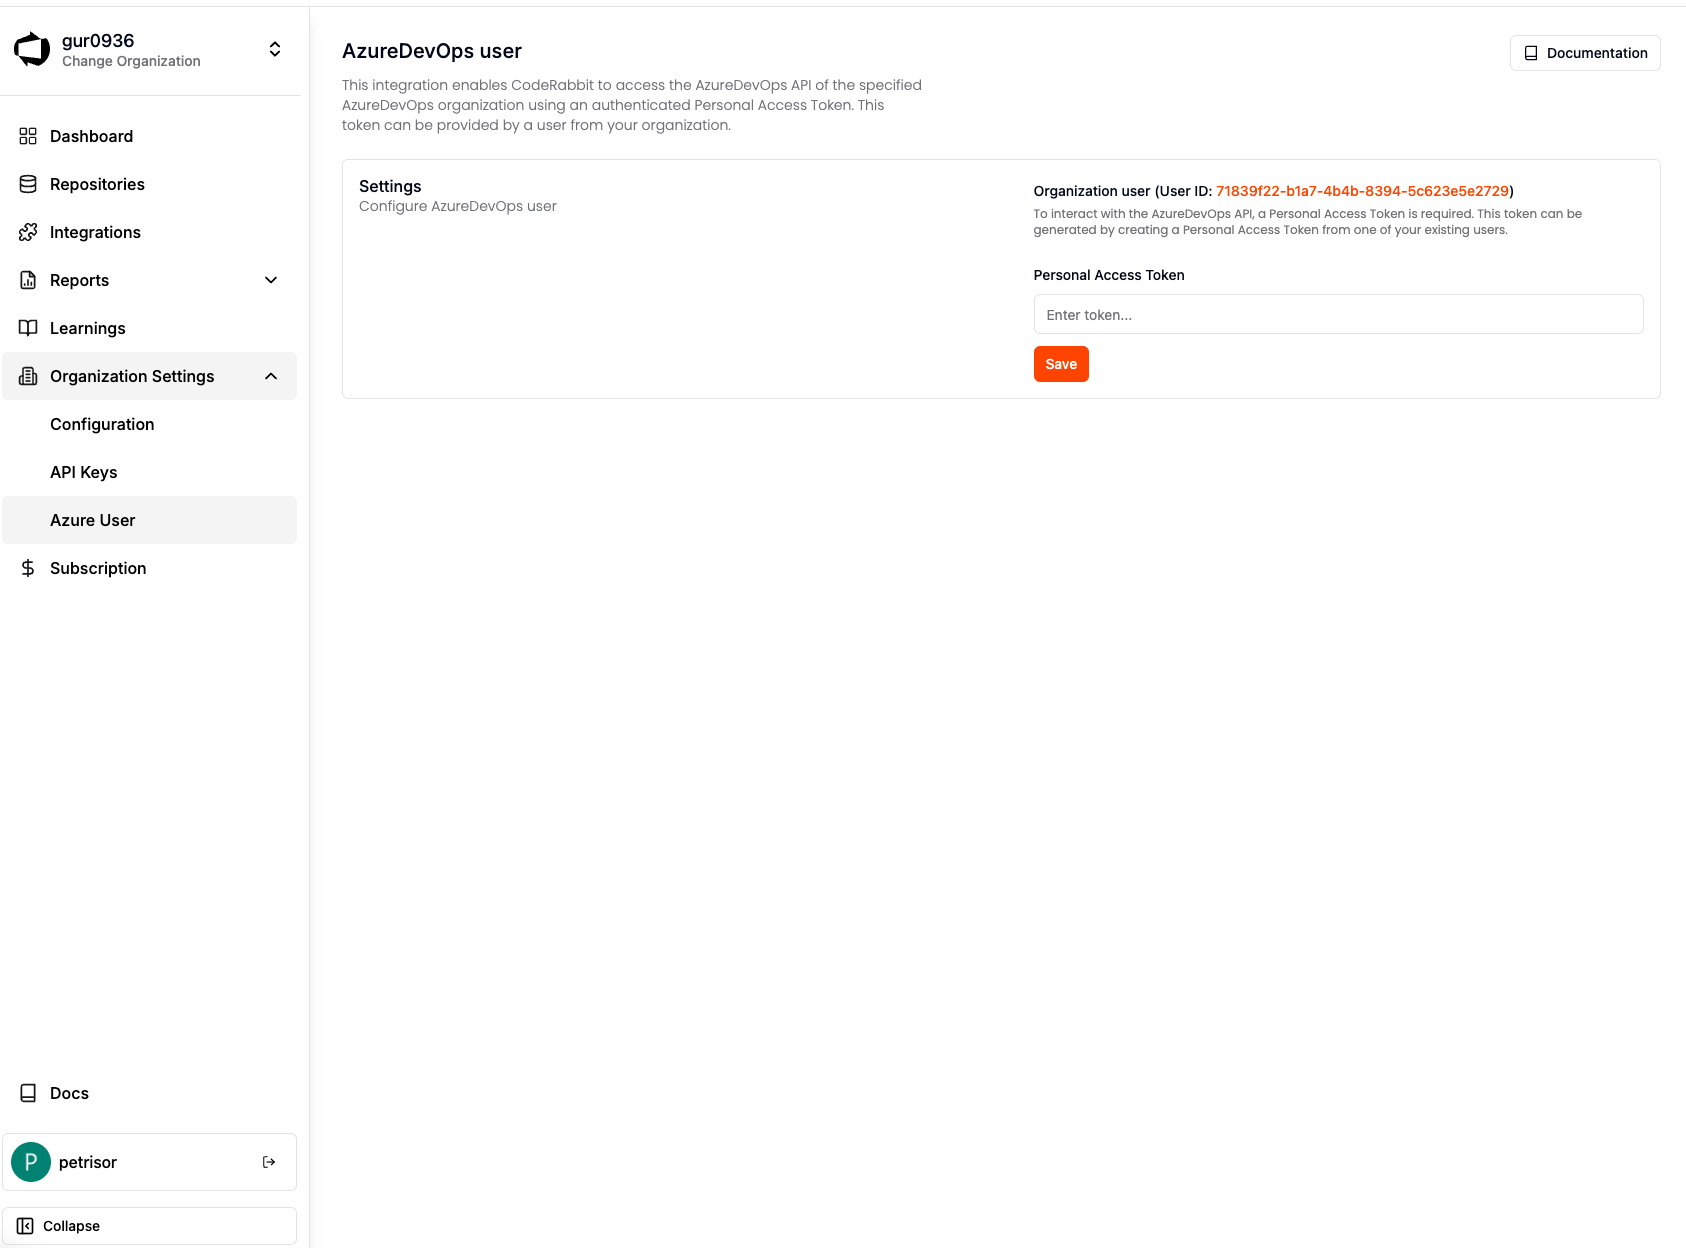 To install CodeRabbit on a repository, toggle the switch on the
"Repositories" page.
## How it works
For the CodeRabbit app to post reviews on pull requests, it needs to interact with the Azure DevOps API, which requires a Personal Access Token. This token can be generated by creating a Personal Access Token from one of your existing users.
You can create a new user in Azure DevOps and generate a Personal Access Token for that user, following [our recommendations](#recommendations).
## Azure DevOps Personal Access Tokens
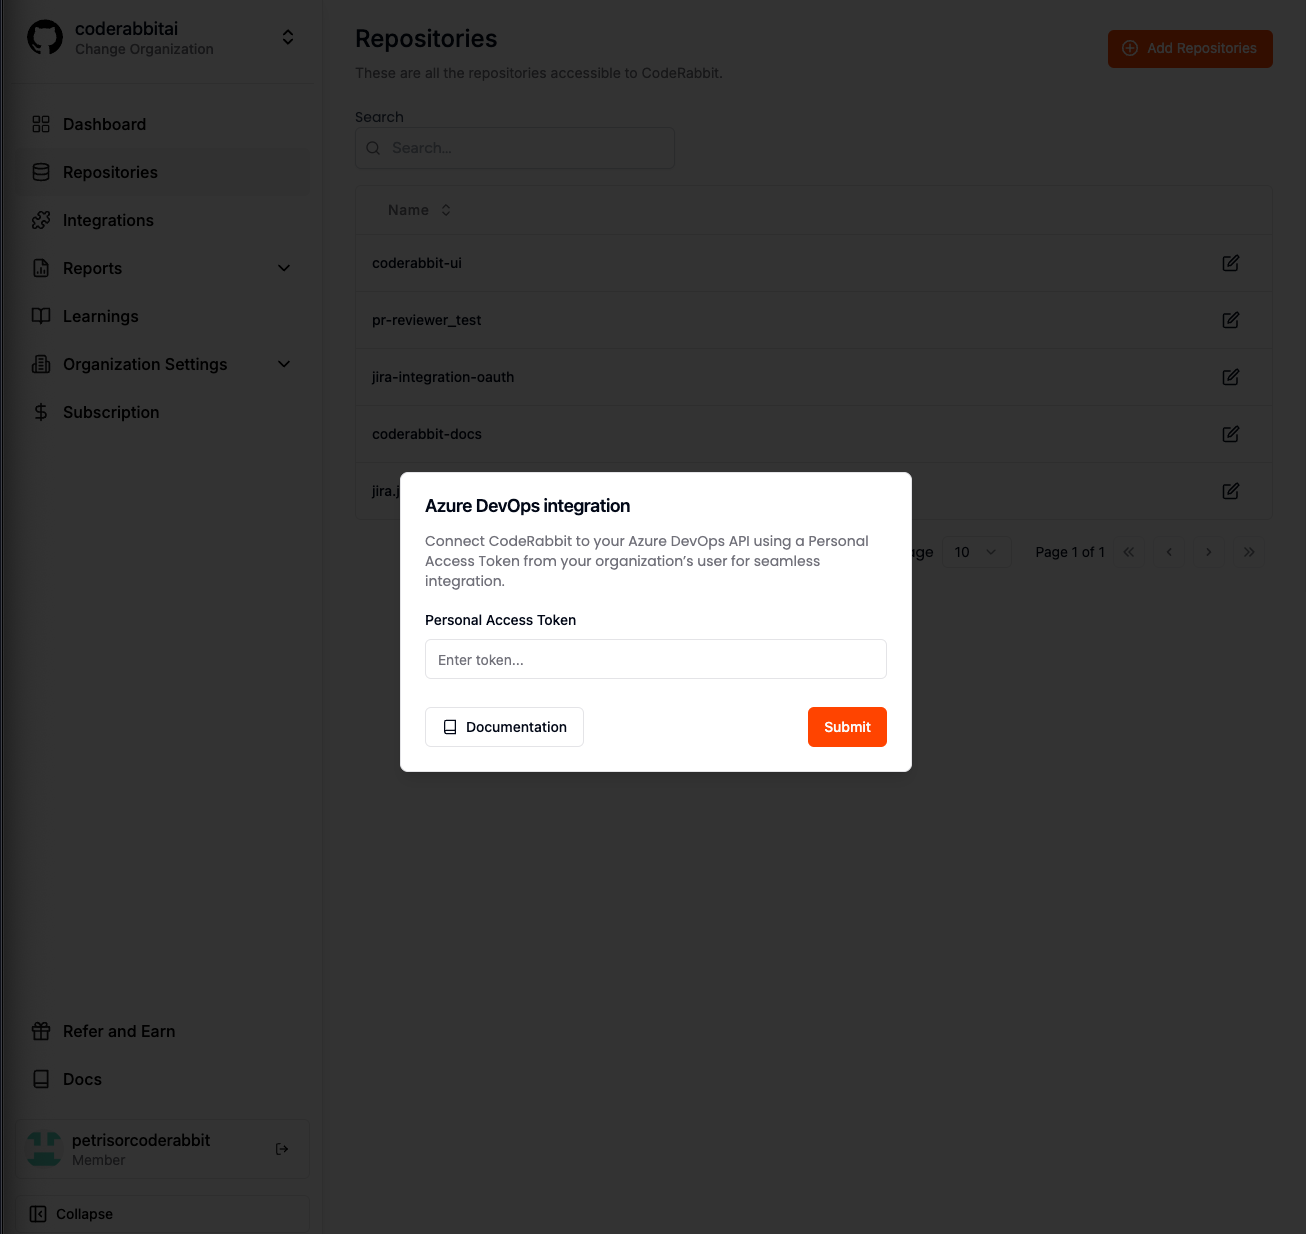
To interact with the Azure DevOps API, a **Personal Access Token** is required. This token can be generated by creating a **Personal Access Token** from one of your existing users.
Upon first login to the application (immediately after the onboarding screen), you will need to add the Personal Access Token.
To install CodeRabbit on a repository, toggle the switch on the
"Repositories" page.
## How it works
For the CodeRabbit app to post reviews on pull requests, it needs to interact with the Azure DevOps API, which requires a Personal Access Token. This token can be generated by creating a Personal Access Token from one of your existing users.
You can create a new user in Azure DevOps and generate a Personal Access Token for that user, following [our recommendations](#recommendations).
## Azure DevOps Personal Access Tokens
To interact with the Azure DevOps API, a **Personal Access Token** is required. This token can be generated by creating a **Personal Access Token** from one of your existing users.
Upon first login to the application (immediately after the onboarding screen), you will need to add the Personal Access Token.
 ### Recommendations
**Best Practices for Azure DevOps Integration:**
* **Create a dedicated user for CodeRabbit** - This ensures the user is exclusively for CodeRabbit, allowing better access control
* **Use "CodeRabbit" as the username** - This makes the user easily recognizable for future reference
* **Use a dedicated email address** - This helps in easy identification and management
* **Use the CodeRabbit logo as the profile picture** - This further ensures easy recognition. You can download our logo from [here](https://www.coderabbit.ai/brand "download")
### Key Points to Remember
**Token Management:**
* Personal access tokens have expiration dates. Ensure the expiration date covers the duration of your intended use of the CodeRabbit app
* Code reviews will be attributed to the owner of the personal access token
* If the personal access token expires, you can add a new one via the CodeRabbit UI:
* Navigate to the **Azure DevOps User** page in the sidebar
* Add the new token and click **Save**
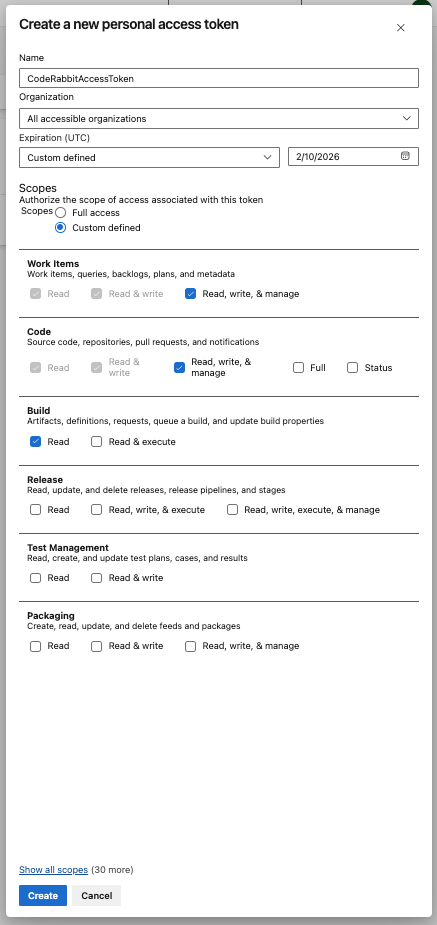
### Generating a Personal Access Token
Azure DevOps provides an option to generate a personal access token for a user. Follow these steps to generate the token:
Log in as the user intended for CodeRabbit reviews.
Next to your avatar on the header's right side is a settings icon, click it,
then choose **Personal Access Tokens**.
Click **New Token**.
Select the organization you want to use the token with or select **All
accessible organizations**.
Enter a name and an expiry date for the token.
Grant the following permissions:
* **Read, write, & manage** access to **Work Items** and **Code** (required for code reviews)
* **Read** access to **Build** (optional, for CodeRabbit Pro pipeline failure remediation)
Click **Create** and save the generated token securely as it will only be
displayed once.
### Recommendations
**Best Practices for Azure DevOps Integration:**
* **Create a dedicated user for CodeRabbit** - This ensures the user is exclusively for CodeRabbit, allowing better access control
* **Use "CodeRabbit" as the username** - This makes the user easily recognizable for future reference
* **Use a dedicated email address** - This helps in easy identification and management
* **Use the CodeRabbit logo as the profile picture** - This further ensures easy recognition. You can download our logo from [here](https://www.coderabbit.ai/brand "download")
### Key Points to Remember
**Token Management:**
* Personal access tokens have expiration dates. Ensure the expiration date covers the duration of your intended use of the CodeRabbit app
* Code reviews will be attributed to the owner of the personal access token
* If the personal access token expires, you can add a new one via the CodeRabbit UI:
* Navigate to the **Azure DevOps User** page in the sidebar
* Add the new token and click **Save**
### Generating a Personal Access Token
Azure DevOps provides an option to generate a personal access token for a user. Follow these steps to generate the token:
Log in as the user intended for CodeRabbit reviews.
Next to your avatar on the header's right side is a settings icon, click it,
then choose **Personal Access Tokens**.
Click **New Token**.
Select the organization you want to use the token with or select **All
accessible organizations**.
Enter a name and an expiry date for the token.
Grant the following permissions:
* **Read, write, & manage** access to **Work Items** and **Code** (required for code reviews)
* **Read** access to **Build** (optional, for CodeRabbit Pro pipeline failure remediation)
Click **Create** and save the generated token securely as it will only be
displayed once.