> ## Documentation Index
> Fetch the complete documentation index at: https://docs.coderabbit.ai/llms.txt
> Use this file to discover all available pages before exploring further.
# GitHub Enterprise Server
> Complete guide to integrate CodeRabbit with your self-hosted GitHub Enterprise Server. Set up OAuth apps, GitHub apps, webhooks, and configure AI-powered code reviews for your enterprise development workflow.
export const GitHubBadge = ({tip = "This feature is available on GitHub and GitHub Enterprise.", title = "GitHub", cta, href, disabled = false}) => {
return
{title}
;
};
CodeRabbit integrates seamlessly with your self-hosted GitHub Enterprise Server to provide AI-powered code reviews directly within your development workflow. This comprehensive guide walks you through the complete setup process.
GitHub Enterprise Cloud customers using a data-residency or Enterprise Managed Users host such as `https://example.ghe.com` should also use the **Self-Hosted GitHub** setup flow. Standard GitHub.com organizations should use the [GitHub guide](/platforms/github-com) instead.
For an overview of all supported Git platforms, see [Platform overview](/platforms/overview).
If your GHES instance cannot accept inbound network access from CodeRabbit, see the [CodeRabbit Reverse Tunnel reference](/self-hosted/coderabbit-reverse-tunnel) for the private-network connectivity option.
**Before you begin:** Ensure you have the following prerequisites before starting the integration process:
* **Administrative privileges** on your GitHub Enterprise Server instance, or enterprise-owner access for a GitHub Enterprise Cloud data-residency host ending in `.ghe.com`
* **Access to create OAuth Apps and GitHub Apps** in your organization
* **Network connectivity** allowing webhooks from CodeRabbit to your instance
* **Ability to allow list IP addresses** if required by your security policy
## Integration overview
The GitHub Enterprise Server integration requires several components working together:
Handles user authentication and login flow
Provides repository access and webhook functionality
Enables real-time event processing
Allows CodeRabbit to communicate with your instance
## Setup process
Follow these steps to integrate CodeRabbit with your GitHub Enterprise Server:
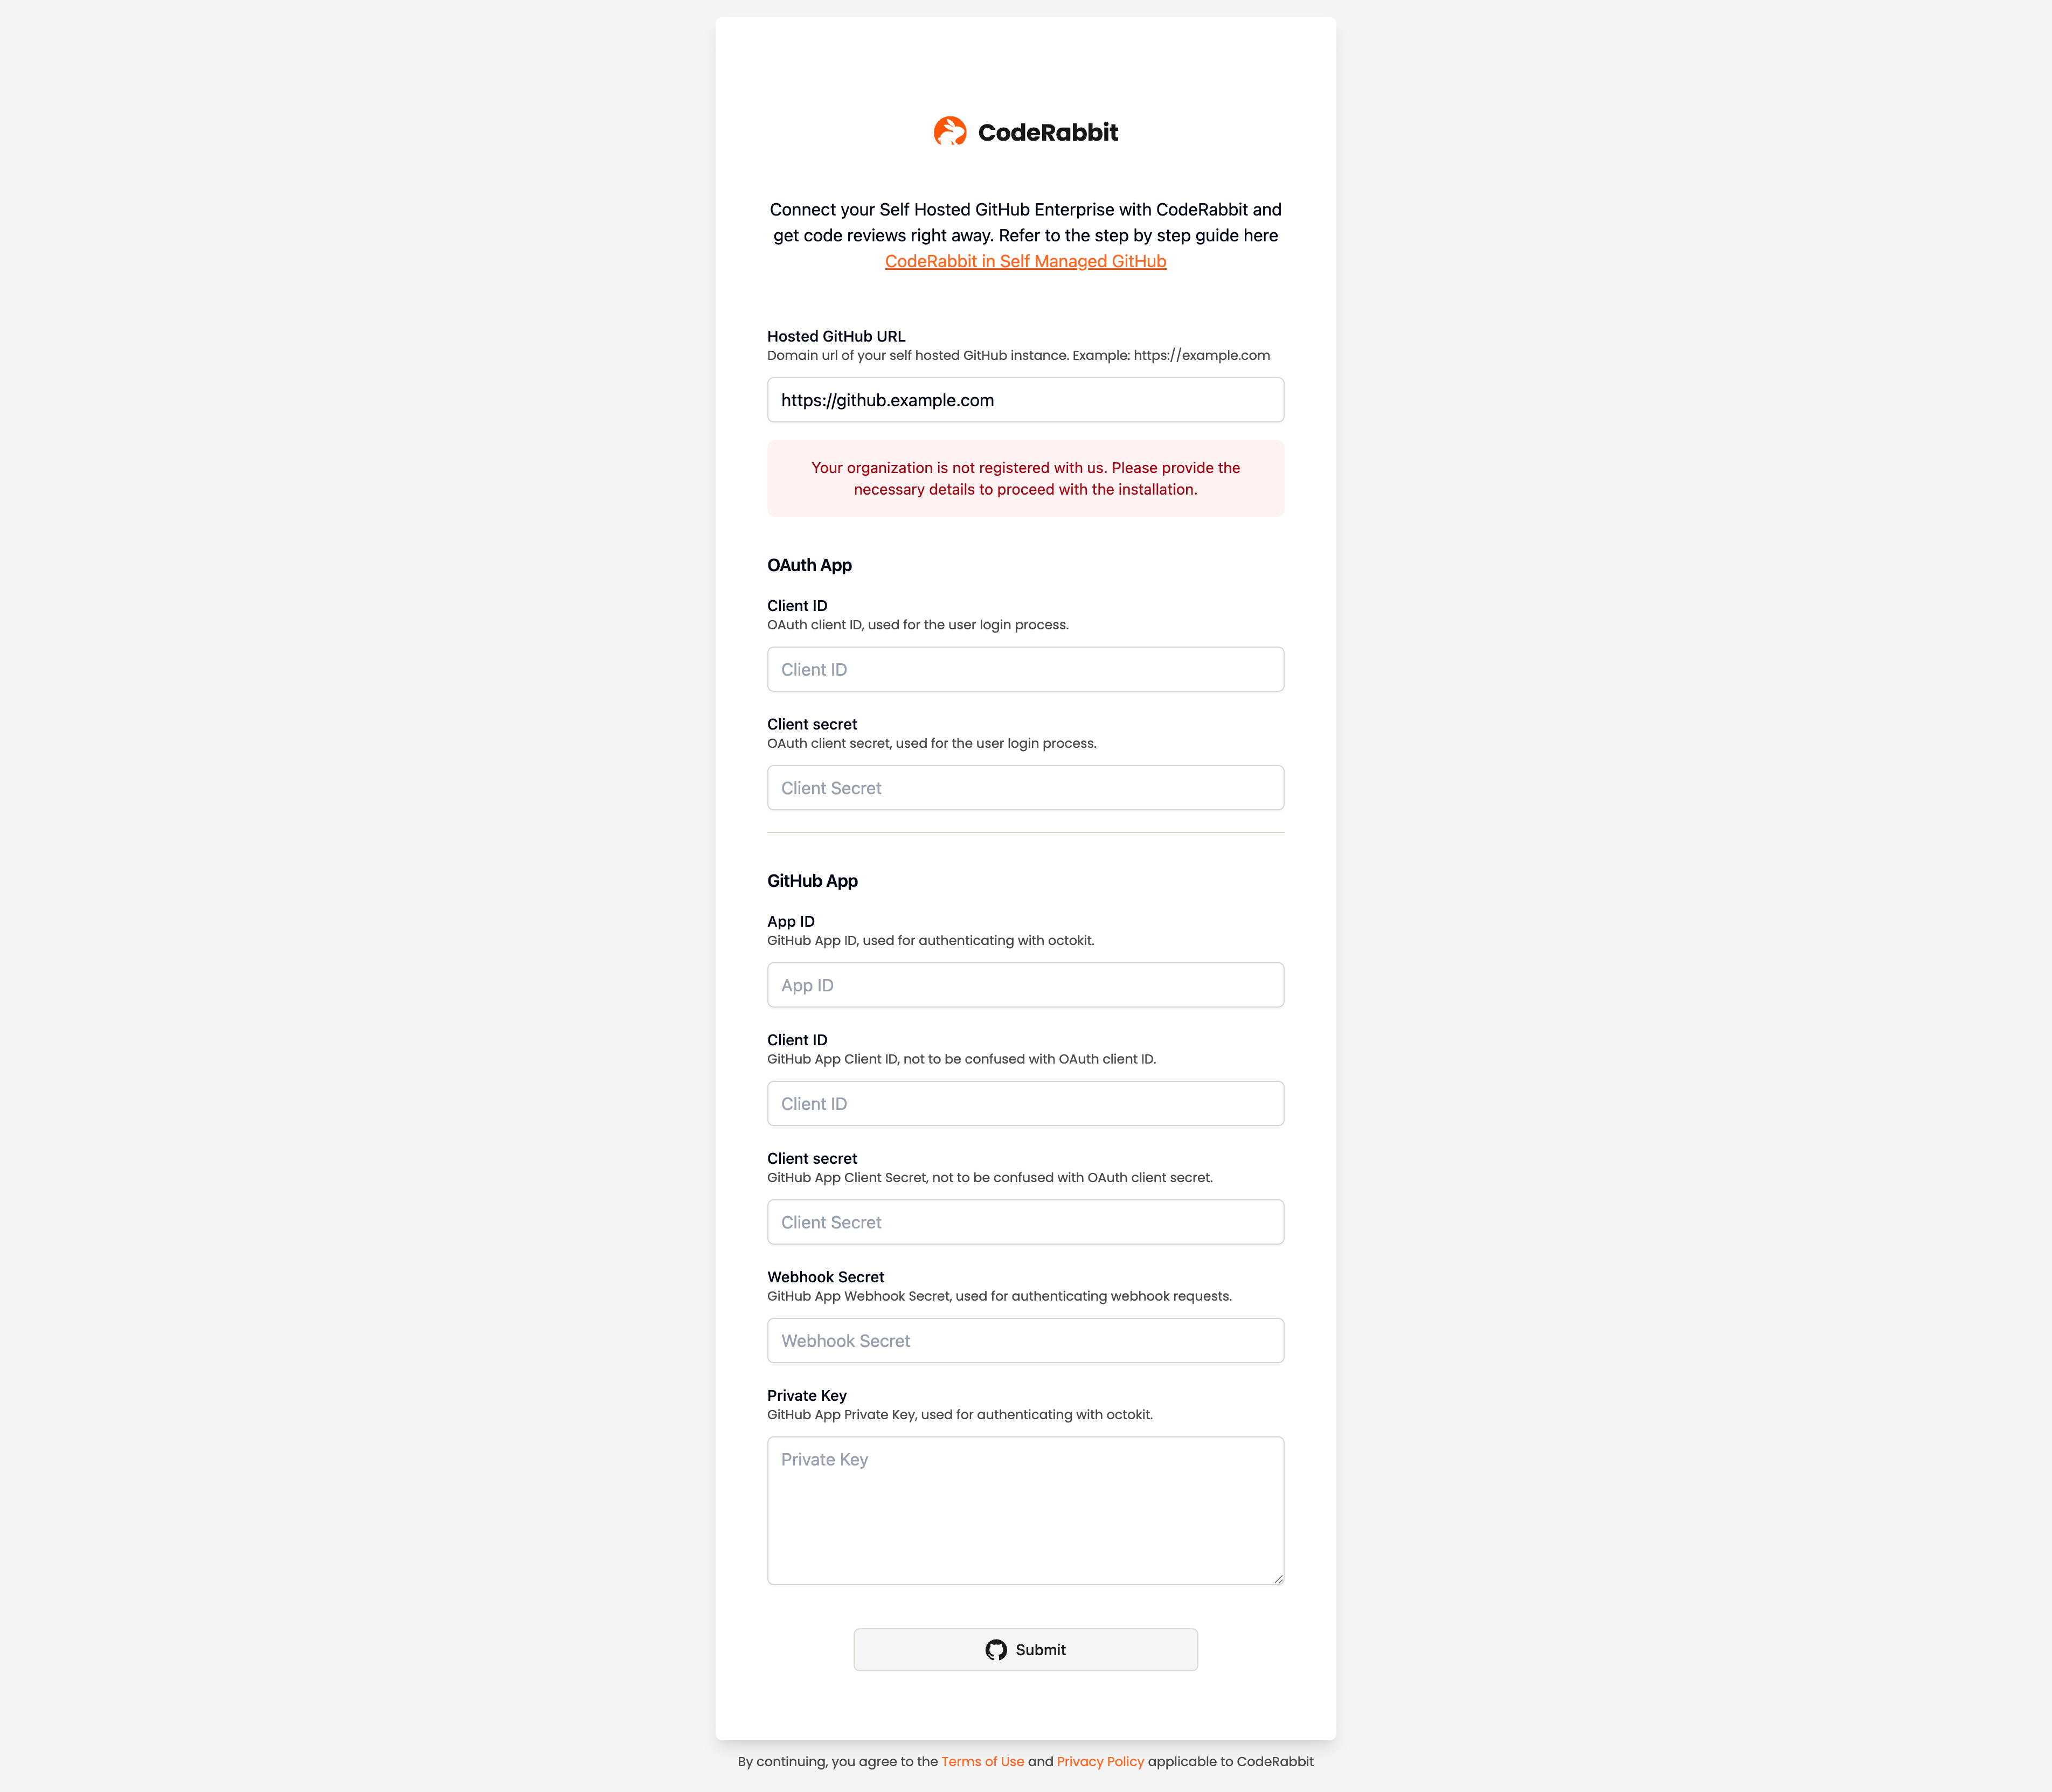
Visit the [CodeRabbit login page](https://app.coderabbit.ai/login?free-trial) and select **Self-Hosted GitHub**.
Enter the URL of your GitHub Enterprise Server instance and click submit. CodeRabbit will check for existing configurations and either:
* Start the login process if your instance is already configured
* Prompt for additional setup details if this is a new integration
 Navigate to your GitHub Enterprise Server instance and create an OAuth App for user authentication.
For detailed instructions, see GitHub's official documentation on [creating an OAuth App](https://docs.github.com/en/enterprise-server@latest/apps/oauth-apps/building-oauth-apps/creating-an-oauth-app).
**Configuration steps:**
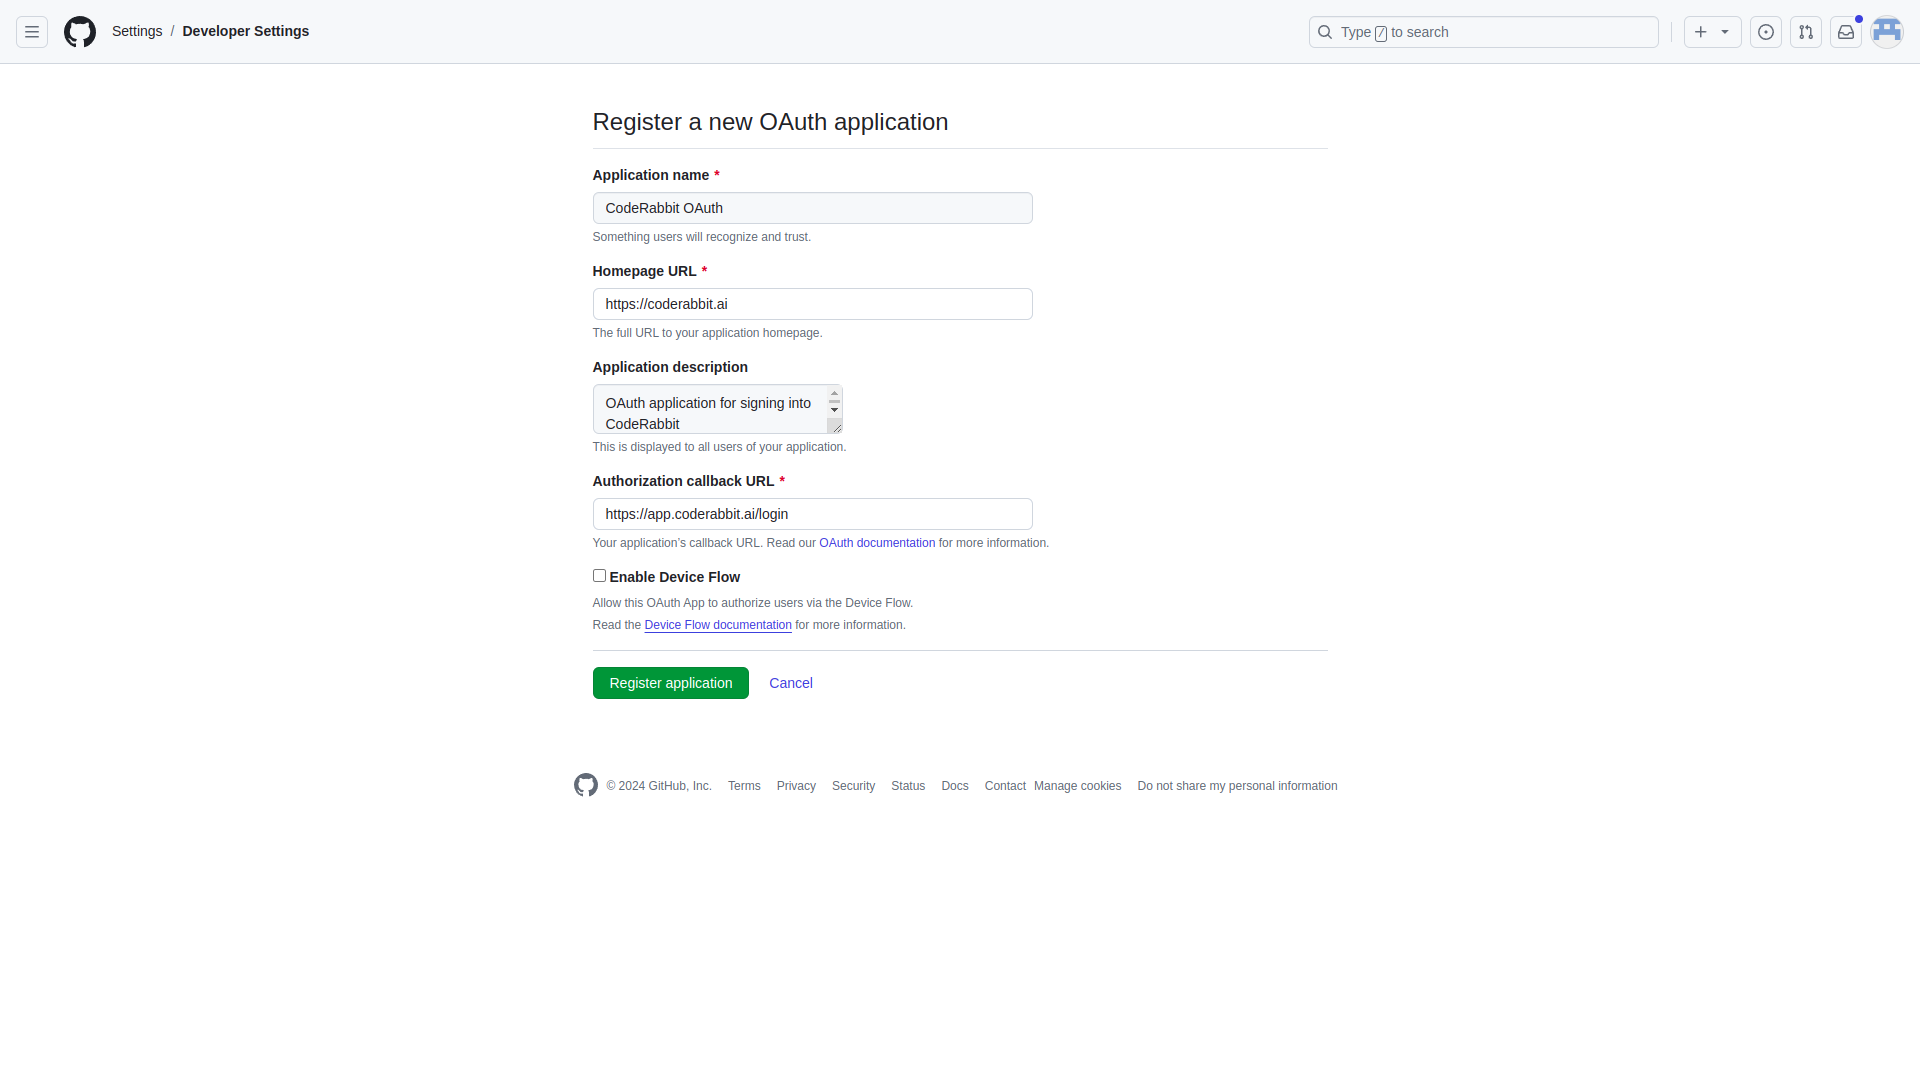
1. Sign in to your GitHub Enterprise Server as an administrator
2. Navigate to **Settings** → **Developer settings** → **OAuth Apps**
3. Click **New OAuth App**
4. Configure the OAuth App with these exact settings:
| Field | Value |
| ------------------------------ | ----------------------------------------------- |
| **Application name** | `CodeRabbit OAuth` |
| **Homepage URL** | `https://coderabbit.ai` |
| **Application description** | `OAuth application for signing into CodeRabbit` |
| **Authorization callback URL** | `https://app.coderabbit.ai/login` |
5. Click **Register application**
Navigate to your GitHub Enterprise Server instance and create an OAuth App for user authentication.
For detailed instructions, see GitHub's official documentation on [creating an OAuth App](https://docs.github.com/en/enterprise-server@latest/apps/oauth-apps/building-oauth-apps/creating-an-oauth-app).
**Configuration steps:**
1. Sign in to your GitHub Enterprise Server as an administrator
2. Navigate to **Settings** → **Developer settings** → **OAuth Apps**
3. Click **New OAuth App**
4. Configure the OAuth App with these exact settings:
| Field | Value |
| ------------------------------ | ----------------------------------------------- |
| **Application name** | `CodeRabbit OAuth` |
| **Homepage URL** | `https://coderabbit.ai` |
| **Application description** | `OAuth application for signing into CodeRabbit` |
| **Authorization callback URL** | `https://app.coderabbit.ai/login` |
5. Click **Register application**
 **Save OAuth credentials:**
After creating the OAuth App:
1. Click **Generate a new client secret** under the 'Client secrets' section
2. Copy and securely store the following credentials:
* **Client ID**
* **Client secret** (visible only once)
**Save OAuth credentials:**
After creating the OAuth App:
1. Click **Generate a new client secret** under the 'Client secrets' section
2. Copy and securely store the following credentials:
* **Client ID**
* **Client secret** (visible only once)
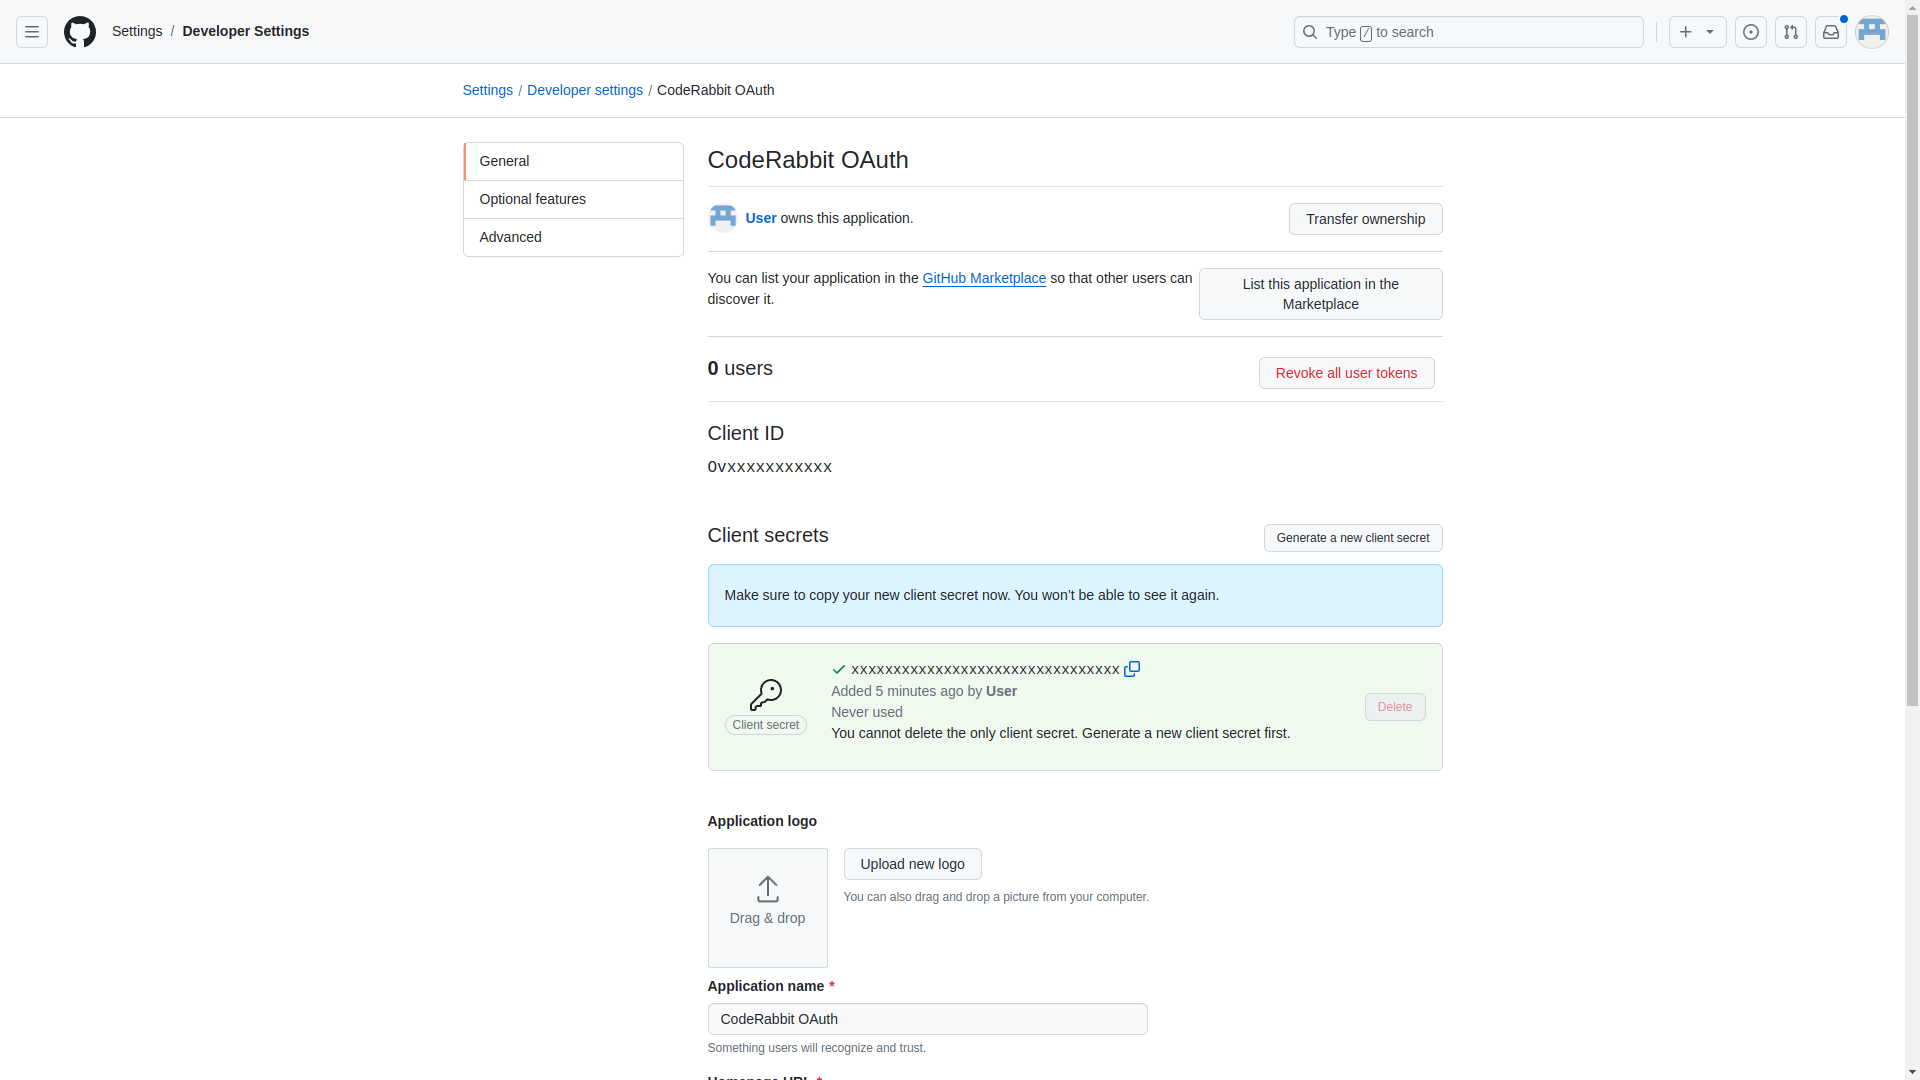 The client secret is only displayed once. Make sure to copy it immediately and store it securely.
Create a GitHub App to enable CodeRabbit's repository access and webhook functionality.
For detailed instructions, see GitHub's official documentation on [registering a GitHub App](https://docs.github.com/en/enterprise-server@latest/apps/creating-github-apps/registering-a-github-app/registering-a-github-app).
**App configuration:**
1. Navigate to **Settings** → **Developer settings** → **GitHub Apps**
2. Click **New GitHub App**
3. Configure the basic app settings:
| Field | Value |
| ---------------------------------------------------------- | --------------------------------- |
| **GitHub App name** | `CodeRabbit` |
| **Description** | `GitHub App for CodeRabbit` |
| **Homepage URL** | `https://coderabbit.ai` |
| **Callback URL** | `https://app.coderabbit.ai/login` |
| **Request user authorization (OAuth) during installation** | ✓ Enabled |
| **Where can this GitHub App be installed?** | Any account |
| Field | Value |
| ------------------ | ----------------------------------------- |
| **Webhook Active** | ✓ Enabled |
| **Webhook URL** | `https://app.coderabbit.ai/githubHandler` |
| **Webhook secret** | Generate a secure string and save it |
| Permission | Access Level |
| ------------------- | -------------- |
| **Actions** | Read-only |
| **Checks** | Read-only |
| **Contents** | Read and write |
| **Commit statuses** | Read and write |
| **Discussions** | Read-only |
| **Issues** | Read and write |
| **Metadata** | Read-only |
| **Pull requests** | Read and write |
**Organization permissions:**
* **Members**: Read-only
**Subscribe to events:**
* Meta, Issue comment, Issues, Label, Public
* Pull request, Pull request review, Pull request review comment
* Pull request review thread, Push, Release
4. Click **Create GitHub App**
**Generate app credentials:**
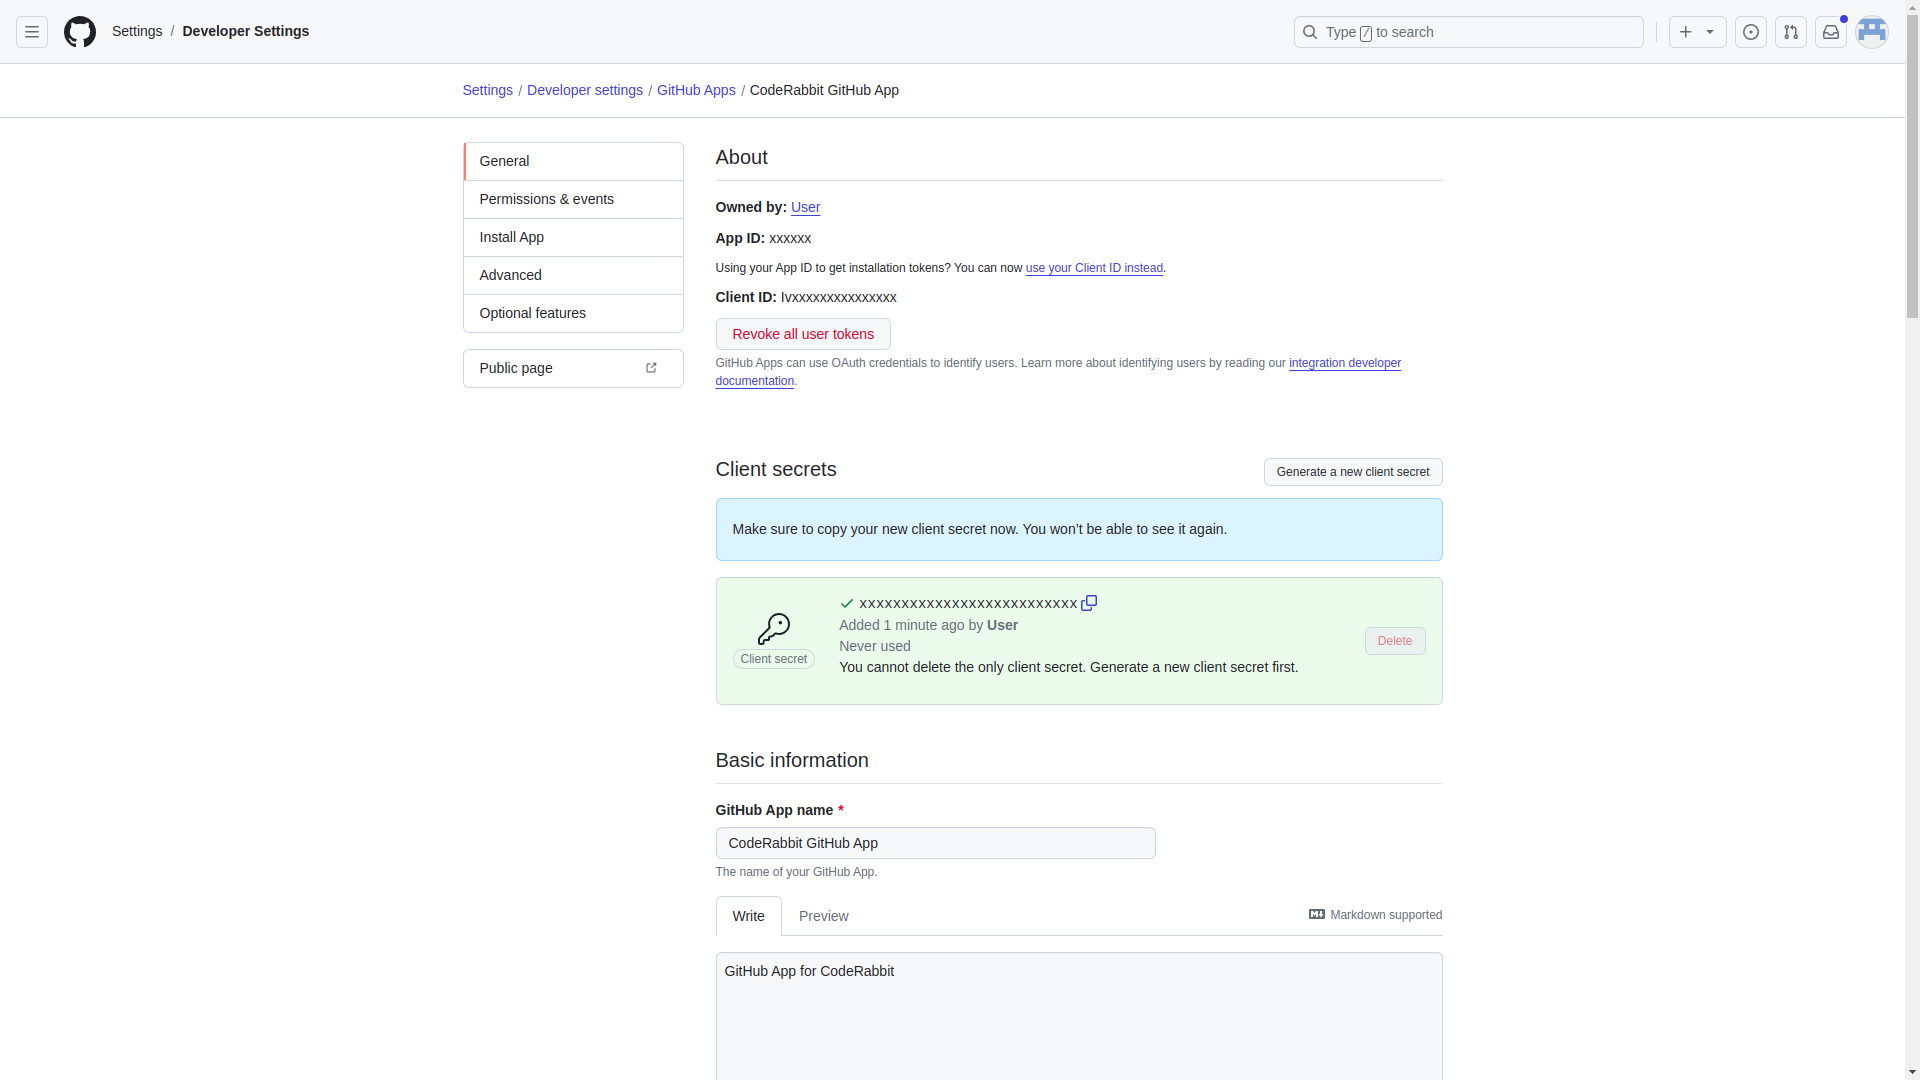
After creating the GitHub App, you'll need to generate and save several credentials:
1. **Client Secret**: Click **Generate a new client secret** and copy it immediately
2. **Private Key**: Click **Generate a private key** and download the PEM file
3. Note the **App ID** and **Client ID** displayed on the page
Make sure you have saved all of these:
* ✅ App ID
* ✅ Client ID
* ✅ Client secret
* ✅ Webhook secret
* ✅ Private key (PEM file)
The client secret is only displayed once. Make sure to copy it immediately and store it securely.
Create a GitHub App to enable CodeRabbit's repository access and webhook functionality.
For detailed instructions, see GitHub's official documentation on [registering a GitHub App](https://docs.github.com/en/enterprise-server@latest/apps/creating-github-apps/registering-a-github-app/registering-a-github-app).
**App configuration:**
1. Navigate to **Settings** → **Developer settings** → **GitHub Apps**
2. Click **New GitHub App**
3. Configure the basic app settings:
| Field | Value |
| ---------------------------------------------------------- | --------------------------------- |
| **GitHub App name** | `CodeRabbit` |
| **Description** | `GitHub App for CodeRabbit` |
| **Homepage URL** | `https://coderabbit.ai` |
| **Callback URL** | `https://app.coderabbit.ai/login` |
| **Request user authorization (OAuth) during installation** | ✓ Enabled |
| **Where can this GitHub App be installed?** | Any account |
| Field | Value |
| ------------------ | ----------------------------------------- |
| **Webhook Active** | ✓ Enabled |
| **Webhook URL** | `https://app.coderabbit.ai/githubHandler` |
| **Webhook secret** | Generate a secure string and save it |
| Permission | Access Level |
| ------------------- | -------------- |
| **Actions** | Read-only |
| **Checks** | Read-only |
| **Contents** | Read and write |
| **Commit statuses** | Read and write |
| **Discussions** | Read-only |
| **Issues** | Read and write |
| **Metadata** | Read-only |
| **Pull requests** | Read and write |
**Organization permissions:**
* **Members**: Read-only
**Subscribe to events:**
* Meta, Issue comment, Issues, Label, Public
* Pull request, Pull request review, Pull request review comment
* Pull request review thread, Push, Release
4. Click **Create GitHub App**
**Generate app credentials:**
After creating the GitHub App, you'll need to generate and save several credentials:
1. **Client Secret**: Click **Generate a new client secret** and copy it immediately
2. **Private Key**: Click **Generate a private key** and download the PEM file
3. Note the **App ID** and **Client ID** displayed on the page
Make sure you have saved all of these:
* ✅ App ID
* ✅ Client ID
* ✅ Client secret
* ✅ Webhook secret
* ✅ Private key (PEM file)
 **Customize the app appearance**: Use the CodeRabbit [logo](https://www.coderabbit.ai/brand) as the profile picture for easy recognition in your GitHub interface.
Submit all the credentials you've gathered to complete the integration setup.
In the CodeRabbit onboarding form, enter the following information:
* **Host URL**: Your GitHub Enterprise Server URL
* **OAuth Client ID**: From Step 2
* **OAuth Client Secret**: From Step 2
* **GitHub App ID**: From Step 3
* **GitHub App Client ID**: From Step 3
* **GitHub App Client Secret**: From Step 3
* **GitHub App Webhook Secret**: From Step 3
* **GitHub App Private Key**: Upload the PEM file from Step 3
Click **Submit** to complete the setup. CodeRabbit will validate the configuration and initiate the login process. On subsequent visits, your setup will be automatically detected for direct login.
Install the GitHub App to your organizations to enable CodeRabbit access to repositories.
1. Navigate to your GitHub App in GitHub Enterprise Server
2. Click the **Install App** tab
3. Select the organization(s) where you want to install CodeRabbit
4. Choose repository access:
* **All repositories** (recommended for full integration)
* **Selected repositories** (for limited access)
5. Click **Install**
**Important timing**: If you install the GitHub App before completing Step 4 (CodeRabbit setup), the installation event will fail. If this happens:
1. Go to your GitHub App's **Advanced** tab
2. Find the failed `installation.created` event
3. Click **Redeliver** to resend the webhook
Ensure your GitHub Enterprise Server can communicate with CodeRabbit by configuring network access.
**IP Allowlisting:**
If your instance requires IP allowlisting, add these CodeRabbit IP addresses to your firewall:
```text IPs to allow list theme={null}
35.222.179.152/32, 34.170.211.100/32, 136.113.208.247/32
```
## Troubleshooting
The OAuth App and GitHub App should be created by a user with **administrative privileges** on the GitHub Enterprise Server instance, or by an enterprise owner for a GitHub Enterprise Cloud data-residency host ending in `.ghe.com`. This user will be responsible for:
* Managing the CodeRabbit integration
* Handling app installations across organizations
* Troubleshooting permission issues
The administrator who creates these apps will have access to manage CodeRabbit's integration settings.
When CodeRabbit asks you to validate or reset Self-Hosted GitHub instance credentials, the required token depends on your host type:
| Host type | Token owner | Required scope |
| ---------------------------------------------------- | ------------------ | ----------------- |
| GitHub Enterprise Server | Site administrator | `read:user` |
| GitHub Enterprise Cloud data residency (`*.ghe.com`) | Enterprise owner | `read:enterprise` |
GitHub Enterprise Cloud data-residency hosts do not expose the GitHub Enterprise Server `site_admin` role. For `*.ghe.com` hosts, CodeRabbit validates enterprise-owner access instead.
If you encounter login errors, try these troubleshooting steps:
**Configuration verification:**
1. Verify all OAuth App and GitHub App settings match the required configuration
2. Ensure webhook URLs are accessible from your GitHub Enterprise Server
3. Confirm all credentials are correctly entered in CodeRabbit
**Browser troubleshooting:**
1. Clear browser cache and cookies for both CodeRabbit and your GitHub instance
2. Try logging in from an incognito/private browser window
3. Disable browser extensions that might interfere with authentication
**Network issues:**
1. Verify your GitHub Enterprise Server can reach `app.coderabbit.ai`
2. Check firewall rules and proxy settings
3. Ensure CodeRabbit IPs are allowlisted if required
If issues persist after trying these steps, [contact our support team](/support) with details about the error messages you're seeing.
If CodeRabbit isn't responding to repository events:
1. **Check webhook configuration:**
* Verify the webhook URL is `https://app.coderabbit.ai/githubHandler`
* Ensure webhook is active in your GitHub App settings
* Confirm the webhook secret matches what you entered in CodeRabbit
2. **Test webhook delivery:**
* Go to your GitHub App's **Advanced** tab
* Look for recent webhook deliveries and their response codes
* Redeliver failed webhooks to test connectivity
3. **Network connectivity:**
* Ensure your GitHub Enterprise Server can reach CodeRabbit's webhook URL
* Check for any proxy or firewall blocking outbound requests
If CodeRabbit has access but isn't providing reviews:
1. **Verify installation:**
* Confirm the GitHub App is installed on the correct organization
* Check that CodeRabbit has access to the specific repository
* Ensure the repository isn't archived or has restrictions
2. **Check permissions:**
* Verify all required repository permissions are granted
* Confirm CodeRabbit can read pull requests and write comments
3. **Review configuration:**
* Check if there are any custom review instructions blocking reviews
* Verify the repository doesn't have CodeRabbit disabled in settings
## What's next
Connect CodeRabbit to a private-network GHES instance without opening inbound firewall access.
Review all supported Git platforms and choose the right integration path for your environment.
Contact CodeRabbit for help with your GitHub Enterprise Server setup.
**Customize the app appearance**: Use the CodeRabbit [logo](https://www.coderabbit.ai/brand) as the profile picture for easy recognition in your GitHub interface.
Submit all the credentials you've gathered to complete the integration setup.
In the CodeRabbit onboarding form, enter the following information:
* **Host URL**: Your GitHub Enterprise Server URL
* **OAuth Client ID**: From Step 2
* **OAuth Client Secret**: From Step 2
* **GitHub App ID**: From Step 3
* **GitHub App Client ID**: From Step 3
* **GitHub App Client Secret**: From Step 3
* **GitHub App Webhook Secret**: From Step 3
* **GitHub App Private Key**: Upload the PEM file from Step 3
Click **Submit** to complete the setup. CodeRabbit will validate the configuration and initiate the login process. On subsequent visits, your setup will be automatically detected for direct login.
Install the GitHub App to your organizations to enable CodeRabbit access to repositories.
1. Navigate to your GitHub App in GitHub Enterprise Server
2. Click the **Install App** tab
3. Select the organization(s) where you want to install CodeRabbit
4. Choose repository access:
* **All repositories** (recommended for full integration)
* **Selected repositories** (for limited access)
5. Click **Install**
**Important timing**: If you install the GitHub App before completing Step 4 (CodeRabbit setup), the installation event will fail. If this happens:
1. Go to your GitHub App's **Advanced** tab
2. Find the failed `installation.created` event
3. Click **Redeliver** to resend the webhook
Ensure your GitHub Enterprise Server can communicate with CodeRabbit by configuring network access.
**IP Allowlisting:**
If your instance requires IP allowlisting, add these CodeRabbit IP addresses to your firewall:
```text IPs to allow list theme={null}
35.222.179.152/32, 34.170.211.100/32, 136.113.208.247/32
```
## Troubleshooting
The OAuth App and GitHub App should be created by a user with **administrative privileges** on the GitHub Enterprise Server instance, or by an enterprise owner for a GitHub Enterprise Cloud data-residency host ending in `.ghe.com`. This user will be responsible for:
* Managing the CodeRabbit integration
* Handling app installations across organizations
* Troubleshooting permission issues
The administrator who creates these apps will have access to manage CodeRabbit's integration settings.
When CodeRabbit asks you to validate or reset Self-Hosted GitHub instance credentials, the required token depends on your host type:
| Host type | Token owner | Required scope |
| ---------------------------------------------------- | ------------------ | ----------------- |
| GitHub Enterprise Server | Site administrator | `read:user` |
| GitHub Enterprise Cloud data residency (`*.ghe.com`) | Enterprise owner | `read:enterprise` |
GitHub Enterprise Cloud data-residency hosts do not expose the GitHub Enterprise Server `site_admin` role. For `*.ghe.com` hosts, CodeRabbit validates enterprise-owner access instead.
If you encounter login errors, try these troubleshooting steps:
**Configuration verification:**
1. Verify all OAuth App and GitHub App settings match the required configuration
2. Ensure webhook URLs are accessible from your GitHub Enterprise Server
3. Confirm all credentials are correctly entered in CodeRabbit
**Browser troubleshooting:**
1. Clear browser cache and cookies for both CodeRabbit and your GitHub instance
2. Try logging in from an incognito/private browser window
3. Disable browser extensions that might interfere with authentication
**Network issues:**
1. Verify your GitHub Enterprise Server can reach `app.coderabbit.ai`
2. Check firewall rules and proxy settings
3. Ensure CodeRabbit IPs are allowlisted if required
If issues persist after trying these steps, [contact our support team](/support) with details about the error messages you're seeing.
If CodeRabbit isn't responding to repository events:
1. **Check webhook configuration:**
* Verify the webhook URL is `https://app.coderabbit.ai/githubHandler`
* Ensure webhook is active in your GitHub App settings
* Confirm the webhook secret matches what you entered in CodeRabbit
2. **Test webhook delivery:**
* Go to your GitHub App's **Advanced** tab
* Look for recent webhook deliveries and their response codes
* Redeliver failed webhooks to test connectivity
3. **Network connectivity:**
* Ensure your GitHub Enterprise Server can reach CodeRabbit's webhook URL
* Check for any proxy or firewall blocking outbound requests
If CodeRabbit has access but isn't providing reviews:
1. **Verify installation:**
* Confirm the GitHub App is installed on the correct organization
* Check that CodeRabbit has access to the specific repository
* Ensure the repository isn't archived or has restrictions
2. **Check permissions:**
* Verify all required repository permissions are granted
* Confirm CodeRabbit can read pull requests and write comments
3. **Review configuration:**
* Check if there are any custom review instructions blocking reviews
* Verify the repository doesn't have CodeRabbit disabled in settings
## What's next
Connect CodeRabbit to a private-network GHES instance without opening inbound firewall access.
Review all supported Git platforms and choose the right integration path for your environment.
Contact CodeRabbit for help with your GitHub Enterprise Server setup.