> ## Documentation Index
> Fetch the complete documentation index at: https://docs.coderabbit.ai/llms.txt
> Use this file to discover all available pages before exploring further.
# Self-managed GitLab
> Learn how to integrate CodeRabbit with your self-managed GitLab instance through automated or manual onboarding, including OAuth setup, user configuration, and webhook installation.
For an overview of how CodeRabbit integrates with Git platforms, see [Add
CodeRabbit to your repository](/platforms).
**Version Requirements**
CodeRabbit supports GitLab `16.x` and above. Version `15.x` may experience unexpected issues such as review comments not being posted or the sign-up process not working at all. We recommend upgrading your GitLab instance to obtain the intended experience.
## Getting Started
To integrate your self-managed GitLab with CodeRabbit, we require specific information for the initial setup within your domain. Once this setup is complete, you can log in directly using the OAuth2 flow.
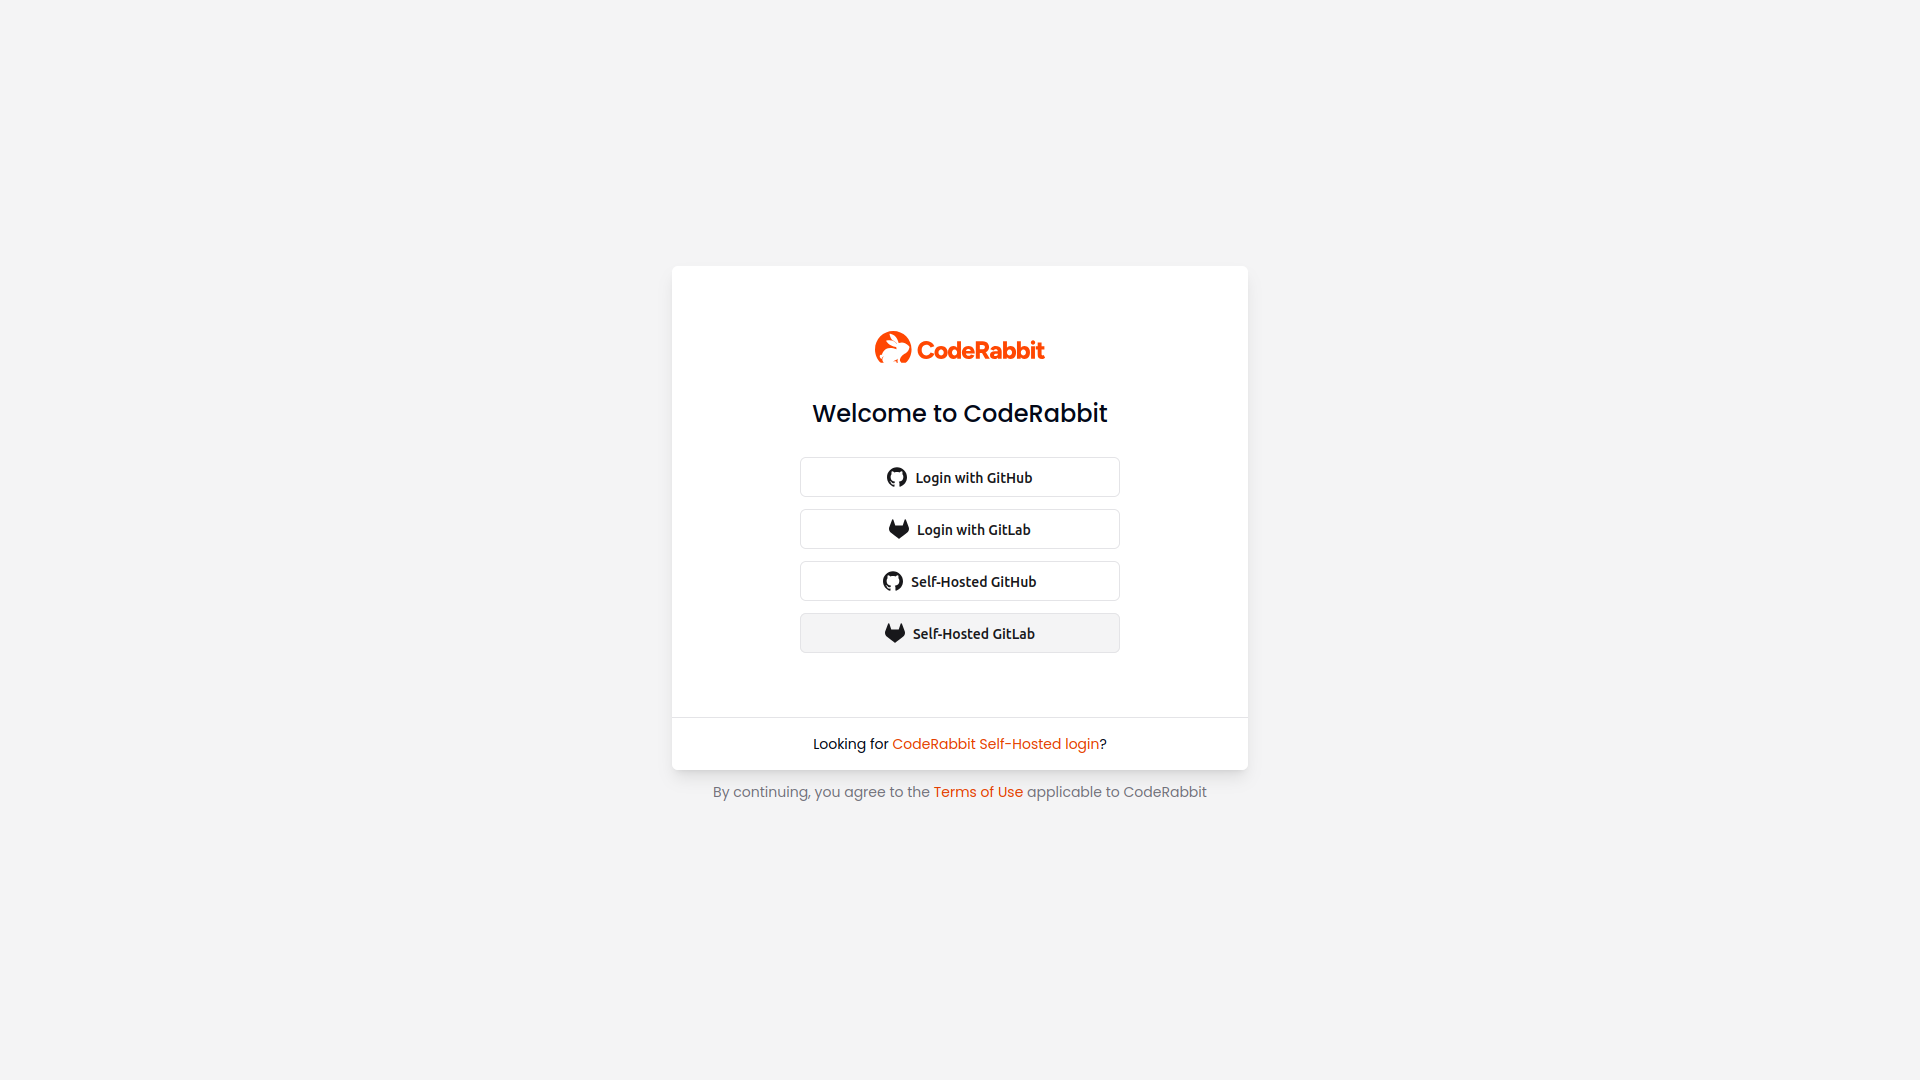
Navigate to the [CodeRabbit login page](https://app.coderabbit.ai/login?free-trial) and select **Self-Hosted GitLab**.
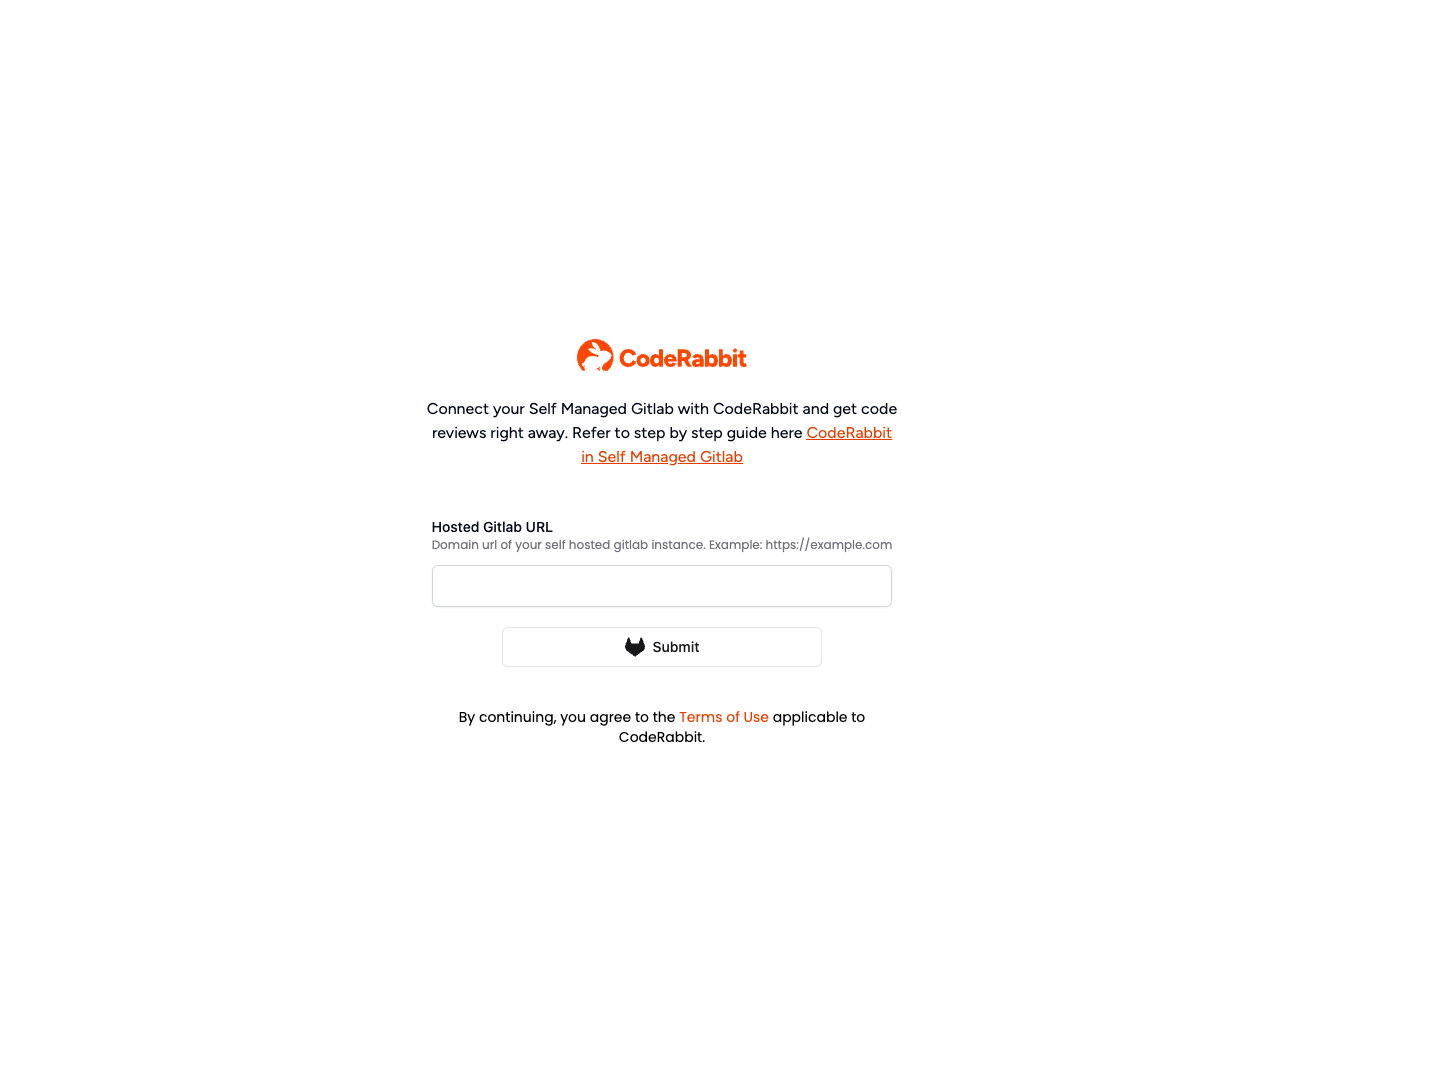
 Enter the URL of your self-managed GitLab instance and click **Submit**. We'll check our database for an existing record of your organization and start the login process if found.
 If your self-managed GitLab instance is not found, we'll initiate the onboarding process.
You can choose between automated or manual onboarding based on your security
preferences and administrative access.
## Onboarding Options
### Automated Onboarding (Recommended)
If your self-managed GitLab instance is not found, we'll initiate the onboarding process.
You can choose between automated or manual onboarding based on your security
preferences and administrative access.
## Onboarding Options
### Automated Onboarding (Recommended)
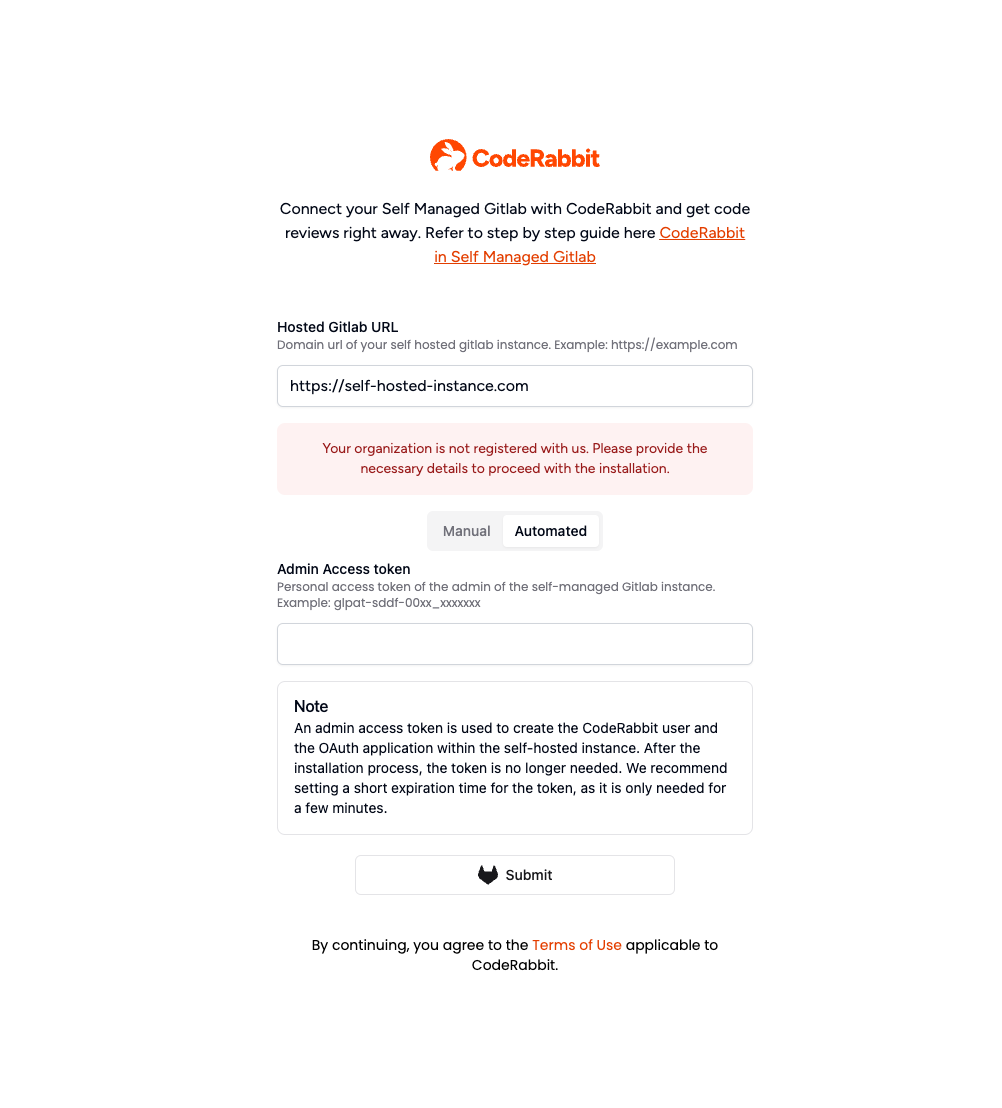 **Why do we need the Admin Access Token?**
The admin access token is required to set up a new CodeRabbit bot user within your self-managed instance. The token is needed only once during the initial setup process. Once generated, you can set its minimum expiration period. This is the standard approach used by other products in this category.
Note: This does not automatically install the CodeRabbit app across all projects. You will add CodeRabbit manually to the projects you wish to integrate.
### Manual Onboarding
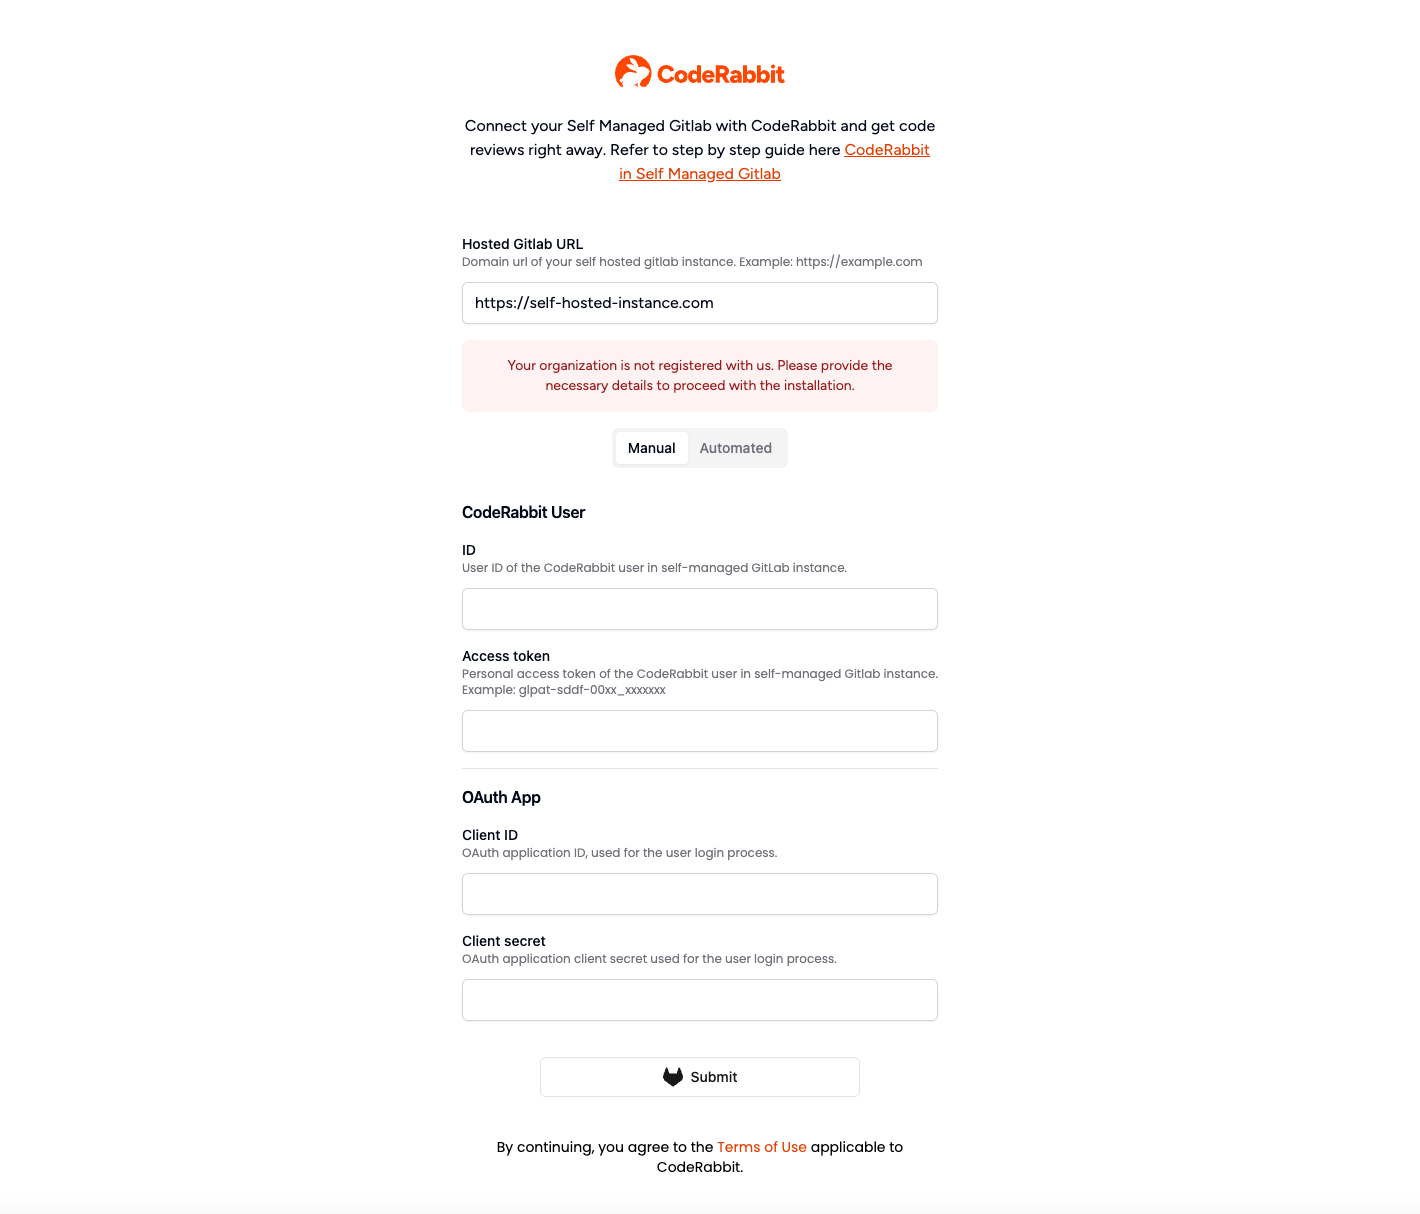
For the manual onboarding process, you need to create the [CodeRabbit user](#creating-coderabbit-user) and the [OAuth2 GitLab application](#creating-oauth2-application).
**Why do we need the Admin Access Token?**
The admin access token is required to set up a new CodeRabbit bot user within your self-managed instance. The token is needed only once during the initial setup process. Once generated, you can set its minimum expiration period. This is the standard approach used by other products in this category.
Note: This does not automatically install the CodeRabbit app across all projects. You will add CodeRabbit manually to the projects you wish to integrate.
### Manual Onboarding
For the manual onboarding process, you need to create the [CodeRabbit user](#creating-coderabbit-user) and the [OAuth2 GitLab application](#creating-oauth2-application).
 #### Creating CodeRabbit User
This feature will work with any user from your organization, but we strongly recommend creating a dedicated user called **CodeRabbitAI**. This ensures clarity about which user is used for our application and allows for better fine-grained access control.
To interact with CodeRabbit in merge request comments, use `@coderabbitai` — or the username of the user you create here, if it differs.
Log in with an instance admin account and follow the steps provided in the
[GitLab
documentation](https://docs.gitlab.com/ee/user/profile/account/create_accounts.html#create-users-in-admin-area)
to create a new user.
After the user is created, retrieve the **User ID** from that user's profile.
Generate an [**access token**](#generating-personal-access-token) for this
user. The access token is used to post reviews on merge requests.
**Recommendations for the CodeRabbit user:** - Use **"CodeRabbitAI"** as the
username for easy identification - Use the CodeRabbit
[logo](https://www.coderabbit.ai/brand) as the profile picture for easy
recognition - Ensure the user has appropriate permissions for the repositories
you want to integrate
If you prefer, you can create a Group Access Token which will create a
dedicated user on your behalf. For more information, see [Group Access
Token](/platforms/gitlab-com#group-access-token).
#### Creating OAuth2 Application
For self-managed GitLab, we recommend creating an instance-wide application unless you want the reviews to be limited to a single group or user.
Follow the steps outlined in the [GitLab documentation](https://docs.gitlab.com/ee/integration/oauth_provider.html#create-an-instance-wide-application) for creating the application.
**OAuth2 Application Requirements:**
* **Scopes:** `api read_user email openid`
* **Callback URL:** `https://app.coderabbit.ai/login`
#### Generating Personal Access Token
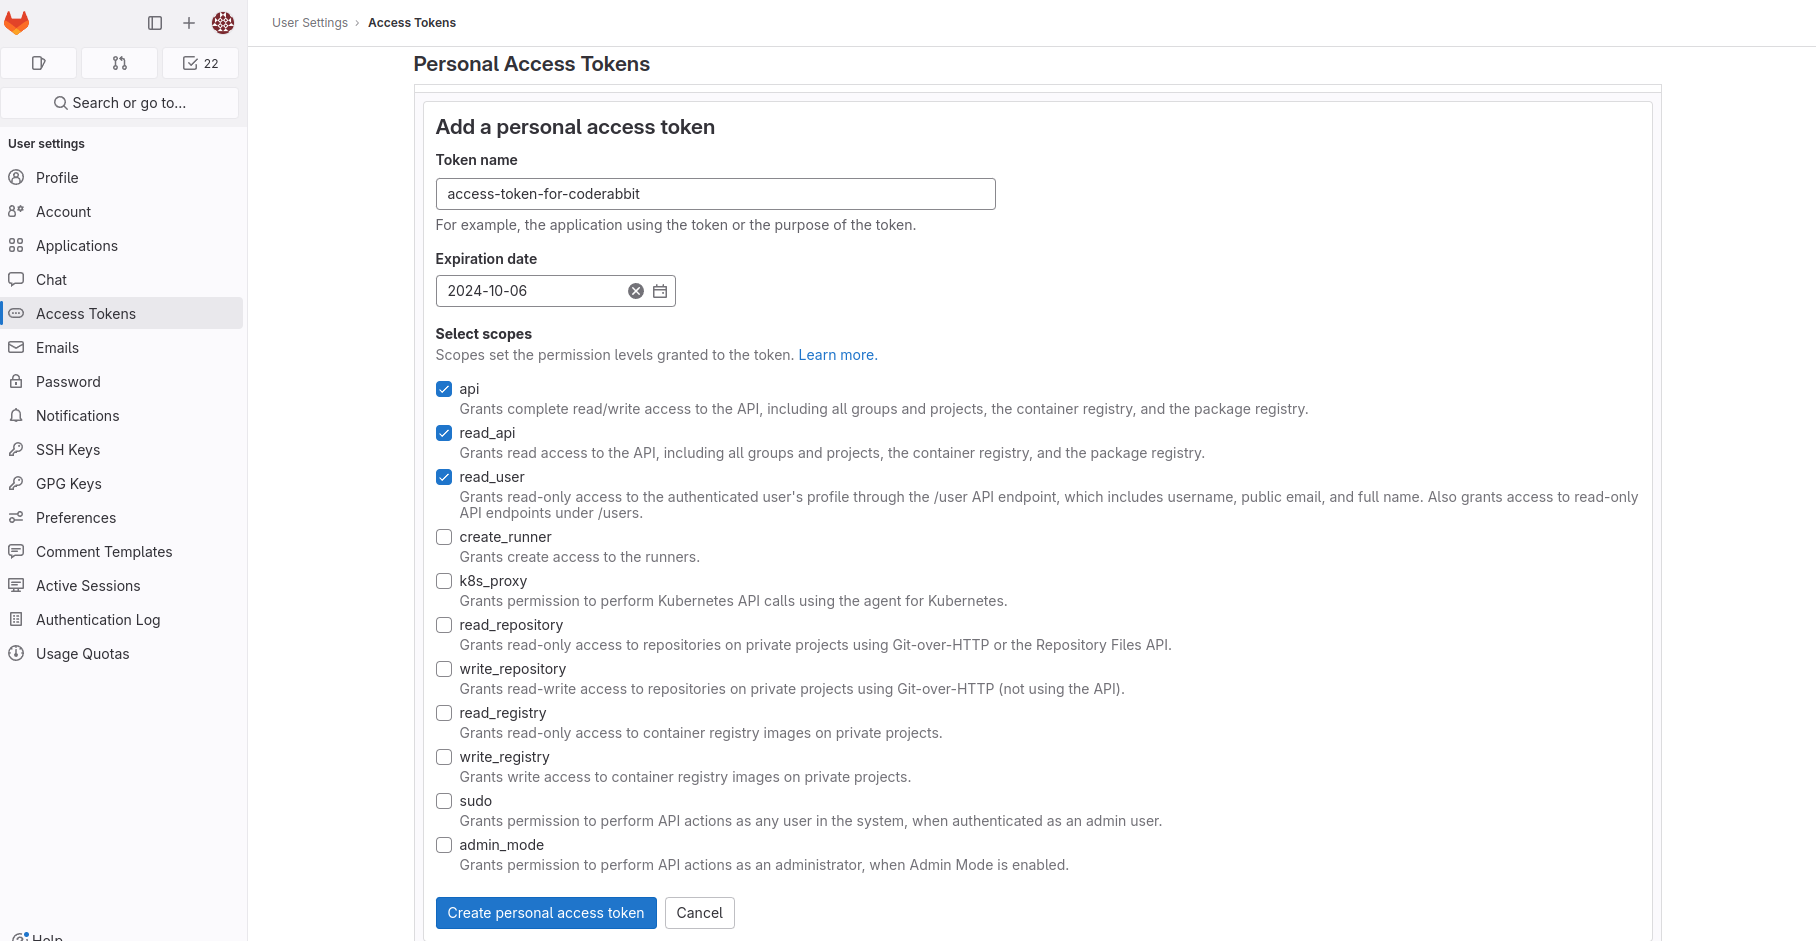
GitLab offers an option to generate a personal access token for adding a new user and setting up the application in the self-managed instance.
Login to your self-hosted instance. For [automated
onboarding](#automated-onboarding-recommended), ensure you have admin rights.
On the left sidebar, select your avatar, then select **Edit profile**.
On the left sidebar, select **Access Tokens**.
Select **Add new token**.
* Enter a name and expiry date for the token
* We need this for the initial setup, so the minimum expiry time is sufficient
* If you do not enter an expiry date, it defaults to 365 days from the current date
* Select the required scopes: `api`, `read_api`, `read_user`
Select **Create personal access token** and note down the token as it will
only be displayed once.
#### Creating CodeRabbit User
This feature will work with any user from your organization, but we strongly recommend creating a dedicated user called **CodeRabbitAI**. This ensures clarity about which user is used for our application and allows for better fine-grained access control.
To interact with CodeRabbit in merge request comments, use `@coderabbitai` — or the username of the user you create here, if it differs.
Log in with an instance admin account and follow the steps provided in the
[GitLab
documentation](https://docs.gitlab.com/ee/user/profile/account/create_accounts.html#create-users-in-admin-area)
to create a new user.
After the user is created, retrieve the **User ID** from that user's profile.
Generate an [**access token**](#generating-personal-access-token) for this
user. The access token is used to post reviews on merge requests.
**Recommendations for the CodeRabbit user:** - Use **"CodeRabbitAI"** as the
username for easy identification - Use the CodeRabbit
[logo](https://www.coderabbit.ai/brand) as the profile picture for easy
recognition - Ensure the user has appropriate permissions for the repositories
you want to integrate
If you prefer, you can create a Group Access Token which will create a
dedicated user on your behalf. For more information, see [Group Access
Token](/platforms/gitlab-com#group-access-token).
#### Creating OAuth2 Application
For self-managed GitLab, we recommend creating an instance-wide application unless you want the reviews to be limited to a single group or user.
Follow the steps outlined in the [GitLab documentation](https://docs.gitlab.com/ee/integration/oauth_provider.html#create-an-instance-wide-application) for creating the application.
**OAuth2 Application Requirements:**
* **Scopes:** `api read_user email openid`
* **Callback URL:** `https://app.coderabbit.ai/login`
#### Generating Personal Access Token
GitLab offers an option to generate a personal access token for adding a new user and setting up the application in the self-managed instance.
Login to your self-hosted instance. For [automated
onboarding](#automated-onboarding-recommended), ensure you have admin rights.
On the left sidebar, select your avatar, then select **Edit profile**.
On the left sidebar, select **Access Tokens**.
Select **Add new token**.
* Enter a name and expiry date for the token
* We need this for the initial setup, so the minimum expiry time is sufficient
* If you do not enter an expiry date, it defaults to 365 days from the current date
* Select the required scopes: `api`, `read_api`, `read_user`
Select **Create personal access token** and note down the token as it will
only be displayed once.
 ### **Paste the details and click submit**
* Submit the form.
* We will handle the setup process for you.
* On subsequent visits, your setup will be automatically detected, allowing for direct login.
### **Paste the details and click submit**
* Submit the form.
* We will handle the setup process for you.
* On subsequent visits, your setup will be automatically detected, allowing for direct login. 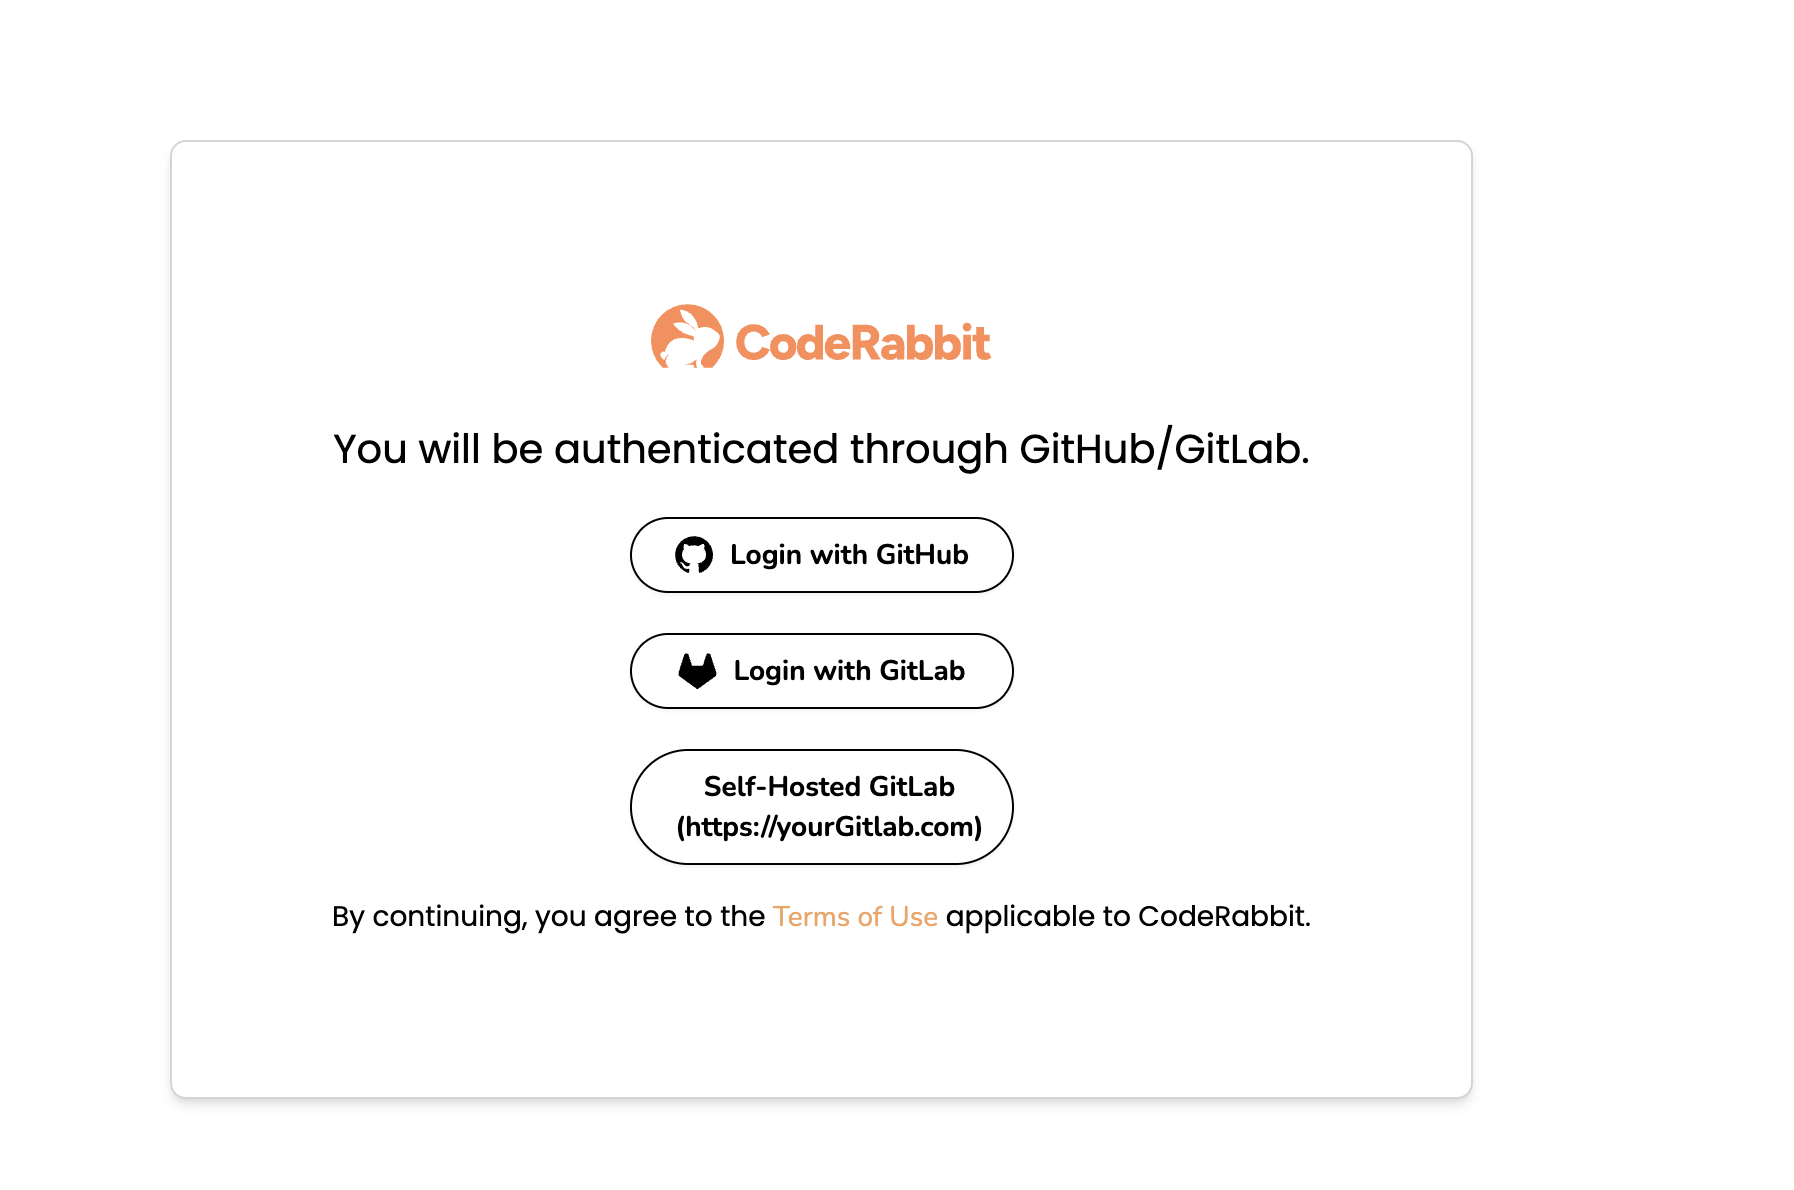 ### **Allow list CodeRabbit IP address**
Use this CodeRabbit IP if your instance requires IP allow listing.
```text IPs to allow list theme={null}
35.222.179.152/32, 34.170.211.100/32, 136.113.208.247/32
```
### Manual webhook installation
Use this flow when you need to install the webhook manually or rotate the shared webhook secret. The **Webhook Secret** page is available for both GitLab.com and self-managed GitLab.
In the CodeRabbit app, open **Account** and select **Webhook Secret** from the sidebar.
Use the **Webhook URL** field on that page to copy the exact endpoint that your GitLab instance should call.
Enter the secret that GitLab should send with webhook deliveries and save it in CodeRabbit.
When creating or editing the webhook in GitLab, use the copied webhook URL and enable these settings:
* **Merge request events**
* **Comments**
* **Issues events**
* **SSL verification** enabled
If you change an existing webhook secret, CodeRabbit attempts to update existing CodeRabbit-managed GitLab project and group webhooks automatically. If a webhook was created manually, or if an automatic refresh fails, update the secret directly in GitLab.
### Bulk webhook installation
For administrators managing many GitLab projects, you can use a script to bulk-install webhooks across all projects.
Login to CodeRabbit UI through your GitLab self-managed instance.
Follow the [Manual webhook installation](#manual-webhook-installation) steps above to get your webhook URL and save a webhook secret in CodeRabbit.
Use a script to install webhooks across your GitLab projects or groups. Below is a sample script that requires:
* Your GitLab host URL
* The webhook URL you copied in the previous step
* The webhook secret you saved in the previous step
* A GitLab access token with API permissions
```bash theme={null}
#!/usr/bin/env bash
## gitlab-webhook.sh
# Add a webhook to one project, or every project in a subgroup tree
set -euo pipefail
usage() {
cat < -u -s \\
[-t ] [-A ] [-p | -g ] [-v]
Required:
-h GitLab host (e.g. gitlab.example.com)
-u Webhook endpoint URL to receive POSTs
-s Webhook secret token (used for signature verification)
Authentication (one of):
-t Access token (PAT, project, group or OAuth). If omitted, \$GITLAB_TOKEN is used
-A Auth header to use. Default detects:
PAT → "PRIVATE-TOKEN"
anything else → "Authorization: Bearer"
Scope (choose one):
-p Project ID or full path (e.g. 42 or group/app)
-g Group ID or full path, recurse through all subgroups & projects
Options:
-v Verbose output (show individual project IDs in final summary)
EOF
exit 1
}
HOST="" HOOK_URL="" HOOK_SECRET=""
TOKEN="${GITLAB_TOKEN:-}" AUTH_HEADER=""
PROJECT="" GROUP="" VERBOSE=false
while getopts "h:u:s:t:A:p:g:v" opt; do
case "$opt" in
h) HOST=$OPTARG ;;
u) HOOK_URL=$OPTARG ;;
s) HOOK_SECRET=$OPTARG ;;
t) TOKEN=$OPTARG ;;
A) AUTH_HEADER=$OPTARG ;;
p) PROJECT=$OPTARG ;;
g) GROUP=$OPTARG ;;
v) VERBOSE=true ;;
*) usage ;;
esac
done
# Mandatory checks
[[ -z $HOST || -z $HOOK_URL || -z $HOOK_SECRET ]] && usage
[[ -n $PROJECT && -n $GROUP ]] && usage
[[ -z $PROJECT && -z $GROUP ]] && usage
# Token handling
if [[ -z $TOKEN ]]; then
echo "[ERROR] No access token provided. Use -t or set \$GITLAB_TOKEN" >&2
exit 1
fi
# Choose header if not forced
if [[ -z $AUTH_HEADER ]]; then
if [[ $TOKEN == glpat-* || $TOKEN == "PAT-"* ]]; then
AUTH_HEADER="PRIVATE-TOKEN"
else
AUTH_HEADER="Authorization: Bearer"
fi
fi
API="https://${HOST}/api/v4"
CURL_BASE=(curl -sSf --header "${AUTH_HEADER}: ${TOKEN}")
# Track processed projects to avoid duplicates
declare -A PROCESSED_PROJECTS
WEBHOOK_PROJECTS=()
EXISTING_WEBHOOK_PROJECTS=()
TOTAL_PROJECTS_FOUND=0
PROJECTS_PROCESSED=0
url_encode() {
local string="$1"
printf '%s' "$string" | sed 's/\//%2F/g; s/ /%20/g; s/@/%40/g; s/:/%3A/g; s/#/%23/g; s/?/%3F/g; s/&/%26/g; s/=/%3D/g; s/+/%2B/g'
}
fetch_paginated() {
local url=$1
local page=1
local per_page=100
while true; do
local paginated_url
if [[ "$url" == *"?"* ]]; then
paginated_url="${url}&per_page=${per_page}&page=${page}"
else
paginated_url="${url}?per_page=${per_page}&page=${page}"
fi
local response
response=$("${CURL_BASE[@]}" "$paginated_url" 2>/dev/null) || {
echo "[ERROR] Failed to fetch page $page from $url" >&2
return 1
}
if [[ "$response" == "[]" || "$response" == "null" ]]; then
break
fi
local page_results
page_results=$(echo "$response" | jq -r '.[].id' 2>/dev/null) || {
echo "[ERROR] Failed to parse JSON response from page $page" >&2
return 1
}
if [[ -z "$page_results" ]]; then
break
fi
local page_count
page_count=$(echo "$page_results" | wc -l)
TOTAL_PROJECTS_FOUND=$((TOTAL_PROJECTS_FOUND + page_count))
echo "[PROGRESS] Found $page_count projects on page $page (total: $TOTAL_PROJECTS_FOUND)" >&2
echo "$page_results"
local item_count
item_count=$(echo "$response" | jq '. | length' 2>/dev/null) || 0
if [[ "$item_count" -lt "$per_page" ]]; then
break
fi
((page++))
done
}
create_hook() {
local pid=$1
if [[ -n "${PROCESSED_PROJECTS[$pid]:-}" ]]; then
return 0
fi
PROCESSED_PROJECTS[$pid]=1
PROJECTS_PROCESSED=$((PROJECTS_PROCESSED + 1))
local encoded_pid
if [[ $pid =~ ^[0-9]+$ ]]; then
encoded_pid=$pid
else
encoded_pid=$(url_encode "$pid")
fi
local existing_webhooks
existing_webhooks=$("${CURL_BASE[@]}" "${API}/projects/${encoded_pid}/hooks" 2>/dev/null) || {
echo "[ERROR] Failed to fetch existing webhooks for project $pid" >&2
return 1
}
if echo "$existing_webhooks" | jq -e --arg url "$HOOK_URL" '.[] | select(.url == $url)' >/dev/null 2>&1; then
[[ "$VERBOSE" == "true" ]] && echo "[INFO] Webhook already exists for project: $pid" >&2
EXISTING_WEBHOOK_PROJECTS+=("$pid")
return 0
fi
[[ "$VERBOSE" == "true" ]] && echo "[INFO] Adding webhook to project: $pid" >&2
"${CURL_BASE[@]}" --request POST \
--data-urlencode "url=${HOOK_URL}" \
--data "token=${HOOK_SECRET}" \
--data "push_events=true" \
--data "note_events=true" \
--data "issues_events=true" \
--data "merge_requests_events=true" \
--data "enable_ssl_verification=true" \
"${API}/projects/${encoded_pid}/hooks" \
> /dev/null
WEBHOOK_PROJECTS+=("$pid")
}
traverse_group() {
local gid=$1
local encoded_gid
if [[ $gid =~ ^[0-9]+$ ]]; then
encoded_gid=$gid
else
encoded_gid=$(url_encode "$gid")
fi
while IFS= read -r pid; do
[[ -n "$pid" ]] && create_hook "$pid"
done < <(
fetch_paginated "${API}/groups/${encoded_gid}/projects?include_subgroups=true"
)
while IFS= read -r sg; do
[[ -n "$sg" ]] && traverse_group "$sg"
done < <(
fetch_paginated "${API}/groups/${encoded_gid}/subgroups"
)
}
echo "[INFO] Starting webhook processing..." >&2
if [[ -n $PROJECT ]]; then
echo "[INFO] Processing single project: $PROJECT" >&2
create_hook "$PROJECT"
else
echo "[INFO] Processing group and subgroups: $GROUP" >&2
traverse_group "$GROUP"
fi
echo "[INFO] Finished processing all projects" >&2
total_projects=$((${#WEBHOOK_PROJECTS[@]} + ${#EXISTING_WEBHOOK_PROJECTS[@]}))
if [[ $total_projects -eq 0 ]]; then
echo "[INFO] No projects were processed"
else
if [[ ${#WEBHOOK_PROJECTS[@]} -gt 0 ]]; then
if [[ "$VERBOSE" == "true" ]]; then
echo "[INFO] Webhooks installed successfully on ${#WEBHOOK_PROJECTS[@]} project(s):"
for pid in "${WEBHOOK_PROJECTS[@]}"; do
echo " - Project ID: $pid"
done
else
echo "[INFO] Webhooks installed successfully on ${#WEBHOOK_PROJECTS[@]} project(s)"
fi
fi
if [[ ${#EXISTING_WEBHOOK_PROJECTS[@]} -gt 0 ]]; then
if [[ "$VERBOSE" == "true" ]]; then
echo "[INFO] Webhooks already existed on ${#EXISTING_WEBHOOK_PROJECTS[@]} project(s):"
for pid in "${EXISTING_WEBHOOK_PROJECTS[@]}"; do
echo " - Project ID: $pid"
done
else
echo "[INFO] Webhooks already existed on ${#EXISTING_WEBHOOK_PROJECTS[@]} project(s)"
fi
fi
echo "[INFO] Total projects processed: $total_projects"
fi
```
```bash theme={null}
# Make sure the script is executable:
chmod +x gitlab-webhook.sh
```
#### Example: Install webhook on a single project
```bash theme={null}
export GITLAB_TOKEN="glpat-xxxxx"
./gitlab-webhook.sh \
-h "gitlab.example.com" \
-u "https://coderabbit.ai/gitlabHandler" \
-s "your-webhook-secret" \
-p 42
```
#### Example: Install webhooks on all projects in a group (including subgroups)
```bash theme={null}
export GITLAB_TOKEN="glpat-xxxxx"
./gitlab-webhook.sh \
-h "gitlab.example.com" \
-u "https://coderabbit.ai/gitlabHandler" \
-s "your-webhook-secret" \
-g "mygroup/mysubgroup"
```
## Repository installation
After completing onboarding, install CodeRabbit on individual projects or across a GitLab group from the [Repositories page](https://app.coderabbit.ai/settings/repositories) in the CodeRabbit app. The permission model and steps are the same as for GitLab.com — see [Repository installation](/platforms/gitlab-com#repository-installation) for details.
## SSH repository access
By default, CodeRabbit clones your GitLab projects over HTTPS. If HTTPS is not available or your organization prefers SSH for repository access, you can configure SSH clone credentials in the CodeRabbit web app.
### Prerequisites
* An SSH key pair generated **without a passphrase**. CodeRabbit cannot use passphrase-protected keys.
* The public key must be registered on the GitLab account used by CodeRabbit under **Edit profile → SSH Keys**. GitLab will deny SSH access if the public key is not registered!
See the [GitLab documentation on SSH keys](https://docs.gitlab.com/ee/user/ssh.html).
### Configure SSH clone credentials
Navigate to [app.coderabbit.ai](https://app.coderabbit.ai) and log in with your self-managed GitLab account.
In the left navigation menu, click **Account** at the bottom.
In the left navigation of the Account page, under **Developer settings**, click **SSH Clone Credentials**.
Fill in the fields as required for your setup:
| Field | Required | Description |
| ------------------- | ----------- | -------------------------------------------------------------------------------------------------------------------- |
| **SSH Private Key** | Yes | The private key used to authenticate with your GitLab instance. Must be generated **without a passphrase**. |
| **SSH Public Key** | Recommended | The corresponding public key. Providing it allows CodeRabbit to verify the key pair. |
| **SSH Port** | Optional | Custom SSH port if your GitLab instance does not use the default port `22`. |
| **known\_hosts** | Optional | Contents of a `known_hosts` file for your GitLab host. Helps prevent man-in-the-middle warnings on first connection. |
For most setups, providing the **SSH Private Key** and **SSH Public Key** is sufficient.
To avoid common copy-paste problems, use `pbcopy` (macOS) or `xclip` (Linux) to copy each key file to your clipboard, then paste directly into the corresponding field.
Click **Save** to apply the SSH clone credentials. CodeRabbit will attempt SSH cloning using these credentials for your self-managed GitLab repositories. If SSH credentials cannot be decrypted or are invalid, cloning falls back to HTTPS.
After the initial setup, you can return to this page to update individual fields without re-entering all credentials.
## What's next
Overview of all Git platforms supported by CodeRabbit and how to get started.
Open your first merge request and see CodeRabbit post a review in minutes.
### **Allow list CodeRabbit IP address**
Use this CodeRabbit IP if your instance requires IP allow listing.
```text IPs to allow list theme={null}
35.222.179.152/32, 34.170.211.100/32, 136.113.208.247/32
```
### Manual webhook installation
Use this flow when you need to install the webhook manually or rotate the shared webhook secret. The **Webhook Secret** page is available for both GitLab.com and self-managed GitLab.
In the CodeRabbit app, open **Account** and select **Webhook Secret** from the sidebar.
Use the **Webhook URL** field on that page to copy the exact endpoint that your GitLab instance should call.
Enter the secret that GitLab should send with webhook deliveries and save it in CodeRabbit.
When creating or editing the webhook in GitLab, use the copied webhook URL and enable these settings:
* **Merge request events**
* **Comments**
* **Issues events**
* **SSL verification** enabled
If you change an existing webhook secret, CodeRabbit attempts to update existing CodeRabbit-managed GitLab project and group webhooks automatically. If a webhook was created manually, or if an automatic refresh fails, update the secret directly in GitLab.
### Bulk webhook installation
For administrators managing many GitLab projects, you can use a script to bulk-install webhooks across all projects.
Login to CodeRabbit UI through your GitLab self-managed instance.
Follow the [Manual webhook installation](#manual-webhook-installation) steps above to get your webhook URL and save a webhook secret in CodeRabbit.
Use a script to install webhooks across your GitLab projects or groups. Below is a sample script that requires:
* Your GitLab host URL
* The webhook URL you copied in the previous step
* The webhook secret you saved in the previous step
* A GitLab access token with API permissions
```bash theme={null}
#!/usr/bin/env bash
## gitlab-webhook.sh
# Add a webhook to one project, or every project in a subgroup tree
set -euo pipefail
usage() {
cat < -u -s \\
[-t ] [-A ] [-p | -g ] [-v]
Required:
-h GitLab host (e.g. gitlab.example.com)
-u Webhook endpoint URL to receive POSTs
-s Webhook secret token (used for signature verification)
Authentication (one of):
-t Access token (PAT, project, group or OAuth). If omitted, \$GITLAB_TOKEN is used
-A Auth header to use. Default detects:
PAT → "PRIVATE-TOKEN"
anything else → "Authorization: Bearer"
Scope (choose one):
-p Project ID or full path (e.g. 42 or group/app)
-g Group ID or full path, recurse through all subgroups & projects
Options:
-v Verbose output (show individual project IDs in final summary)
EOF
exit 1
}
HOST="" HOOK_URL="" HOOK_SECRET=""
TOKEN="${GITLAB_TOKEN:-}" AUTH_HEADER=""
PROJECT="" GROUP="" VERBOSE=false
while getopts "h:u:s:t:A:p:g:v" opt; do
case "$opt" in
h) HOST=$OPTARG ;;
u) HOOK_URL=$OPTARG ;;
s) HOOK_SECRET=$OPTARG ;;
t) TOKEN=$OPTARG ;;
A) AUTH_HEADER=$OPTARG ;;
p) PROJECT=$OPTARG ;;
g) GROUP=$OPTARG ;;
v) VERBOSE=true ;;
*) usage ;;
esac
done
# Mandatory checks
[[ -z $HOST || -z $HOOK_URL || -z $HOOK_SECRET ]] && usage
[[ -n $PROJECT && -n $GROUP ]] && usage
[[ -z $PROJECT && -z $GROUP ]] && usage
# Token handling
if [[ -z $TOKEN ]]; then
echo "[ERROR] No access token provided. Use -t or set \$GITLAB_TOKEN" >&2
exit 1
fi
# Choose header if not forced
if [[ -z $AUTH_HEADER ]]; then
if [[ $TOKEN == glpat-* || $TOKEN == "PAT-"* ]]; then
AUTH_HEADER="PRIVATE-TOKEN"
else
AUTH_HEADER="Authorization: Bearer"
fi
fi
API="https://${HOST}/api/v4"
CURL_BASE=(curl -sSf --header "${AUTH_HEADER}: ${TOKEN}")
# Track processed projects to avoid duplicates
declare -A PROCESSED_PROJECTS
WEBHOOK_PROJECTS=()
EXISTING_WEBHOOK_PROJECTS=()
TOTAL_PROJECTS_FOUND=0
PROJECTS_PROCESSED=0
url_encode() {
local string="$1"
printf '%s' "$string" | sed 's/\//%2F/g; s/ /%20/g; s/@/%40/g; s/:/%3A/g; s/#/%23/g; s/?/%3F/g; s/&/%26/g; s/=/%3D/g; s/+/%2B/g'
}
fetch_paginated() {
local url=$1
local page=1
local per_page=100
while true; do
local paginated_url
if [[ "$url" == *"?"* ]]; then
paginated_url="${url}&per_page=${per_page}&page=${page}"
else
paginated_url="${url}?per_page=${per_page}&page=${page}"
fi
local response
response=$("${CURL_BASE[@]}" "$paginated_url" 2>/dev/null) || {
echo "[ERROR] Failed to fetch page $page from $url" >&2
return 1
}
if [[ "$response" == "[]" || "$response" == "null" ]]; then
break
fi
local page_results
page_results=$(echo "$response" | jq -r '.[].id' 2>/dev/null) || {
echo "[ERROR] Failed to parse JSON response from page $page" >&2
return 1
}
if [[ -z "$page_results" ]]; then
break
fi
local page_count
page_count=$(echo "$page_results" | wc -l)
TOTAL_PROJECTS_FOUND=$((TOTAL_PROJECTS_FOUND + page_count))
echo "[PROGRESS] Found $page_count projects on page $page (total: $TOTAL_PROJECTS_FOUND)" >&2
echo "$page_results"
local item_count
item_count=$(echo "$response" | jq '. | length' 2>/dev/null) || 0
if [[ "$item_count" -lt "$per_page" ]]; then
break
fi
((page++))
done
}
create_hook() {
local pid=$1
if [[ -n "${PROCESSED_PROJECTS[$pid]:-}" ]]; then
return 0
fi
PROCESSED_PROJECTS[$pid]=1
PROJECTS_PROCESSED=$((PROJECTS_PROCESSED + 1))
local encoded_pid
if [[ $pid =~ ^[0-9]+$ ]]; then
encoded_pid=$pid
else
encoded_pid=$(url_encode "$pid")
fi
local existing_webhooks
existing_webhooks=$("${CURL_BASE[@]}" "${API}/projects/${encoded_pid}/hooks" 2>/dev/null) || {
echo "[ERROR] Failed to fetch existing webhooks for project $pid" >&2
return 1
}
if echo "$existing_webhooks" | jq -e --arg url "$HOOK_URL" '.[] | select(.url == $url)' >/dev/null 2>&1; then
[[ "$VERBOSE" == "true" ]] && echo "[INFO] Webhook already exists for project: $pid" >&2
EXISTING_WEBHOOK_PROJECTS+=("$pid")
return 0
fi
[[ "$VERBOSE" == "true" ]] && echo "[INFO] Adding webhook to project: $pid" >&2
"${CURL_BASE[@]}" --request POST \
--data-urlencode "url=${HOOK_URL}" \
--data "token=${HOOK_SECRET}" \
--data "push_events=true" \
--data "note_events=true" \
--data "issues_events=true" \
--data "merge_requests_events=true" \
--data "enable_ssl_verification=true" \
"${API}/projects/${encoded_pid}/hooks" \
> /dev/null
WEBHOOK_PROJECTS+=("$pid")
}
traverse_group() {
local gid=$1
local encoded_gid
if [[ $gid =~ ^[0-9]+$ ]]; then
encoded_gid=$gid
else
encoded_gid=$(url_encode "$gid")
fi
while IFS= read -r pid; do
[[ -n "$pid" ]] && create_hook "$pid"
done < <(
fetch_paginated "${API}/groups/${encoded_gid}/projects?include_subgroups=true"
)
while IFS= read -r sg; do
[[ -n "$sg" ]] && traverse_group "$sg"
done < <(
fetch_paginated "${API}/groups/${encoded_gid}/subgroups"
)
}
echo "[INFO] Starting webhook processing..." >&2
if [[ -n $PROJECT ]]; then
echo "[INFO] Processing single project: $PROJECT" >&2
create_hook "$PROJECT"
else
echo "[INFO] Processing group and subgroups: $GROUP" >&2
traverse_group "$GROUP"
fi
echo "[INFO] Finished processing all projects" >&2
total_projects=$((${#WEBHOOK_PROJECTS[@]} + ${#EXISTING_WEBHOOK_PROJECTS[@]}))
if [[ $total_projects -eq 0 ]]; then
echo "[INFO] No projects were processed"
else
if [[ ${#WEBHOOK_PROJECTS[@]} -gt 0 ]]; then
if [[ "$VERBOSE" == "true" ]]; then
echo "[INFO] Webhooks installed successfully on ${#WEBHOOK_PROJECTS[@]} project(s):"
for pid in "${WEBHOOK_PROJECTS[@]}"; do
echo " - Project ID: $pid"
done
else
echo "[INFO] Webhooks installed successfully on ${#WEBHOOK_PROJECTS[@]} project(s)"
fi
fi
if [[ ${#EXISTING_WEBHOOK_PROJECTS[@]} -gt 0 ]]; then
if [[ "$VERBOSE" == "true" ]]; then
echo "[INFO] Webhooks already existed on ${#EXISTING_WEBHOOK_PROJECTS[@]} project(s):"
for pid in "${EXISTING_WEBHOOK_PROJECTS[@]}"; do
echo " - Project ID: $pid"
done
else
echo "[INFO] Webhooks already existed on ${#EXISTING_WEBHOOK_PROJECTS[@]} project(s)"
fi
fi
echo "[INFO] Total projects processed: $total_projects"
fi
```
```bash theme={null}
# Make sure the script is executable:
chmod +x gitlab-webhook.sh
```
#### Example: Install webhook on a single project
```bash theme={null}
export GITLAB_TOKEN="glpat-xxxxx"
./gitlab-webhook.sh \
-h "gitlab.example.com" \
-u "https://coderabbit.ai/gitlabHandler" \
-s "your-webhook-secret" \
-p 42
```
#### Example: Install webhooks on all projects in a group (including subgroups)
```bash theme={null}
export GITLAB_TOKEN="glpat-xxxxx"
./gitlab-webhook.sh \
-h "gitlab.example.com" \
-u "https://coderabbit.ai/gitlabHandler" \
-s "your-webhook-secret" \
-g "mygroup/mysubgroup"
```
## Repository installation
After completing onboarding, install CodeRabbit on individual projects or across a GitLab group from the [Repositories page](https://app.coderabbit.ai/settings/repositories) in the CodeRabbit app. The permission model and steps are the same as for GitLab.com — see [Repository installation](/platforms/gitlab-com#repository-installation) for details.
## SSH repository access
By default, CodeRabbit clones your GitLab projects over HTTPS. If HTTPS is not available or your organization prefers SSH for repository access, you can configure SSH clone credentials in the CodeRabbit web app.
### Prerequisites
* An SSH key pair generated **without a passphrase**. CodeRabbit cannot use passphrase-protected keys.
* The public key must be registered on the GitLab account used by CodeRabbit under **Edit profile → SSH Keys**. GitLab will deny SSH access if the public key is not registered!
See the [GitLab documentation on SSH keys](https://docs.gitlab.com/ee/user/ssh.html).
### Configure SSH clone credentials
Navigate to [app.coderabbit.ai](https://app.coderabbit.ai) and log in with your self-managed GitLab account.
In the left navigation menu, click **Account** at the bottom.
In the left navigation of the Account page, under **Developer settings**, click **SSH Clone Credentials**.
Fill in the fields as required for your setup:
| Field | Required | Description |
| ------------------- | ----------- | -------------------------------------------------------------------------------------------------------------------- |
| **SSH Private Key** | Yes | The private key used to authenticate with your GitLab instance. Must be generated **without a passphrase**. |
| **SSH Public Key** | Recommended | The corresponding public key. Providing it allows CodeRabbit to verify the key pair. |
| **SSH Port** | Optional | Custom SSH port if your GitLab instance does not use the default port `22`. |
| **known\_hosts** | Optional | Contents of a `known_hosts` file for your GitLab host. Helps prevent man-in-the-middle warnings on first connection. |
For most setups, providing the **SSH Private Key** and **SSH Public Key** is sufficient.
To avoid common copy-paste problems, use `pbcopy` (macOS) or `xclip` (Linux) to copy each key file to your clipboard, then paste directly into the corresponding field.
Click **Save** to apply the SSH clone credentials. CodeRabbit will attempt SSH cloning using these credentials for your self-managed GitLab repositories. If SSH credentials cannot be decrypted or are invalid, cloning falls back to HTTPS.
After the initial setup, you can return to this page to update individual fields without re-entering all credentials.
## What's next
Overview of all Git platforms supported by CodeRabbit and how to get started.
Open your first merge request and see CodeRabbit post a review in minutes.