🐰 New: Triage — a self-updating cross-repository queue that prioritizes pull requests by value and risk, so you always know what to review next. Explore Triage →
Create CodeRabbit automations in the web app editor, from Slack or Discord chat, or with the CodeRabbit API, then pause, resume, and edit them.
The web app editor creates scheduled, channel message, and webhook automations. Slack and Discord chat and the CodeRabbit API are other ways to create the same automations. One-time automations are created from Slack chat.
Before you start
An automation can only use what your workspace has set up. Check these before you create one, or ask a CodeRabbit admin:
Requirement
Who sets it up
Agent billing. Runs use Agent minutes. Automations without a Slack or Discord destination need the Automations Agent trial or paid Agent access. See Who can use Automations.
A CodeRabbit admin
A connection for each tool the trigger or destination uses, such as Linear, Jira, or PagerDuty. See Connections.
A CodeRabbit admin
Those connections in the automation’s scope, which is Base Scope unless you choose another. See Connections and Base Scope.
A CodeRabbit admin
The CodeRabbit GitHub App on the repositories that runs read or change. See Identity for changes.
A GitHub organization owner
Create an automation in the web app
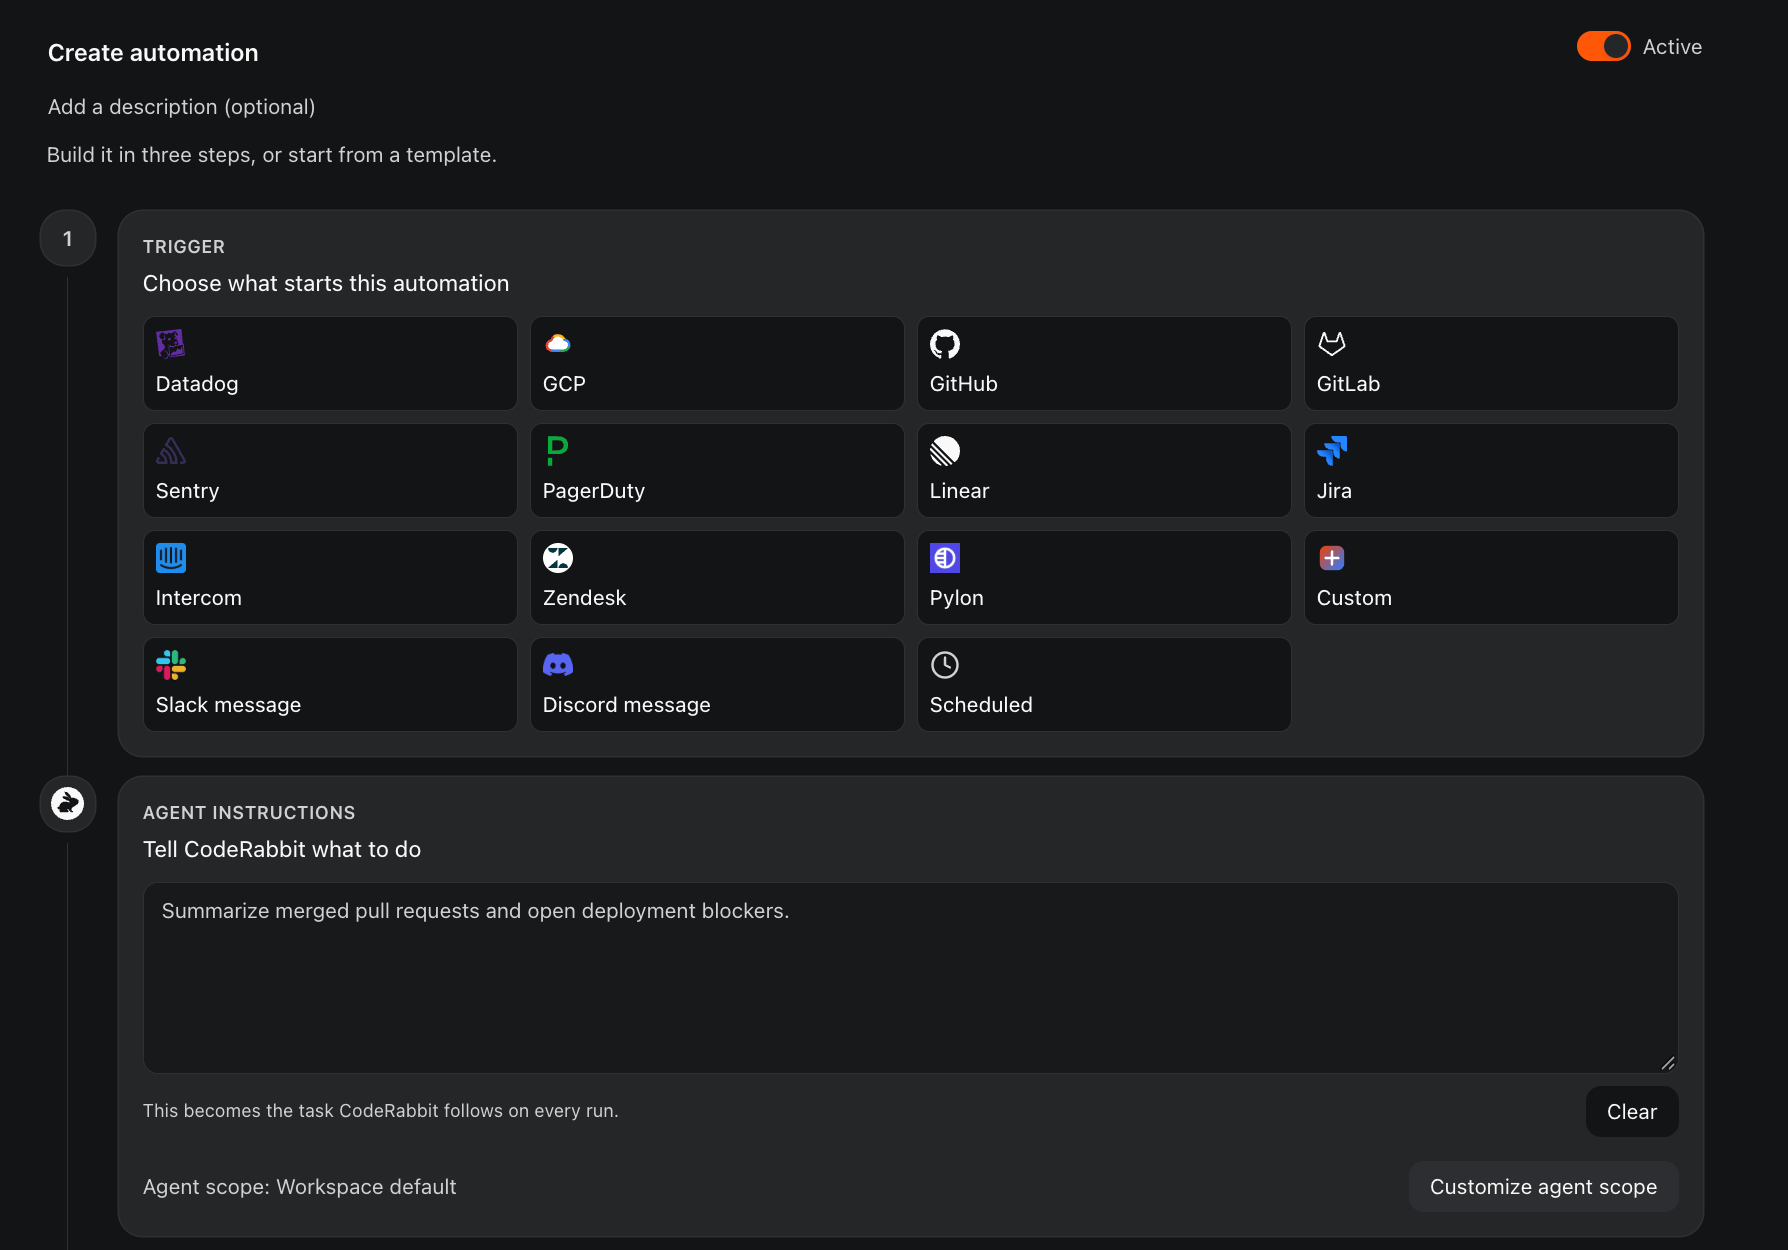
The automation editor: pick a trigger tile, then tell CodeRabbit what to do on each run
1
Open Automations
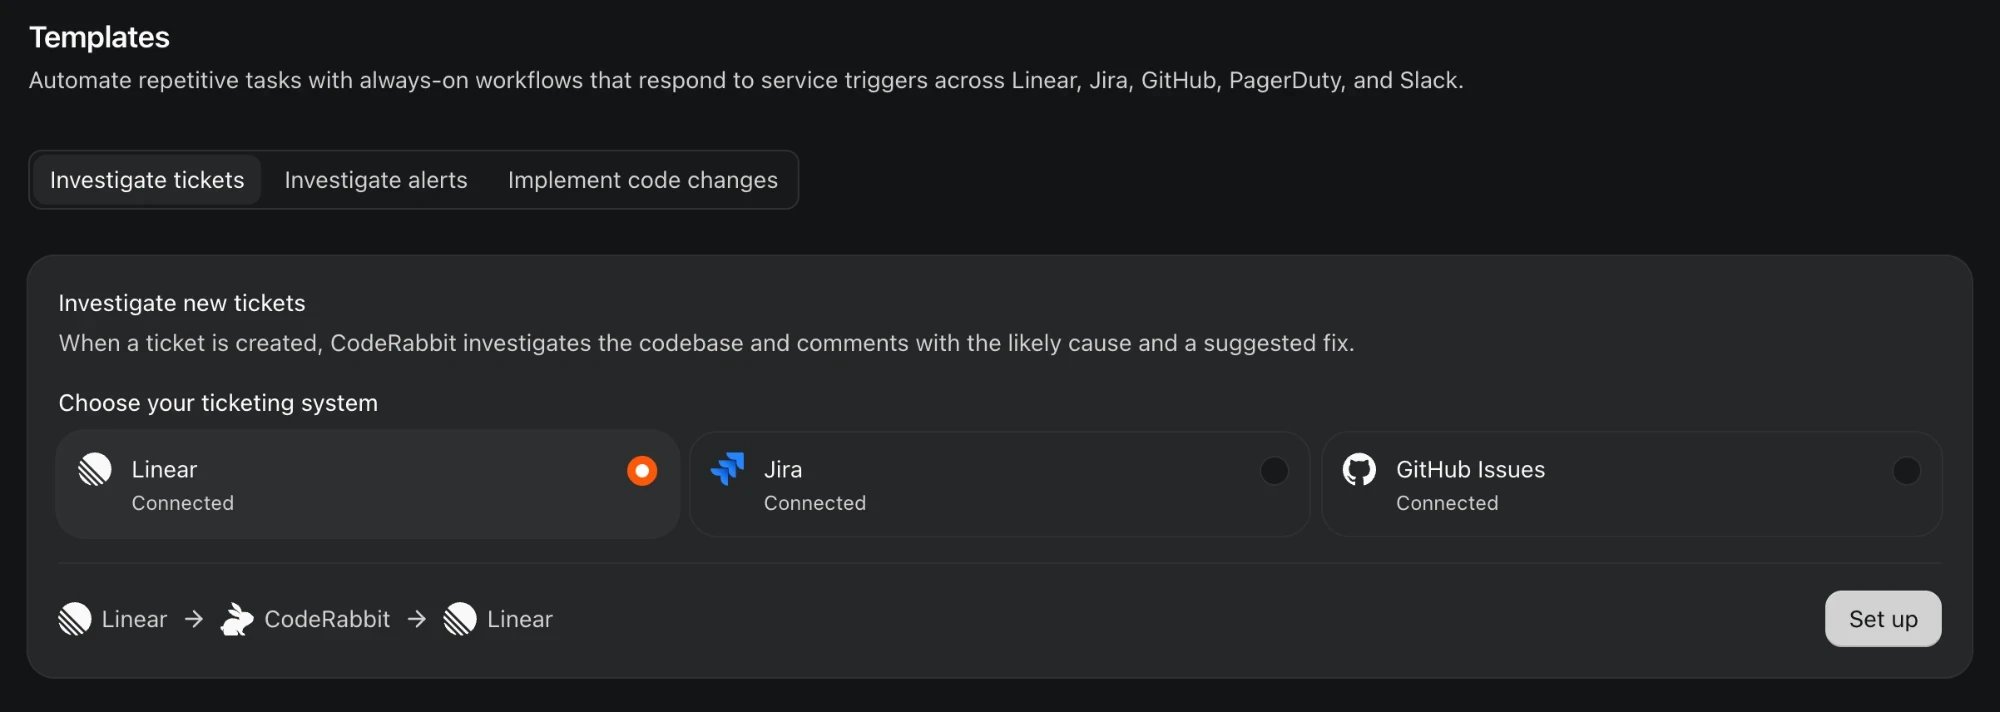
In the CodeRabbit web app, select Automations > Home in the sidebar. To start from scratch, select Create Automation.To start from a template, pick a category under Templates on the same page: Investigate tickets, Investigate alerts, or Implement code changes. Each category shows a card that says what the automation does, such as Investigate new tickets or Implement PRs for labeled tickets. If the card asks you to Choose your ticketing system, pick Linear, Jira, or GitHub Issues; tools that are already connected show Connected. The row at the bottom of the card shows where the automation starts and where the result goes, for example Linear → CodeRabbit → GitHub. Select Set up to open the editor with the trigger, instructions, and destination filled in, and with the template’s name, such as Recommend fix on Linear issue, as the automation’s name.
The Investigate tickets template with Linear selected: CodeRabbit comments on each new Linear issue
2
Name the automation
Replace Untitled automation with a name, and optionally add a description.
3
Choose a trigger
In the Trigger card, select a tile: Scheduled, Slack message, Discord message, or one of the webhook providers, such as Linear, Jira, GitHub, or PagerDuty. Then fill in the trigger’s settings. See Automation triggers.
4
Write the agent instructions
In the Agent instructions card, tell CodeRabbit what to do on each run. See Write agent instructions.
5
Choose a destination
In the Target card, choose where results go: a Slack or Discord channel, a Slack DM, a GitHub repository, or any connected tool CodeRabbit can write to, such as Linear, Jira, PagerDuty, Notion, or HubSpot. Select Add target to deliver to more than one. See Automation destinations.
6
Save
Set the toggle next to the name to Active to start running right away, or to Paused to save a draft. Then select Save automation.
7
Test it
With the automation active, start a run: select Run now on a scheduled automation’s page, post a matching message in the channel, or cause a matching event in the other tool, such as adding the label to a Linear issue. Follow the run on the automation’s page and check what it delivered. See Test a trigger.
For a webhook provider that CodeRabbit doesn’t manage, the editor shows the webhook URL and setup steps after you save. Configure them in the other tool before you expect runs. See Webhook events.Slack and Discord have their own templates. In the web app, open Slack > Automations or Discord > Automations and look under Prebuilt automations for templates such as Triage Linear issue and Triage PagerDuty incident, which post results to a channel.
Write agent instructions
The agent instructions are the task CodeRabbit runs each time the trigger fires. They can be up to 20,000 characters. Write them the way you would brief a teammate:
Say what to look at. Name the repositories, services, or connected tools to check, such as “the backend repositories” or “recent deploys in Datadog”.
Say what to do. Investigate, summarize, recommend a fix, or implement a change and open a pull request.
Describe the result. Say what the output should contain and how long it should be. For webhook triggers, refer to the event, for example “the new Linear issue” or “the triggered PagerDuty incident”.
Say what to do when there’s nothing to report. For example, “If there are no new advisories, reply with one line saying so.”
Instructions can also ask CodeRabbit to follow an existing durable skill, so every run reuses an established procedure.The Agent instructions card also shows the automation’s Agent scope, the repositories and connections each run can use. It’s the workspace default unless you choose a shared or custom scope. See Agent scope.Each destination can also have its own instructions that say how to deliver the result, such as the format of a Linear comment. See Automation destinations.In Slack, the instructions can also add buttons to the reply, post to a second channel, or send DMs. See Buttons, second channel, and DMs.
Create an automation from chat
In Slack, ask @coderabbit to automate a job in a channel or DM, or run /automations. For a recurring or message-triggered automation, CodeRabbit runs the job once as a trial, then shows a draft card so you can review the output before anything is saved. Slack chat is also where you create one-time automations, which skip the trial. See Automations in Slack.In Discord, ask CodeRabbit in a public channel or run /automations. The automation belongs to the parent channel even when you create it in a thread. See Automations in Discord.Automations created from chat appear in the web app with the others, and you can edit them in the web app editor, except one-time automations.
Create automations with the API
The CodeRabbit API manages automations under /v1/automations. A key needs the automations:read scope to read automations and runs, and automations:write to create, update, or control them. See Authentication. The CodeRabbit MCP server offers the same operations as tools, such as create_automation and list_automation_runs, with the same scopes; see MCP tools.
Updates and commands take the expected_revision that you read from the automation, so a change made in the meantime isn’t overwritten. A run_now command only starts the run; read the runs endpoint to follow it. The same permission, billing, and availability checks apply as in the web app.
Active and paused automations
Every automation is either active or paused. You choose with the Active and Paused toggle in the editor, and you can switch later from the automation’s page. See Run now, pause, resume, and delete.
State
Behavior
Active
Runs on its schedule, on matching channel messages, or on matching webhook events.
Paused
Keeps its configuration but doesn’t run. Schedules are skipped, and new channel messages and webhook events are ignored. Run now isn’t available.
Save a new automation as paused when you still need to set up the other tool, such as a webhook in Datadog, or when you want a teammate to review the instructions first.
Edit an automation
Open the automation from Automations > Home and select Edit, or select Edit in the row’s menu in the list. The editor opens with the same Trigger, Agent instructions, and Target cards. Change what you need and select Save automation.
If you can view an automation but not manage it, the editor opens read-only. See Permissions.
One-time automations can’t be edited in the web app editor.
Who can create automations
Each Slack workspace and Discord server has a setting that controls who can create automations in it:
Value
Who can create
Any user (default)
Every member
Slack or Discord workspace admins
Slack workspace admins or Discord server admins, and CodeRabbit admins
Automation admins
Automation admins
CodeRabbit admins can always create automations. When the setting doesn’t include you, creating an automation fails with a message such as “Only Slack workspace admins or CodeRabbit admins can create automations in this workspace.” Ask an admin to create the automation or to change the setting.Creating an automation doesn’t require permission to add connections. If the trigger or destination needs a tool that isn’t connected yet, the editor tells you to ask a CodeRabbit admin to connect it. Adding connections requires a CodeRabbit admin. See Connections and Base Scope.
What’s next
Automation triggers
Set up schedules, channel message triggers, and webhook events.
Automation destinations
Deliver results to a channel, a ticket, an incident, or a GitHub repository.
Manage and monitor automations
Follow runs, run an automation on demand, and pause or delete it.
Was this page helpful?
{"docsConfig":{"theme":"mint","$schema":"https://mintlify.com/docs.json","name":"CodeRabbit","description":"Guides for Agentic Change Management: review, prioritize, understand, and secure changes across pull requests, your IDE, CLI, and team chat.","colors":{"primary":"#FF570A","light":"#FF570A","dark":"#FF570A"},"logo":{"light":"https://mintcdn.com/coderabbit/qAZa_d7FrwPO_w-O/coderabbit-logo-light.svg?fit=max\u0026auto=format\u0026n=qAZa_d7FrwPO_w-O\u0026q=85\u0026s=d2bf9e91be0e760ec9cb468676fa6ab6","dark":"https://mintcdn.com/coderabbit/qAZa_d7FrwPO_w-O/coderabbit-logo-dark.svg?fit=max\u0026auto=format\u0026n=qAZa_d7FrwPO_w-O\u0026q=85\u0026s=feeb1667ed4a2768a15b271f130395c0","href":"/"},"favicon":{"light":"https://mintcdn.com/coderabbit/qAZa_d7FrwPO_w-O/favicon-light.svg?fit=max\u0026auto=format\u0026n=qAZa_d7FrwPO_w-O\u0026q=85\u0026s=c0b0fbea23b48949cc631606f2a30022","dark":"https://mintcdn.com/coderabbit/qAZa_d7FrwPO_w-O/favicon-dark.svg?fit=max\u0026auto=format\u0026n=qAZa_d7FrwPO_w-O\u0026q=85\u0026s=4db7fc04860b6907c7f236f05b37f5c6"},"api":{"openapi":"openapi.json","playground":{"display":"simple"},"examples":{"languages":["curl","python","javascript"]}},"navbar":{"primary":{"type":"button","label":"Sign up","href":"https://app.coderabbit.ai/login?free-trial="}},"footer":{"socials":{"x":"https://x.com/coderabbitai","linkedin":"https://www.linkedin.com/company/coderabbitai","github":"https://github.com/coderabbitai","discord":"https://discord.gg/GsXnASn26c"},"links":[{"header":"Resources","items":[{"label":"Blog","href":"https://coderabbit.ai/blog"},{"label":"Pricing","href":"https://www.coderabbit.ai/pricing"},{"label":"Changelog","href":"https://docs.coderabbit.ai/changelog"},{"label":"Support knowledge base","href":"https://kb.coderabbit.ai"}]},{"header":"Quick links","items":[{"label":"Schedule a demo","href":"https://www.coderabbit.ai/contact-us/sales"},{"label":"Get support","href":"https://docs.coderabbit.ai/support"},{"label":"Status page","href":"https://status.coderabbit.ai"},{"label":"Terms of service","href":"https://www.coderabbit.ai/terms-of-service"},{"label":"Privacy Policy","href":"https://coderabbit.ai/privacy-policy"}]}]},"seo":{"metatags":{"description":"Guides for Agentic Change Management: review, prioritize, understand, and secure changes across pull requests, your IDE, CLI, and team chat.","og:type":"website","og:site_name":"CodeRabbit Documentation","og:locale":"en_US","twitter:card":"summary_large_image","twitter:site":"@coderabbitai","canonical":"https://docs.coderabbit.ai"}},"fonts":{"heading":{"family":"Geist"},"body":{"family":"Geist"}},"icons":{"library":"lucide"},"styling":{"eyebrows":"breadcrumbs","latex":true},"integrations":{"gtm":{"tagId":"GTM-5BWLXJRC"},"posthog":{"apiKey":"phc_6fDZRN9hYzB83I7Fk2GNHYqas4WMIdGBQ58aZ6EOZR0"}},"banner":{"content":"🐰 New: **Triage** — a self-updating cross-repository queue that prioritizes pull requests by value and risk, so you always know what to review next. [Explore Triage →](/triage)","dismissible":true,"type":"info","color":{"light":"#171717","dark":"#171717"}},"errors":{"404":{"redirect":false,"title":"Page Not Found. Sorry!","description":"Try **Search** or **Ask AI** to find what you're looking for.\nPress \u003ckbd>⌘K\u003c/kbd> (Mac) or \u003ckbd>Ctrl+K\u003c/kbd> (Windows/Linux) to open the search.\n\n\nNeed help? [Get support](/support)."}},"contextual":{"options":["copy","view","chatgpt","claude","perplexity","mcp","cursor","vscode"],"display":"header"},"navigation":{"global":{"anchors":[{"anchor":"Quickstart","icon":"rocket","hidden":false,"href":"/getting-started/quickstart"},{"anchor":"Blog","icon":"pen-line","hidden":true,"href":"https://coderabbit.ai/blog"},{"anchor":"Changelog","icon":"history","href":"/changelog"},{"anchor":"Support","icon":"life-buoy","href":"/support"},{"anchor":"Discord","icon":"discord","href":"https://discord.gg/coderabbit"}]},"pages":[]}},"deployment":{"deploymentMetadataValue":{"subdomain":"coderabbit","hasAudioNarration":false,"actualSubdomain":"coderabbit","customDomains":["docs.coderabbit.ai"],"gitSource":{"type":"github","owner":"coderabbitai","repo":"docs","deployBranch":"main","contentDirectory":"","isPrivate":true,"mountPath":"","label":""},"feedback":{"thumbs":true,"agentFeedback":true},"entitlements":{"AI_CHAT":{"status":"ENABLED"},"WEB_MCP":{"status":"ENABLED"},"NARRATION":{"status":"ENABLED"}},"buildId":"6aff357d7fb6886116678079","clientVersion":"0.0.4227","searchFilterCounts":[{"language":"default","tag":"API and MCP","count":193},{"language":"default","tag":"API reference","count":179},{"language":"default","tag":"Review","count":145},{"language":"default","tag":"Tools","count":61},{"language":"default","tag":"Per-tool guides","count":59},{"language":"default","tag":"Admin","count":55},{"language":"default","tag":"Agents","count":48},{"language":"default","tag":"Coding Agent","count":47},{"language":"default","tag":"Configuration","count":45},{"language":"default","tag":"Languages","count":39}]},"assistantConfig":{},"basePath":"","hasChatPermissions":false,"hasWebMcpPermissions":true,"toggles":[{"name":"kill-isr","enabled":true,"variant":{"name":"disabled","enabled":false,"feature_enabled":true},"impressionData":false},{"name":"custom-rbac-roles","enabled":true,"variant":{"name":"disabled","enabled":false,"feature_enabled":true},"impressionData":false},{"name":"agent-mintlify-slack","enabled":true,"variant":{"name":"disabled","enabled":false,"feature_enabled":true},"impressionData":false},{"name":"agent-integrations-settings","enabled":true,"variant":{"name":"disabled","enabled":false,"feature_enabled":true},"impressionData":false},{"name":"rbac-expansion","enabled":true,"variant":{"name":"disabled","enabled":false,"feature_enabled":true},"impressionData":false},{"name":"automations-pr-grouping","enabled":true,"variant":{"name":"disabled","enabled":false,"feature_enabled":true},"impressionData":false},{"name":"custom-prefix","enabled":true,"variant":{"name":"disabled","enabled":false,"feature_enabled":true},"impressionData":false},{"name":"analytics-v7","enabled":true,"variant":{"name":"disabled","enabled":false,"feature_enabled":true},"impressionData":false},{"name":"user-flows-analytics","enabled":true,"variant":{"name":"disabled","enabled":false,"feature_enabled":true},"impressionData":false},{"name":"no-publish-flow","enabled":true,"variant":{"name":"disabled","enabled":false,"feature_enabled":true},"impressionData":false},{"name":"workos-onboarding","enabled":true,"variant":{"name":"disabled","enabled":false,"feature_enabled":true},"impressionData":false},{"name":"snapshot-serving-live","enabled":true,"variant":{"name":"disabled","enabled":false,"feature_enabled":true},"impressionData":false},{"name":"stripTemperatureMiddleware","enabled":true,"variant":{"name":"disabled","enabled":false,"feature_enabled":true},"impressionData":false},{"name":"support-platform-pylon-zendesk","enabled":true,"variant":{"name":"disabled","enabled":false,"feature_enabled":true},"impressionData":false},{"name":"snapshot-serving","enabled":true,"variant":{"name":"disabled","enabled":false,"feature_enabled":true},"impressionData":false},{"name":"instant-rollback","enabled":true,"variant":{"name":"disabled","enabled":false,"feature_enabled":true},"impressionData":false},{"name":"granular-notifications-server","enabled":true,"variant":{"name":"disabled","enabled":false,"feature_enabled":true},"impressionData":false},{"name":"granular-notifications","enabled":true,"variant":{"name":"disabled","enabled":false,"feature_enabled":true},"impressionData":false},{"name":"automations-fable","enabled":true,"variant":{"name":"disabled","enabled":false,"feature_enabled":true},"impressionData":false},{"name":"fixed-ai-action-pricing","enabled":true,"variant":{"name":"disabled","enabled":false,"feature_enabled":true},"impressionData":false},{"name":"automation-resolve-merge-conflict","enabled":true,"variant":{"name":"disabled","enabled":false,"feature_enabled":true},"impressionData":false},{"name":"scoped-publishing","enabled":true,"variant":{"name":"disabled","enabled":false,"feature_enabled":true},"impressionData":false},{"name":"mintql","enabled":true,"variant":{"name":"disabled","enabled":false,"feature_enabled":true},"impressionData":false},{"name":"page-level-analytics","enabled":true,"variant":{"name":"disabled","enabled":false,"feature_enabled":true},"impressionData":false},{"name":"editor-version-history-v2","enabled":true,"variant":{"name":"disabled","enabled":false,"feature_enabled":true},"impressionData":false},{"name":"billing-page-v2","enabled":true,"variant":{"name":"disabled","enabled":false,"feature_enabled":true},"impressionData":false},{"name":"full-page-search","enabled":true,"variant":{"name":"disabled","enabled":false,"feature_enabled":true},"impressionData":false},{"name":"workspace-projects","enabled":true,"variant":{"name":"disabled","enabled":false,"feature_enabled":true},"impressionData":false},{"name":"assistant-v5","enabled":true,"variant":{"name":"disabled","enabled":false,"feature_enabled":true},"impressionData":false},{"name":"fork-pr-previews","enabled":true,"variant":{"name":"disabled","enabled":false,"feature_enabled":true},"impressionData":false},{"name":"revalidation-jwt","enabled":true,"variant":{"name":"disabled","enabled":false,"feature_enabled":true},"impressionData":false},{"name":"workos-sso-scim","enabled":true,"variant":{"name":"disabled","enabled":false,"feature_enabled":true},"impressionData":false},{"name":"hobby-abuse-scan","enabled":true,"variant":{"name":"disabled","enabled":false,"feature_enabled":true},"impressionData":false},{"name":"dashboard-inbox","enabled":true,"variant":{"name":"disabled","enabled":false,"feature_enabled":true},"impressionData":false},{"name":"workos-signup","enabled":true,"variant":{"name":"disabled","enabled":false,"feature_enabled":true},"impressionData":false},{"name":"turbopuffer-dual-write","enabled":true,"variant":{"name":"disabled","enabled":false,"feature_enabled":true},"impressionData":false},{"name":"workos-enabled","enabled":true,"variant":{"name":"disabled","enabled":false,"feature_enabled":true},"impressionData":false},{"name":"approve-review-flow","enabled":true,"variant":{"name":"disabled","enabled":false,"feature_enabled":true},"impressionData":false},{"name":"editor-metadata","enabled":true,"variant":{"name":"disabled","enabled":false,"feature_enabled":true},"impressionData":false},{"name":"sso-setup-deadline-banner","enabled":true,"variant":{"name":"disabled","enabled":false,"feature_enabled":true},"impressionData":false},{"name":"turbopuffer-serve","enabled":true,"variant":{"name":"disabled","enabled":false,"feature_enabled":true},"impressionData":false},{"name":"live-agents","enabled":true,"variant":{"name":"disabled","enabled":false,"feature_enabled":true},"impressionData":false},{"name":"starter-pricing","enabled":true,"variant":{"name":"control","enabled":true,"payload":{"type":"string","value":"control"},"feature_enabled":true},"impressionData":false},{"name":"llms-txt-v2","enabled":true,"variant":{"name":"disabled","enabled":false,"feature_enabled":true},"impressionData":false},{"name":"wildcard-email-auth","enabled":true,"variant":{"name":"disabled","enabled":false,"feature_enabled":true},"impressionData":false}],"googleFontsInlined":true},"customCss":[]}
{"page":{"pagePath":"automations/create","slug":"/automations/create","pageMetadata":{"title":"Create and edit automations","sidebarTitle":"Create and edit","description":"Create CodeRabbit automations in the web app editor, from Slack or Discord chat, or with the CodeRabbit API, then pause, resume, and edit them.","href":"/automations/create"},"description":{"compiledSource":"\"use strict\";\nconst {jsx: _jsx} = arguments[0];\nconst {useMDXComponents: _provideComponents} = arguments[0];\nfunction _createMdxContent(props) {\n const _components = {\n p: \"p\",\n ..._provideComponents(),\n ...props.components\n };\n return _jsx(_components.p, {\n children: \"Create CodeRabbit automations in the web app editor, from Slack or Discord chat, or with the CodeRabbit API, then pause, resume, and edit them.\"\n });\n}\nfunction MDXContent(props = {}) {\n const {wrapper: MDXLayout} = {\n ..._provideComponents(),\n ...props.components\n };\n return MDXLayout ? _jsx(MDXLayout, {\n ...props,\n children: _jsx(_createMdxContent, {\n ...props\n })\n }) : _createMdxContent(props);\n}\nreturn {\n default: MDXContent\n};\n","frontmatter":{},"scope":{}},"pageType":"default","mdx":{"mdxSource":{"compiledSource":"\"use strict\";const{Fragment:_Fragment,jsx:_jsx,jsxs:_jsxs}=arguments[0];const{useMDXComponents:_provideComponents}=arguments[0];const DeploymentBadge=({variant=`cloud-only`,tip,title,cta=`Learn more`,href=`/self-hosted/overview`,disabled=false})=>{const{Badge,Tooltip}=_provideComponents()||{};if(!Badge)_missingMdxReference(`Badge`,true);if(!Tooltip)_missingMdxReference(`Tooltip`,true);const isCloudOnly=variant===`cloud-only`;const defaultTitle=isCloudOnly?`Cloud Only`:`Self-Hosted Only`;const defaultTip=isCloudOnly?`This feature is available on CodeRabbit Cloud only. It is not available on self-hosted CodeRabbit deployments.`:`This feature is available on self-hosted CodeRabbit deployments only. It is not available on CodeRabbit Cloud.`;return _jsx(Tooltip,{tip:tip||defaultTip,cta,href,children:_jsx(Badge,{icon:`rabbit`,disabled:disabled||undefined,children:title||defaultTitle})})};function _createMdxContent(props){const _components={a:`a`,code:`code`,li:`li`,p:`p`,strong:`strong`,tbody:`tbody`,td:`td`,th:`th`,thead:`thead`,tr:`tr`,ul:`ul`,..._provideComponents(),...props.components},{Card,CardGroup,Frame,Heading,OptimizedImage,Step,Steps,Table,_MdxComponentBoundary}=_components;if(!Card)_missingMdxReference(`Card`,true);if(!CardGroup)_missingMdxReference(`CardGroup`,true);if(!Frame)_missingMdxReference(`Frame`,true);if(!Heading)_missingMdxReference(`Heading`,true);if(!OptimizedImage)_missingMdxReference(`OptimizedImage`,true);if(!Step)_missingMdxReference(`Step`,true);if(!Steps)_missingMdxReference(`Steps`,true);if(!Table)_missingMdxReference(`Table`,true);if(!_MdxComponentBoundary)_missingMdxReference(`_MdxComponentBoundary`,true);return _jsxs(_Fragment,{children:[_jsx(_MdxComponentBoundary,{name:`DeploymentBadge`,children:_jsx(DeploymentBadge,{variant:`cloud-only`})}),`\n`,_jsx(_components.p,{children:`The web app editor creates scheduled, channel message, and webhook automations. Slack and Discord chat and the CodeRabbit API are other ways to create the same automations. One-time automations are created from Slack chat.`}),`\n`,_jsx(Heading,{level:`2`,id:`before-you-start`,children:`Before you start`}),`\n`,_jsx(_components.p,{children:`An automation can only use what your workspace has set up. Check these before you create one, or ask a CodeRabbit admin:`}),`\n`,_jsxs(Table,{children:[_jsx(_components.thead,{children:_jsxs(_components.tr,{children:[_jsx(_components.th,{children:`Requirement`}),_jsx(_components.th,{children:`Who sets it up`})]})}),_jsxs(_components.tbody,{children:[_jsxs(_components.tr,{children:[_jsxs(_components.td,{children:[`Agent billing. Runs use Agent minutes. Automations without a Slack or Discord destination need the Automations Agent trial or paid Agent access. See `,_jsx(_components.a,{href:`/automations#who-can-use-automations`,children:`Who can use Automations`}),`.`]}),_jsx(_components.td,{children:`A CodeRabbit admin`})]}),_jsxs(_components.tr,{children:[_jsxs(_components.td,{children:[`A connection for each tool the trigger or destination uses, such as Linear, Jira, or PagerDuty. See `,_jsx(_components.a,{href:`/connections`,children:`Connections`}),`.`]}),_jsx(_components.td,{children:`A CodeRabbit admin`})]}),_jsxs(_components.tr,{children:[_jsxs(_components.td,{children:[`Those connections in the automation’s scope, which is Base Scope unless you choose another. See `,_jsx(_components.a,{href:`/automations/destinations#connections-and-base-scope`,children:`Connections and Base Scope`}),`.`]}),_jsx(_components.td,{children:`A CodeRabbit admin`})]}),_jsxs(_components.tr,{children:[_jsxs(_components.td,{children:[`The CodeRabbit GitHub App on the repositories that runs read or change. See `,_jsx(_components.a,{href:`/automations/destinations#identity-for-changes`,children:`Identity for changes`}),`.`]}),_jsx(_components.td,{children:`A GitHub organization owner`})]})]})]}),`\n`,_jsx(Heading,{level:`2`,id:`create-an-automation-in-the-web-app`,children:`Create an automation in the web app`}),`\n`,_jsx(Frame,{caption:`The automation editor: pick a trigger tile, then tell CodeRabbit what to do on each run`,children:_jsx(OptimizedImage,{src:`https://mintcdn.com/coderabbit/gKPHgRl-bneGQ2yQ/assets/images/automations-editor.png?fit=max\u0026auto=format\u0026n=gKPHgRl-bneGQ2yQ\u0026q=85\u0026s=e41de55cf5dac6644b06c559700b9d99`,alt:`The Create automation editor in the CodeRabbit web app. The Trigger card shows tiles for Datadog, GCP, GitHub, GitLab, Sentry, PagerDuty, Linear, Jira, Intercom, Zendesk, Pylon, Custom, Slack message, Discord message, and Scheduled. Below it, the Agent instructions card holds the instruction Summarize merged pull requests and open deployment blockers, with Agent scope set to Workspace default and a Customize agent scope button. An Active toggle sits in the top-right corner.`,\"data-og-width\":`1788`,width:`1788`,\"data-og-height\":`1250`,height:`1250`,\"data-path\":`assets/images/automations-editor.png`,\"data-optimize\":`true`,\"data-opv\":`3`,srcset:`https://mintcdn.com/coderabbit/gKPHgRl-bneGQ2yQ/assets/images/automations-editor.png?w=280\u0026fit=max\u0026auto=format\u0026n=gKPHgRl-bneGQ2yQ\u0026q=85\u0026s=914d742b5d8668ebdcea26d8c17432e5 280w, https://mintcdn.com/coderabbit/gKPHgRl-bneGQ2yQ/assets/images/automations-editor.png?w=560\u0026fit=max\u0026auto=format\u0026n=gKPHgRl-bneGQ2yQ\u0026q=85\u0026s=e6fab1513602f31c90a681906439266c 560w, https://mintcdn.com/coderabbit/gKPHgRl-bneGQ2yQ/assets/images/automations-editor.png?w=840\u0026fit=max\u0026auto=format\u0026n=gKPHgRl-bneGQ2yQ\u0026q=85\u0026s=08ab1cdd12d778c2f6f4b307a53035a0 840w, https://mintcdn.com/coderabbit/gKPHgRl-bneGQ2yQ/assets/images/automations-editor.png?w=1100\u0026fit=max\u0026auto=format\u0026n=gKPHgRl-bneGQ2yQ\u0026q=85\u0026s=e175efd7005c8bd962697a2c6b218f81 1100w, https://mintcdn.com/coderabbit/gKPHgRl-bneGQ2yQ/assets/images/automations-editor.png?w=1650\u0026fit=max\u0026auto=format\u0026n=gKPHgRl-bneGQ2yQ\u0026q=85\u0026s=71556c45e436702031be69c58f5e5c0f 1650w, https://mintcdn.com/coderabbit/gKPHgRl-bneGQ2yQ/assets/images/automations-editor.png?w=2500\u0026fit=max\u0026auto=format\u0026n=gKPHgRl-bneGQ2yQ\u0026q=85\u0026s=58a7eb4b56e27097d2b72f4955b552bc 2500w`})}),`\n`,_jsxs(Steps,{children:[_jsxs(Step,{title:`Open Automations`,children:[_jsxs(_components.p,{children:[`In the CodeRabbit web app, select `,_jsx(_components.strong,{children:`Automations`}),` > `,_jsx(_components.strong,{children:`Home`}),` in the sidebar. To start from scratch, select `,_jsx(_components.strong,{children:`Create Automation`}),`.`]}),_jsxs(_components.p,{children:[`To start from a template, pick a category under `,_jsx(_components.strong,{children:`Templates`}),` on the same page: `,_jsx(_components.strong,{children:`Investigate tickets`}),`, `,_jsx(_components.strong,{children:`Investigate alerts`}),`, or `,_jsx(_components.strong,{children:`Implement code changes`}),`. Each category shows a card that says what the automation does, such as `,_jsx(_components.strong,{children:`Investigate new tickets`}),` or `,_jsx(_components.strong,{children:`Implement PRs for labeled tickets`}),`. If the card asks you to `,_jsx(_components.strong,{children:`Choose your ticketing system`}),`, pick `,_jsx(_components.strong,{children:`Linear`}),`, `,_jsx(_components.strong,{children:`Jira`}),`, or `,_jsx(_components.strong,{children:`GitHub Issues`}),`; tools that are already connected show `,_jsx(_components.strong,{children:`Connected`}),`. The row at the bottom of the card shows where the automation starts and where the result goes, for example Linear → CodeRabbit → GitHub. Select `,_jsx(_components.strong,{children:`Set up`}),` to open the editor with the trigger, instructions, and destination filled in, and with the template’s name, such as `,_jsx(_components.strong,{children:`Recommend fix on Linear issue`}),`, as the automation’s name.`]}),_jsx(Frame,{caption:`The Investigate tickets template with Linear selected: CodeRabbit comments on each new Linear issue`,children:_jsx(OptimizedImage,{src:`https://mintcdn.com/coderabbit/gKPHgRl-bneGQ2yQ/assets/images/automations-templates.webp?fit=max\u0026auto=format\u0026n=gKPHgRl-bneGQ2yQ\u0026q=85\u0026s=3e2801dc9d284a11b0fef7e6b4acd6ea`,alt:`The Templates section of the Automations page. The Investigate tickets category is selected and shows the Investigate new tickets card: when a ticket is created, CodeRabbit investigates the codebase and comments with the likely cause and a suggested fix. Under Choose your ticketing system, Linear is selected, and Linear, Jira, and GitHub Issues all show Connected. The flow row reads Linear, CodeRabbit, Linear, next to a Set up button.`,\"data-og-width\":`2000`,width:`2000`,\"data-og-height\":`712`,height:`712`,\"data-path\":`assets/images/automations-templates.webp`,\"data-optimize\":`true`,\"data-opv\":`3`,srcset:`https://mintcdn.com/coderabbit/gKPHgRl-bneGQ2yQ/assets/images/automations-templates.webp?w=280\u0026fit=max\u0026auto=format\u0026n=gKPHgRl-bneGQ2yQ\u0026q=85\u0026s=4bed175c8248095e76f6ab1978a61331 280w, https://mintcdn.com/coderabbit/gKPHgRl-bneGQ2yQ/assets/images/automations-templates.webp?w=560\u0026fit=max\u0026auto=format\u0026n=gKPHgRl-bneGQ2yQ\u0026q=85\u0026s=5aa28b7a81be0b951336913f38b10023 560w, https://mintcdn.com/coderabbit/gKPHgRl-bneGQ2yQ/assets/images/automations-templates.webp?w=840\u0026fit=max\u0026auto=format\u0026n=gKPHgRl-bneGQ2yQ\u0026q=85\u0026s=067e6b7f5105327b10e491fe23ff3b7b 840w, https://mintcdn.com/coderabbit/gKPHgRl-bneGQ2yQ/assets/images/automations-templates.webp?w=1100\u0026fit=max\u0026auto=format\u0026n=gKPHgRl-bneGQ2yQ\u0026q=85\u0026s=38c4c4f3edee4831194a86e04119966b 1100w, https://mintcdn.com/coderabbit/gKPHgRl-bneGQ2yQ/assets/images/automations-templates.webp?w=1650\u0026fit=max\u0026auto=format\u0026n=gKPHgRl-bneGQ2yQ\u0026q=85\u0026s=b531ff899244e991c3e31f0137cceff8 1650w, https://mintcdn.com/coderabbit/gKPHgRl-bneGQ2yQ/assets/images/automations-templates.webp?w=2500\u0026fit=max\u0026auto=format\u0026n=gKPHgRl-bneGQ2yQ\u0026q=85\u0026s=ccb253c10c700477e1f3e18dbd73b41d 2500w`})})]}),_jsx(Step,{title:`Name the automation`,children:_jsxs(_components.p,{children:[`Replace `,_jsx(_components.strong,{children:`Untitled automation`}),` with a name, and optionally add a description.`]})}),_jsx(Step,{title:`Choose a trigger`,children:_jsxs(_components.p,{children:[`In the `,_jsx(_components.strong,{children:`Trigger`}),` card, select a tile: `,_jsx(_components.strong,{children:`Scheduled`}),`, `,_jsx(_components.strong,{children:`Slack message`}),`, `,_jsx(_components.strong,{children:`Discord message`}),`, or one of the webhook providers, such as `,_jsx(_components.strong,{children:`Linear`}),`, `,_jsx(_components.strong,{children:`Jira`}),`, `,_jsx(_components.strong,{children:`GitHub`}),`, or `,_jsx(_components.strong,{children:`PagerDuty`}),`. Then fill in the trigger’s settings. See `,_jsx(_components.a,{href:`/automations/triggers`,children:`Automation triggers`}),`.`]})}),_jsx(Step,{title:`Write the agent instructions`,children:_jsxs(_components.p,{children:[`In the `,_jsx(_components.strong,{children:`Agent instructions`}),` card, tell CodeRabbit what to do on each run. See `,_jsx(_components.a,{href:`#write-agent-instructions`,children:`Write agent instructions`}),`.`]})}),_jsx(Step,{title:`Choose a destination`,children:_jsxs(_components.p,{children:[`In the `,_jsx(_components.strong,{children:`Target`}),` card, choose where results go: a Slack or Discord channel, a Slack DM, a GitHub repository, or any connected tool CodeRabbit can write to, such as Linear, Jira, PagerDuty, Notion, or HubSpot. Select `,_jsx(_components.strong,{children:`Add target`}),` to deliver to more than one. See `,_jsx(_components.a,{href:`/automations/destinations`,children:`Automation destinations`}),`.`]})}),_jsx(Step,{title:`Save`,children:_jsxs(_components.p,{children:[`Set the toggle next to the name to `,_jsx(_components.strong,{children:`Active`}),` to start running right away, or to `,_jsx(_components.strong,{children:`Paused`}),` to save a draft. Then select `,_jsx(_components.strong,{children:`Save automation`}),`.`]})}),_jsx(Step,{title:`Test it`,children:_jsxs(_components.p,{children:[`With the automation active, start a run: select `,_jsx(_components.strong,{children:`Run now`}),` on a scheduled automation’s page, post a matching message in the channel, or cause a matching event in the other tool, such as adding the label to a Linear issue. Follow the run on the automation’s page and check what it delivered. See `,_jsx(_components.a,{href:`/automations/triggers#test-a-trigger`,children:`Test a trigger`}),`.`]})})]}),`\n`,_jsxs(_components.p,{children:[`For a webhook provider that CodeRabbit doesn’t manage, the editor shows the webhook URL and setup steps after you save. Configure them in the other tool before you expect runs. See `,_jsx(_components.a,{href:`/automations/triggers#webhook-events`,children:`Webhook events`}),`.`]}),`\n`,_jsxs(_components.p,{children:[`Slack and Discord have their own templates. In the web app, open `,_jsx(_components.strong,{children:`Slack`}),` > `,_jsx(_components.strong,{children:`Automations`}),` or `,_jsx(_components.strong,{children:`Discord`}),` > `,_jsx(_components.strong,{children:`Automations`}),` and look under `,_jsx(_components.strong,{children:`Prebuilt automations`}),` for templates such as `,_jsx(_components.strong,{children:`Triage Linear issue`}),` and `,_jsx(_components.strong,{children:`Triage PagerDuty incident`}),`, which post results to a channel.`]}),`\n`,_jsx(Heading,{level:`2`,id:`write-agent-instructions`,children:`Write agent instructions`}),`\n`,_jsx(_components.p,{children:`The agent instructions are the task CodeRabbit runs each time the trigger fires. They can be up to 20,000 characters. Write them the way you would brief a teammate:`}),`\n`,_jsxs(_components.ul,{children:[`\n`,_jsxs(_components.li,{children:[_jsx(_components.strong,{children:`Say what to look at.`}),` Name the repositories, services, or connected tools to check, such as “the backend repositories” or “recent deploys in Datadog”.`]}),`\n`,_jsxs(_components.li,{children:[_jsx(_components.strong,{children:`Say what to do.`}),` Investigate, summarize, recommend a fix, or implement a change and open a pull request.`]}),`\n`,_jsxs(_components.li,{children:[_jsx(_components.strong,{children:`Describe the result.`}),` Say what the output should contain and how long it should be. For webhook triggers, refer to the event, for example “the new Linear issue” or “the triggered PagerDuty incident”.`]}),`\n`,_jsxs(_components.li,{children:[_jsx(_components.strong,{children:`Say what to do when there’s nothing to report.`}),` For example, “If there are no new advisories, reply with one line saying so.”`]}),`\n`]}),`\n`,_jsxs(_components.p,{children:[`Instructions can also ask CodeRabbit to follow an existing `,_jsx(_components.a,{href:`/agent/skills`,children:`durable skill`}),`, so every run reuses an established procedure.`]}),`\n`,_jsxs(_components.p,{children:[`The `,_jsx(_components.strong,{children:`Agent instructions`}),` card also shows the automation’s `,_jsx(_components.strong,{children:`Agent scope`}),`, the repositories and connections each run can use. It’s the workspace default unless you choose a shared or custom scope. See `,_jsx(_components.a,{href:`/automations/destinations#agent-scope`,children:`Agent scope`}),`.`]}),`\n`,_jsxs(_components.p,{children:[`Each destination can also have its own instructions that say how to deliver the result, such as the format of a Linear comment. See `,_jsx(_components.a,{href:`/automations/destinations#choose-a-destination`,children:`Automation destinations`}),`.`]}),`\n`,_jsxs(_components.p,{children:[`In Slack, the instructions can also add buttons to the reply, post to a second channel, or send DMs. See `,_jsx(_components.a,{href:`/slack-agent/automations#buttons-second-channel-and-dms`,children:`Buttons, second channel, and DMs`}),`.`]}),`\n`,_jsx(Heading,{level:`2`,id:`create-an-automation-from-chat`,children:`Create an automation from chat`}),`\n`,_jsxs(_components.p,{children:[`In Slack, ask `,_jsx(_components.code,{children:`@coderabbit`}),` to automate a job in a channel or DM, or run `,_jsx(_components.code,{children:`/automations`}),`. For a recurring or message-triggered automation, CodeRabbit runs the job once as a trial, then shows a draft card so you can review the output before anything is saved. Slack chat is also where you create one-time automations, which skip the trial. See `,_jsx(_components.a,{href:`/slack-agent/automations#create-an-automation-from-slack`,children:`Automations in Slack`}),`.`]}),`\n`,_jsxs(_components.p,{children:[`In Discord, ask CodeRabbit in a public channel or run `,_jsx(_components.code,{children:`/automations`}),`. The automation belongs to the parent channel even when you create it in a thread. See `,_jsx(_components.a,{href:`/discord-agent/automations`,children:`Automations in Discord`}),`.`]}),`\n`,_jsx(_components.p,{children:`Automations created from chat appear in the web app with the others, and you can edit them in the web app editor, except one-time automations.`}),`\n`,_jsx(Heading,{level:`2`,id:`create-automations-with-the-api`,children:`Create automations with the API`}),`\n`,_jsxs(_components.p,{children:[`The `,_jsx(_components.a,{href:`/api`,children:`CodeRabbit API`}),` manages automations under `,_jsx(_components.code,{children:`/v1/automations`}),`. A key needs the `,_jsx(_components.code,{children:`automations:read`}),` scope to read automations and runs, and `,_jsx(_components.code,{children:`automations:write`}),` to create, update, or control them. See `,_jsx(_components.a,{href:`/api/authentication`,children:`Authentication`}),`. The `,_jsx(_components.a,{href:`/api/mcp`,children:`CodeRabbit MCP server`}),` offers the same operations as tools, such as `,_jsx(_components.code,{children:`create_automation`}),` and `,_jsx(_components.code,{children:`list_automation_runs`}),`, with the same scopes; see `,_jsx(_components.a,{href:`/api/mcp/tools`,children:`MCP tools`}),`.`]}),`\n`,_jsxs(Table,{children:[_jsx(_components.thead,{children:_jsxs(_components.tr,{children:[_jsx(_components.th,{children:`Operation`}),_jsx(_components.th,{children:`Endpoint`})]})}),_jsxs(_components.tbody,{children:[_jsxs(_components.tr,{children:[_jsx(_components.td,{children:_jsx(_components.a,{href:`/api/reference/list-automations`,children:`List automations`})}),_jsx(_components.td,{children:_jsx(_components.code,{children:`GET /v1/automations`})})]}),_jsxs(_components.tr,{children:[_jsx(_components.td,{children:_jsx(_components.a,{href:`/api/reference/create-automation`,children:`Create an automation`})}),_jsx(_components.td,{children:_jsx(_components.code,{children:`POST /v1/automations`})})]}),_jsxs(_components.tr,{children:[_jsx(_components.td,{children:_jsx(_components.a,{href:`/api/reference/get-automation`,children:`Read an automation and its definition`})}),_jsx(_components.td,{children:_jsx(_components.code,{children:`GET /v1/automations/{automation_id}`})})]}),_jsxs(_components.tr,{children:[_jsx(_components.td,{children:_jsx(_components.a,{href:`/api/reference/update-automation`,children:`Replace an automation’s definition`})}),_jsx(_components.td,{children:_jsx(_components.code,{children:`PUT /v1/automations/{automation_id}`})})]}),_jsxs(_components.tr,{children:[_jsx(_components.td,{children:_jsx(_components.a,{href:`/api/reference/command-automation`,children:`Run now, pause, resume, or delete`})}),_jsx(_components.td,{children:_jsx(_components.code,{children:`POST /v1/automations/{automation_id}/commands`})})]}),_jsxs(_components.tr,{children:[_jsx(_components.td,{children:_jsx(_components.a,{href:`/api/reference/list-automation-runs`,children:`List runs`})}),_jsx(_components.td,{children:_jsx(_components.code,{children:`GET /v1/automations/{automation_id}/runs`})})]})]})]}),`\n`,_jsxs(_components.p,{children:[`Updates and commands take the `,_jsx(_components.code,{children:`expected_revision`}),` that you read from the automation, so a change made in the meantime isn’t overwritten. A `,_jsx(_components.code,{children:`run_now`}),` command only starts the run; read the runs endpoint to follow it. The same permission, billing, and availability checks apply as in the web app.`]}),`\n`,_jsx(Heading,{level:`2`,id:`active-and-paused-automations`,children:`Active and paused automations`}),`\n`,_jsxs(_components.p,{children:[`Every automation is either active or paused. You choose with the `,_jsx(_components.strong,{children:`Active`}),` and `,_jsx(_components.strong,{children:`Paused`}),` toggle in the editor, and you can switch later from the automation’s page. See `,_jsx(_components.a,{href:`/automations/manage#run-now-pause-resume-and-delete`,children:`Run now, pause, resume, and delete`}),`.`]}),`\n`,_jsxs(Table,{children:[_jsx(_components.thead,{children:_jsxs(_components.tr,{children:[_jsx(_components.th,{children:`State`}),_jsx(_components.th,{children:`Behavior`})]})}),_jsxs(_components.tbody,{children:[_jsxs(_components.tr,{children:[_jsx(_components.td,{children:`Active`}),_jsx(_components.td,{children:`Runs on its schedule, on matching channel messages, or on matching webhook events.`})]}),_jsxs(_components.tr,{children:[_jsx(_components.td,{children:`Paused`}),_jsxs(_components.td,{children:[`Keeps its configuration but doesn’t run. Schedules are skipped, and new channel messages and webhook events are ignored. `,_jsx(_components.strong,{children:`Run now`}),` isn’t available.`]})]})]})]}),`\n`,_jsx(_components.p,{children:`Save a new automation as paused when you still need to set up the other tool, such as a webhook in Datadog, or when you want a teammate to review the instructions first.`}),`\n`,_jsx(Heading,{level:`2`,id:`edit-an-automation`,children:`Edit an automation`}),`\n`,_jsxs(_components.p,{children:[`Open the automation from `,_jsx(_components.strong,{children:`Automations`}),` > `,_jsx(_components.strong,{children:`Home`}),` and select `,_jsx(_components.strong,{children:`Edit`}),`, or select `,_jsx(_components.strong,{children:`Edit`}),` in the row’s menu in the list. The editor opens with the same `,_jsx(_components.strong,{children:`Trigger`}),`, `,_jsx(_components.strong,{children:`Agent instructions`}),`, and `,_jsx(_components.strong,{children:`Target`}),` cards. Change what you need and select `,_jsx(_components.strong,{children:`Save automation`}),`.`]}),`\n`,_jsxs(_components.ul,{children:[`\n`,_jsxs(_components.li,{children:[`If you can view an automation but not manage it, the editor opens read-only. See `,_jsx(_components.a,{href:`/automations/manage#permissions`,children:`Permissions`}),`.`]}),`\n`,_jsx(_components.li,{children:`One-time automations can’t be edited in the web app editor.`}),`\n`]}),`\n`,_jsx(Heading,{level:`2`,id:`who-can-create-automations`,children:`Who can create automations`}),`\n`,_jsx(_components.p,{children:`Each Slack workspace and Discord server has a setting that controls who can create automations in it:`}),`\n`,_jsxs(Table,{children:[_jsx(_components.thead,{children:_jsxs(_components.tr,{children:[_jsx(_components.th,{children:`Value`}),_jsx(_components.th,{children:`Who can create`})]})}),_jsxs(_components.tbody,{children:[_jsxs(_components.tr,{children:[_jsx(_components.td,{children:`Any user (default)`}),_jsx(_components.td,{children:`Every member`})]}),_jsxs(_components.tr,{children:[_jsx(_components.td,{children:`Slack or Discord workspace admins`}),_jsx(_components.td,{children:`Slack workspace admins or Discord server admins, and CodeRabbit admins`})]}),_jsxs(_components.tr,{children:[_jsx(_components.td,{children:`Automation admins`}),_jsx(_components.td,{children:`Automation admins`})]})]})]}),`\n`,_jsx(_components.p,{children:`CodeRabbit admins can always create automations. When the setting doesn’t include you, creating an automation fails with a message such as “Only Slack workspace admins or CodeRabbit admins can create automations in this workspace.” Ask an admin to create the automation or to change the setting.`}),`\n`,_jsxs(_components.p,{children:[`Creating an automation doesn’t require permission to add connections. If the trigger or destination needs a tool that isn’t connected yet, the editor tells you to ask a CodeRabbit admin to connect it. Adding connections requires a CodeRabbit admin. See `,_jsx(_components.a,{href:`/automations/destinations#connections-and-base-scope`,children:`Connections and Base Scope`}),`.`]}),`\n`,_jsx(Heading,{level:`2`,id:`what’s-next`,children:`What’s next`}),`\n`,_jsxs(CardGroup,{cols:1,children:[_jsx(Card,{title:`Automation triggers`,href:`/automations/triggers`,icon:`zap`,horizontal:true,children:_jsx(_components.p,{children:`Set up schedules, channel message triggers, and webhook events.`})}),_jsx(Card,{title:`Automation destinations`,href:`/automations/destinations`,icon:`send`,horizontal:true,children:_jsx(_components.p,{children:`Deliver results to a channel, a ticket, an incident, or a GitHub repository.`})}),_jsx(Card,{title:`Manage and monitor automations`,href:`/automations/manage`,icon:`activity`,horizontal:true,children:_jsx(_components.p,{children:`Follow runs, run an automation on demand, and pause or delete it.`})})]})]})}function MDXContent(props={}){const{wrapper:MDXLayout}={..._provideComponents(),...props.components};return MDXLayout?_jsx(MDXLayout,{...props,children:_jsx(_createMdxContent,{...props})}):_createMdxContent(props)}return{DeploymentBadge,default:MDXContent};function _missingMdxReference(id,component){throw new Error(`Expected `+(component?`component`:`object`)+\" `\"+id+\"` to be defined: you likely forgot to import, pass, or provide it.\")}","frontmatter":{},"scope":{"config":{},"pageMetadata":{"title":"Create and edit automations","sidebarTitle":"Create and edit","description":"Create CodeRabbit automations in the web app editor, from Slack or Discord chat, or with the CodeRabbit API, then pause, resume, and edit them.","href":"/automations/create"}}},"mdxSourceWithNoJs":null,"noJsSplices":[[151,907,")=>null;function _cr"]]},"mdxExtracts":{"tableOfContents":[{"title":"Before you start","slug":"before-you-start","depth":2,"children":[]},{"title":"Create an automation in the web app","slug":"create-an-automation-in-the-web-app","depth":2,"children":[]},{"title":"Write agent instructions","slug":"write-agent-instructions","depth":2,"children":[]},{"title":"Create an automation from chat","slug":"create-an-automation-from-chat","depth":2,"children":[]},{"title":"Create automations with the API","slug":"create-automations-with-the-api","depth":2,"children":[]},{"title":"Active and paused automations","slug":"active-and-paused-automations","depth":2,"children":[]},{"title":"Edit an automation","slug":"edit-an-automation","depth":2,"children":[]},{"title":"Who can create automations","slug":"who-can-create-automations","depth":2,"children":[]},{"title":"What’s next","slug":"what’s-next","depth":2,"children":[]}],"codeExamples":{}},"jsLinks":["/_mintlify/custom/coderabbit/c83587702ff75216/inkeep.js","/_mintlify/custom/coderabbit/b7ecafa4358af1c7/yaml-editor.js","/_mintlify/custom/coderabbit/44fd990531d7b83e/acquisition.js"],"subdomain":"coderabbit","siteName":"CodeRabbit","title":"Create and edit automations - CodeRabbit","navMaps":{"firstHrefInVersion":{},"firstHrefInLanguage":{}},"lastModified":"2026-11-19T12:02:44.456Z","originalFileLocation":"automations/create.mdx"},"headHtml":"\u003cscript data-mint-head>(function(){var d=document.documentElement,p=null;if(!p){try{p=localStorage.getItem(\"isDarkMode\")}catch(e){}if(p==='true')p='dark';else if(p==='false')p='light';if(p!=='light'\u0026\u0026p!=='dark'\u0026\u0026p!=='system')p=\"system\"}var r=p==='system'?(matchMedia(\"(prefers-color-scheme: dark)\").matches?'dark':'light'):p;d.classList.remove(r==='dark'?'light':'dark');d.classList.add(r);d.setAttribute(\"data-theme-preference\",p)})();\u003c/script>\u003cmeta data-mint-head name=\"description\" content=\"Create CodeRabbit automations in the web app editor, from Slack or Discord chat, or with the CodeRabbit API, then pause, resume, and edit them.\">\u003cmeta data-mint-head name=\"application-name\" content=\"CodeRabbit\">\u003cmeta data-mint-head name=\"generator\" content=\"Mintlify\">\u003clink data-mint-head rel=\"icon\" type=\"image/png\" sizes=\"192x192\" href=\"/mintlify-assets/_mintlify/favicons/coderabbit/d4muCEkFHyXyjg4k/_generated/favicon/android-chrome-192x192.png\" media=\"(prefers-color-scheme: light)\">\u003clink data-mint-head rel=\"apple-touch-icon\" type=\"image/png\" sizes=\"180x180\" href=\"/mintlify-assets/_mintlify/favicons/coderabbit/d4muCEkFHyXyjg4k/_generated/favicon/apple-touch-icon.png\">\u003clink data-mint-head rel=\"icon\" type=\"image/png\" sizes=\"16x16\" href=\"/mintlify-assets/_mintlify/favicons/coderabbit/d4muCEkFHyXyjg4k/_generated/favicon/favicon-16x16.png\" media=\"(prefers-color-scheme: light)\">\u003clink data-mint-head rel=\"icon\" type=\"image/png\" sizes=\"32x32\" href=\"/mintlify-assets/_mintlify/favicons/coderabbit/d4muCEkFHyXyjg4k/_generated/favicon/favicon-32x32.png\" media=\"(prefers-color-scheme: light)\">\u003clink data-mint-head rel=\"shortcut icon\" type=\"image/x-icon\" href=\"/mintlify-assets/_mintlify/favicons/coderabbit/d4muCEkFHyXyjg4k/_generated/favicon/favicon.ico\" media=\"(prefers-color-scheme: light)\">\u003clink data-mint-head rel=\"icon\" type=\"image/png\" sizes=\"192x192\" href=\"/mintlify-assets/_mintlify/favicons/coderabbit/d4muCEkFHyXyjg4k/_generated/favicon-dark/android-chrome-192x192.png\" media=\"(prefers-color-scheme: dark)\">\u003clink data-mint-head rel=\"icon\" type=\"image/png\" sizes=\"16x16\" href=\"/mintlify-assets/_mintlify/favicons/coderabbit/d4muCEkFHyXyjg4k/_generated/favicon-dark/favicon-16x16.png\" media=\"(prefers-color-scheme: dark)\">\u003clink data-mint-head rel=\"icon\" type=\"image/png\" sizes=\"32x32\" href=\"/mintlify-assets/_mintlify/favicons/coderabbit/d4muCEkFHyXyjg4k/_generated/favicon-dark/favicon-32x32.png\" media=\"(prefers-color-scheme: dark)\">\u003clink data-mint-head rel=\"shortcut icon\" type=\"image/x-icon\" href=\"/mintlify-assets/_mintlify/favicons/coderabbit/d4muCEkFHyXyjg4k/_generated/favicon-dark/favicon.ico\" media=\"(prefers-color-scheme: dark)\">\u003cmeta data-mint-head property=\"og:title\" content=\"Create and edit automations - CodeRabbit\">\u003cmeta data-mint-head property=\"og:description\" content=\"Create CodeRabbit automations in the web app editor, from Slack or Discord chat, or with the CodeRabbit API, then pause, resume, and edit them.\">\u003cmeta data-mint-head property=\"og:site_name\" content=\"CodeRabbit Documentation\">\u003cmeta data-mint-head property=\"og:url\" content=\"https://docs.coderabbit.ai/automations/create\">\u003cmeta data-mint-head property=\"og:type\" content=\"website\">\u003cmeta data-mint-head property=\"og:image\" content=\"https://coderabbit.mintlify.site/_mintlify/api/og/v2?division=Automations\u0026amp;title=Create+and+edit+automations\u0026amp;description=Create+CodeRabbit+automations+in+the+web+app+editor%2C+from+Slack+or+Discord+chat%2C+or+with+the+CodeRabbit+API%2C+then+pause%2C+resume%2C+and+edit+them.\u0026amp;theme=e25dc9e67170d7dae31e0b2f\u0026amp;signature=fa465d266a8c002fd3b8653dda8a3ab1917df8788c942a0b167d268d42e5092d\">\u003cmeta data-mint-head property=\"og:image:width\" content=\"1200\">\u003cmeta data-mint-head property=\"og:image:height\" content=\"630\">\u003cmeta data-mint-head name=\"twitter:card\" content=\"summary_large_image\">\u003cmeta data-mint-head name=\"twitter:title\" content=\"Create and edit automations - CodeRabbit\">\u003cmeta data-mint-head name=\"twitter:description\" content=\"Create CodeRabbit automations in the web app editor, from Slack or Discord chat, or with the CodeRabbit API, then pause, resume, and edit them.\">\u003cmeta data-mint-head name=\"twitter:image\" content=\"https://coderabbit.mintlify.site/_mintlify/api/og/v2?division=Automations\u0026amp;title=Create+and+edit+automations\u0026amp;description=Create+CodeRabbit+automations+in+the+web+app+editor%2C+from+Slack+or+Discord+chat%2C+or+with+the+CodeRabbit+API%2C+then+pause%2C+resume%2C+and+edit+them.\u0026amp;theme=e25dc9e67170d7dae31e0b2f\u0026amp;signature=fa465d266a8c002fd3b8653dda8a3ab1917df8788c942a0b167d268d42e5092d\">\u003cmeta data-mint-head name=\"twitter:image:width\" content=\"1200\">\u003cmeta data-mint-head name=\"twitter:image:height\" content=\"630\">\u003cmeta data-mint-head name=\"msapplication-config\" content=\"/mintlify-assets/_mintlify/favicons/coderabbit/d4muCEkFHyXyjg4k/_generated/favicon/browserconfig.xml\">\u003cmeta data-mint-head name=\"apple-mobile-web-app-title\" content=\"CodeRabbit\">\u003cmeta data-mint-head name=\"msapplication-TileColor\" content=\"#FF570A\">\u003cmeta data-mint-head name=\"og:locale\" content=\"en_US\">\u003clink data-mint-head rel=\"canonical\" href=\"https://docs.coderabbit.ai/automations/create\">\u003clink data-mint-head rel=\"alternate\" type=\"application/xml\" href=\"/sitemap.xml\">\u003clink data-mint-head rel=\"alternate\" type=\"text/markdown\" href=\"/automations/create.md\">\u003cscript data-mint-head type=\"application/ld+json\">{\"@context\":\"https://schema.org\",\"@graph\":[{\"@type\":\"Organization\",\"@id\":\"https://docs.coderabbit.ai/#organization\",\"name\":\"CodeRabbit\",\"url\":\"https://docs.coderabbit.ai\",\"logo\":{\"@type\":\"ImageObject\",\"url\":\"https://mintcdn.com/coderabbit/qAZa_d7FrwPO_w-O/coderabbit-logo-light.svg?fit=max\u0026auto=format\u0026n=qAZa_d7FrwPO_w-O\u0026q=85\u0026s=d2bf9e91be0e760ec9cb468676fa6ab6\"}},{\"@type\":\"WebSite\",\"@id\":\"https://docs.coderabbit.ai#website\",\"name\":\"CodeRabbit\",\"url\":\"https://docs.coderabbit.ai\",\"publisher\":{\"@id\":\"https://docs.coderabbit.ai/#organization\"}},{\"@type\":\"WebPage\",\"@id\":\"https://docs.coderabbit.ai/automations/create#webpage\",\"url\":\"https://docs.coderabbit.ai/automations/create\",\"name\":\"Create and edit automations\",\"description\":\"Create CodeRabbit automations in the web app editor, from Slack or Discord chat, or with the CodeRabbit API, then pause, resume, and edit them.\",\"dateModified\":\"2026-11-19T12:02:44.456Z\",\"isPartOf\":{\"@id\":\"https://docs.coderabbit.ai#website\"},\"breadcrumb\":{\"@id\":\"https://docs.coderabbit.ai/automations/create#breadcrumb\"}},{\"@type\":\"BreadcrumbList\",\"@id\":\"https://docs.coderabbit.ai/automations/create#breadcrumb\",\"itemListElement\":[{\"@type\":\"ListItem\",\"position\":1,\"name\":\"Automations\",\"item\":\"https://docs.coderabbit.ai/automations\"},{\"@type\":\"ListItem\",\"position\":2,\"name\":\"Create and edit automations\",\"item\":\"https://docs.coderabbit.ai/automations/create\"}]},{\"@type\":[\"Article\",\"TechArticle\"],\"@id\":\"https://docs.coderabbit.ai/automations/create#article\",\"headline\":\"Create and edit automations\",\"name\":\"Create and edit automations\",\"description\":\"Create CodeRabbit automations in the web app editor, from Slack or Discord chat, or with the CodeRabbit API, then pause, resume, and edit them.\",\"url\":\"https://docs.coderabbit.ai/automations/create\",\"mainEntityOfPage\":{\"@id\":\"https://docs.coderabbit.ai/automations/create#webpage\"},\"dateModified\":\"2026-11-19T12:02:44.456Z\",\"publisher\":{\"@id\":\"https://docs.coderabbit.ai/#organization\"},\"isPartOf\":{\"@id\":\"https://docs.coderabbit.ai#website\"}}]}\u003c/script>\u003cscript data-mint-head type=\"application/ld+json\">{\"@context\":\"https://schema.org\",\"@type\":\"WebSite\",\"name\":\"CodeRabbit\",\"publisher\":{\"@type\":\"Organization\",\"name\":\"CodeRabbit\"},\"provider\":{\"@type\":\"Organization\",\"name\":\"Mintlify\",\"url\":\"https://mintlify.com\"}}\u003c/script>","agentPointerHref":"/automations/create.md","siteName":"CodeRabbit","nav":{"global":{"anchors":[{"anchor":"Quickstart","icon":"rocket","hidden":false,"href":"/getting-started/quickstart"},{"anchor":"Blog","icon":"pen-line","hidden":true,"href":"https://coderabbit.ai/blog"},{"anchor":"Changelog","icon":"history","href":"/changelog"},{"anchor":"Support","icon":"life-buoy","href":"/support"},{"anchor":"Discord","icon":"discord","href":"https://discord.gg/coderabbit"}]},"tabs":[{"tab":"Review","icon":"git-pull-request","pages":[{"title":"Review","href":""}]},{"tab":"Triage","icon":"list-filter","pages":[{"title":"Triage","href":"/triage"}]},{"tab":"Change Stack","icon":"layers","pages":[{"title":"Change Stack","href":"/change-stack"}]},{"tab":"Secure","icon":"shield-check","pages":[{"title":"Secure","href":"/security"}]},{"tab":"Verify","icon":"flask-conical","pages":[{"title":"Verify","href":"/verify"}]},{"tab":"Agents","icon":"bot","menu":[{"item":"Coding Agent","icon":"square-code","description":"Delegate coding tasks from the web app","pages":[{"title":"Coding Agent","href":"/code"}]},{"item":"Agent for Slack","icon":"slack","description":"Ask, plan and open pull requests from Slack","pages":[{"title":"Agent for Slack","href":"/agent"}]},{"item":"Agent for Discord","icon":"discord","description":"The same agent in Discord","pages":[{"title":"Agent for Discord","href":"/discord-agent"}]},{"item":"Automations","icon":"workflow","description":"Triggers, instructions and destinations","groups":[{"group":"Automations","icon":"workflow","pages":[{"title":"CodeRabbit Automations","sidebarTitle":"Overview","description":"Automations run CodeRabbit Agent on a schedule, on new chat messages, or on webhook events from tools such as Linear, Jira, GitHub, and PagerDuty, and deliver the results where your team works.","mode":"wide","href":"/automations"},{"title":"Create and edit automations","sidebarTitle":"Create and edit","href":"/automations/create"},{"title":"Automation triggers","sidebarTitle":"Triggers","description":"Start CodeRabbit automations on a schedule, on new Slack or Discord channel messages, or on webhook events from GitHub, Linear, Jira, PagerDuty, Datadog, and other tools.","href":"/automations/triggers"},{"title":"Automation destinations","sidebarTitle":"Destinations","href":"/automations/destinations"},{"title":"Manage and monitor automations","sidebarTitle":"Manage and monitor","href":"/automations/manage"}]},{"group":"Guides","icon":"book-open","pages":[{"title":"Automation guides","sidebarTitle":"Overview","href":"/automations/guides/index"},{"title":"Respond to incidents","sidebarTitle":"Respond to incidents","href":"/automations/guides/respond-to-incidents"},{"title":"Turn labeled Linear issues into pull requests","sidebarTitle":"Linear issue to pull request","href":"/automations/guides/linear-issue-to-pull-request"},{"title":"Triage new engineering tickets","sidebarTitle":"Triage engineering tickets","href":"/automations/guides/triage-engineering-tickets"},{"title":"Triage support tickets","sidebarTitle":"Triage support tickets","href":"/automations/guides/triage-support-tickets"},{"title":"Answer code and product questions in Slack","sidebarTitle":"Answer questions in Slack","href":"/automations/guides/answer-questions-in-slack"},{"title":"Share customer-facing change summaries","sidebarTitle":"Share customer updates","href":"/automations/guides/share-customer-updates"}]}]}]},{"tab":"CLI and IDE","icon":"square-terminal","pages":[{"title":"CLI and IDE","href":"/cli-ide-overview"}]},{"tab":"API and MCP","icon":"braces","pages":[{"title":"API and MCP","href":"/api"}]},{"tab":"Admin","icon":"wrench","pages":[{"title":"Admin","href":"/management"}]}]},"basePath":"","title":"Create and edit automations - CodeRabbit","deploymentId":"dpl_vSEmv961Ncyvz1psVwgUnTXQMSYk","buildId":"dpl_vSEmv961Ncyvz1psVwgUnTXQMSYk","dynamics":["10e4515597","07c022d89b","a74be98ba7"],"chunks":["BannerMarkdown-DnSAhvaM.js","dist-DIfYWxfm.js","lib-DMeTj1gb.js","lib-B8HbPgcC.js","katex-Dbtb6Wk7.js","html-void-elements-mCSPHezU.js","marked.esm-CZWythHk.js","Frame-BRsfsIIG.js","DynamicMarkdown-NFqqduU7.js","zoom-image-lightbox-BguUeq2N.js","lightbox-handle-r17bVUz3.js"]}